TELUS PS Suite
More information about Ocean's integration with TELUS PS Suite.
PS Suite: Why are some appointment providers or appointment schedules missing in the Cloud Connect setup?
Some of our sites have informed us that only a subset of their appointment providers show up in the list of available providers during Cloud Connect's configuration. The missing providers are usually appointment providers linked to a particular "Billing MD". PS Suite hides providers from Cloud Connect's schedule request if it believes that a provider belongs to a PSS location that is not accessible to the user associated with the Cloud Connect activation. Locations are a PSS-specific security setting that allows one clinic to keep a population of patients segmented privately from another clinic when both clinics are using the same PSS server. Many sites have this feature enabled in their PS Suite without their users' knowledge.
To verify and correct this problem, try the following steps:
- Choose a provider that is missing from Cloud Connect's list. Let's call this Provider1.
- In the Appointments window in PS Suite, choose the Appointments Menu, then Change Provider to Provider1.
- Take note of the "Billing MD" field for Provider1 (third field from the top). If the Billing MD is empty, it is likely that this particular provider would have appeared in Cloud Connect. However, if the Billing MD is set to, e.g., Doctor1, then we need to ensure Doctor1 is linked to an accessible location.
- If possible, change to Doctor1 as your current Billing Doctor. Choose Settings and edit Doctor1's billing information. Take note of the "Doctor Number": it should be a six digit number. Let's call it DocNum1.
- Open the Settings, then edit the Users dialog.
- Find the user that theoretically maps to Doctor1. Let's call this DoctorUser1.
- Verify that DoctorUser1's six-digit physician number matches DocNum1.
- Take note of the Accessible Locations for DoctorUser1 by clicking the corresponding field (3/4 toward the bottom in this Edit Users dialog).
- Find the user that theoretically maps to the Ocean Cloud Connect device. Let's call this OceanUser.
- Take note of the Accessible Locations for OceanUser by clicking the corresponding field (3/4 toward the bottom in this Edit Users dialog). Ensure that all of the accessible locations for DoctorUser1 are checked ON for OceanUser.
- Open Settings, select the Preferences dialog and choose the Mobile tab.
- Ensure that the "CognisantMD / SIS" or "Cloud Connect" device is associated with the OceanUser identified above.
- If you made any changes, proceed to Cloud Connect.
- Trigger a new synchronization of the appointments.
- Click the "Reconfigure EMR"" button to see whether the schedule is now visible.
If the above steps failed to identify any possible issues that could lead to an inaccessible location, try the following experiments:
- De-register and re-register the Cloud Connect device in the Mobile tab, then proceed to "Reconfigure EMR" in Cloud Connect with this new device registration (Step 8).
- Blank out the "Billing MD" field for Provider1 and complete Step 8 again.
If the schedule appears with a blank Billing MD, you can conclude that the schedule is indeed missing due to an inaccessible location. You may be able to leave the Billing MD blank if the schedule doesn't need to be linked for billing purposes (some clients have decided to simply leave it blank). However, if leaving the Billing MD blank is not an option and the first set of steps in this article failed to correct the problem, there may be additional configuration or workarounds necessary requiring TELUS' and our assistance.
PS Suite: How do I switch between Ocean sites on PS Suite?
-
If you want to switch your Ocean site on PS Suite, refer to the following steps:
- Sign into PS Suite and open a test patient's chart.
- Locate the Ocean toolbar and click on the Ocean logo to access the Ocean Custom Form.
- Click on "Settings", you will be prompted to enter your Ocean account credentials.
- Once your credentials have been validated, a popup window with multiple settings should appear, click on "Ocean Site Number".
-
- Select the appropriate site or Add/Remove sites, then click "OK".
Note: Following these steps only changes the Ocean site for the computer being used. You will have to repeat these steps for other computers running PS Suite.
Removing Sites
-
If you are attempting to remove an Ocean site, you will be prompted to enter a permission code. Please contact us at ocean.tips/support and specify you are requesting the code to remove a site number from the Ocean Custom Form.
-
PS Suite: Moving to the New TELUS API - What You Need to Know
There are a few things to be aware of when moving over to the new TELUS API integration from the original Ocean custom form integration. We recommend reviewing this article before making this change.
New Features
The TELUS API integration will enable features for an improved user experience, including (but not limited to):
Check-in Kiosk Improvements:
- Scheduled patients are automatically uploaded in Ocean, eliminating the need to manually insert the Ocean custom form.
- Real-time patient health card sync enables support for walk-in patients with queue for non-scheduled patients.
- Expired health cards (with real-time validation check with the Ministry of Health database) will not allow check-in.
Ocean Online Message Enhancements:
- Clinics can now set up automated, customized appointment reminders with forms based on the scheduled reason for visit (requires a sitewide Ocean Online licence).
Ocean Toolbar/Custom Form Changes:
- The new Ocean Toolbar has enhanced functionality that provides live status updates and direct links to Ocean. As a result, you can now add forms for a patient or send patients a message from the Ocean Toolbar, without loading the Ocean custom form into the chart. This eliminates the risk of orphaned or outdated Ocean custom forms being left in patient charts taking up space.
Preparing to Upgrade
- If you are a current Ocean user who would like to get connected to the new TELUS API, please consult Step 1 of the Upgrade Instructions for Existing Clients guide to determine what type of connection request your site needs to complete. If you are unsure of how to proceed, please consult our support team via ocean.tips/support.
- Using the TELUS API requires you to replace your existing Ocean Toolbar with the new, improved version. Please be aware that if you have customized your Ocean toolbar, those customizations will be lost.
- Your site will need to be configured for 4-digit patient refs. Instructions to make this change can be found in "How do I increase the number of digits for patient refs?".
- When moving to the new API, we recommend making the change outside of clinic hours if possible.
- Before moving to the new API, we recommend communicating with your clinic staff to let them know that they can expect to see the following minor changes:
Changes to How PS Suite and Ocean Work Together
- Following the upgrade, they will see a new Ocean Toolbar with enhanced functionality to allow staff to interact with Ocean (eg. add forms or send a patient message) right from the toolbar. Clicking on the Ocean logo will open a pop-up window with the same features and functionality as the traditional Ocean custom form.
- The Ocean custom form will no longer appear directly within patient charts in the notes view, providing a cleaner, less cluttered user experience.
- If a patient chart is left open while the patient is completing a form in Ocean, the chart may need to be updated using the "Chart Out Of Date" refresh prompt in the top right corner.
Now that you're ready to get started, go ahead and follow the steps in our updated PS Suite Ocean Set-Up Guide.
PS Suite: Upgrade Instructions for Existing Clients
In order to take advantage of the new Ocean features that come with the TELUS API, you will first need to upgrade your Ocean custom form and toolbar.
The new Ocean toolbar has enhanced functionality that replaces the need to insert the Ocean custom form in the chart. You can learn more about these changes in "Moving to the New TELUS API – What You Need to Know".
Step 1: Telus Connection Request Form
Please enter your site number below to check if you need to complete the Telus Connection Request Form:
Complete the Telus Connection Request Form
Please download and fill out the Telus Connection Request form and submit it to our support team ocean.tips/support.
Once we've received your request, we will confirm that we've received it and activate your site for the Telus API.
Have you signed your TELUS contract yet?
Please contact TELUS directly and request to be enabled and connected to the API. Once you have signed your TELUS contract agreement, move on to the next step. If you require additional assistance, please contact our support team at ocean.tips/support.
Please Try Again
That's not a valid site number. Ocean site numbers are four digits long and only contain numbers. If you're not sure what your Ocean site number is, please refer to "Where do I find my Ocean site number?".
Step 2: Update your Ocean Custom Form and Ocean Toolbar
Note Regarding Preexisting Toolbars
If you already have an Ocean toolbar installed, you will need to ensure the new .cfm filename matches your existing Ocean toolbar filename. Also, please note that any customized links that you may have added will be lost.
-
- Select "OK" when prompted to replace the existing custom form and make sure that PS Suite confirms that your custom form has been replaced successfully.
-
Create a reminder trigger for your toolbar.
- Skip this step if you were already using the standard Ocean toolbar.
- If you have never used the Ocean toolbar before, follow the steps in the article "Create a Reminder Trigger for the Ocean Toolbar".
Do You Have Your Own Custom Toolbar that Links to Ocean?
If you added a link to Ocean on an existing custom toolbar, the link will be not be supported once the new Ocean Toolbar is installed and activated. We recommend clinics remove any Ocean-related links from custom toolbars and rely on the Ocean Toolbar instead.
Step 3: Proceed to the Set Up Guide
Now you will need to enable and setup Cloud Connect. You can complete these steps by following along with our TELUS PS Suite Integration Set Up Guide. Since you've already completed some of the set up steps you can jump in at Enabling Cloud Connect.
PS Suite: Limitations of the New TELUS API & Workarounds Using the Ocean Toolbar
The new TELUS API integration allows Ocean to read and update values for patients within the EMR, without requiring the user to open the patient's chart. Although this API provides some great new functionality for Ocean users (such as automated kiosk check-in), it has some limitations that require workarounds, outlined below.
Background
Unfortunately, some important data elements in the API are not currently accessible to Ocean (see tablet below). As a result, these fields cannot be pulled from the EMR and displayed on the tablet (or an Ocean eForm), nor can they be updated by Ocean when a patient changes it.
The ability to update some of these fields is important for certain Ocean workflows, such as when a patient updates their demographic on a kiosk or when a patient fills out a form that is mapped to a PS Suite custom form (e.g. perinatal questionnaire).
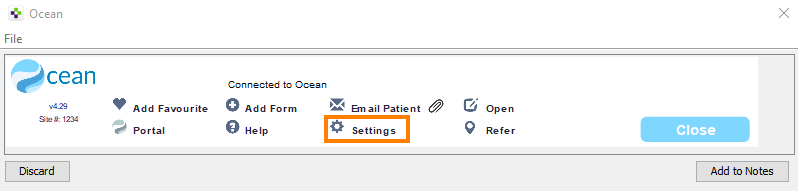
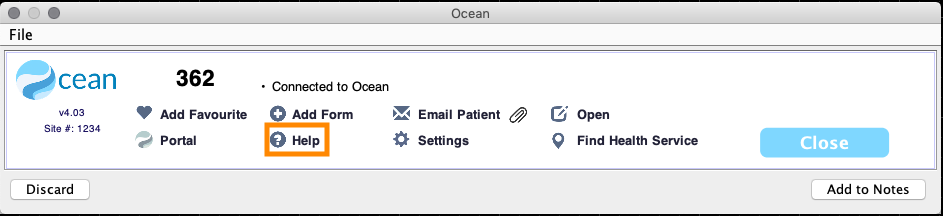
Fortunately, enhanced functionality of the Ocean Toolbar has been developed to work around this limitation. The Ocean Toolbar can set these missing values automatically for users, but only once the patient's chart is opened.
Mechanism of Action for the Ocean Toolbar to Detect and Update PS Suite Fields
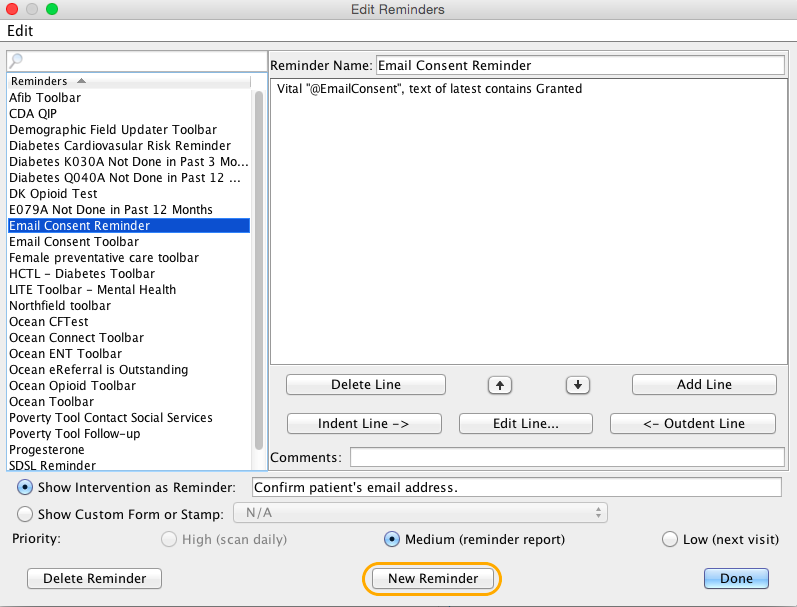
When Ocean sees a field update request for one of the fields that the API does not support, it places it in a special "Ocean Temporary Note". This note contains the value of the field in a structured format. Once the chart has been opened, the Ocean Toolbar will detect and interpret this temporary note and proceed to automatically set the field value in PS Suite directly.
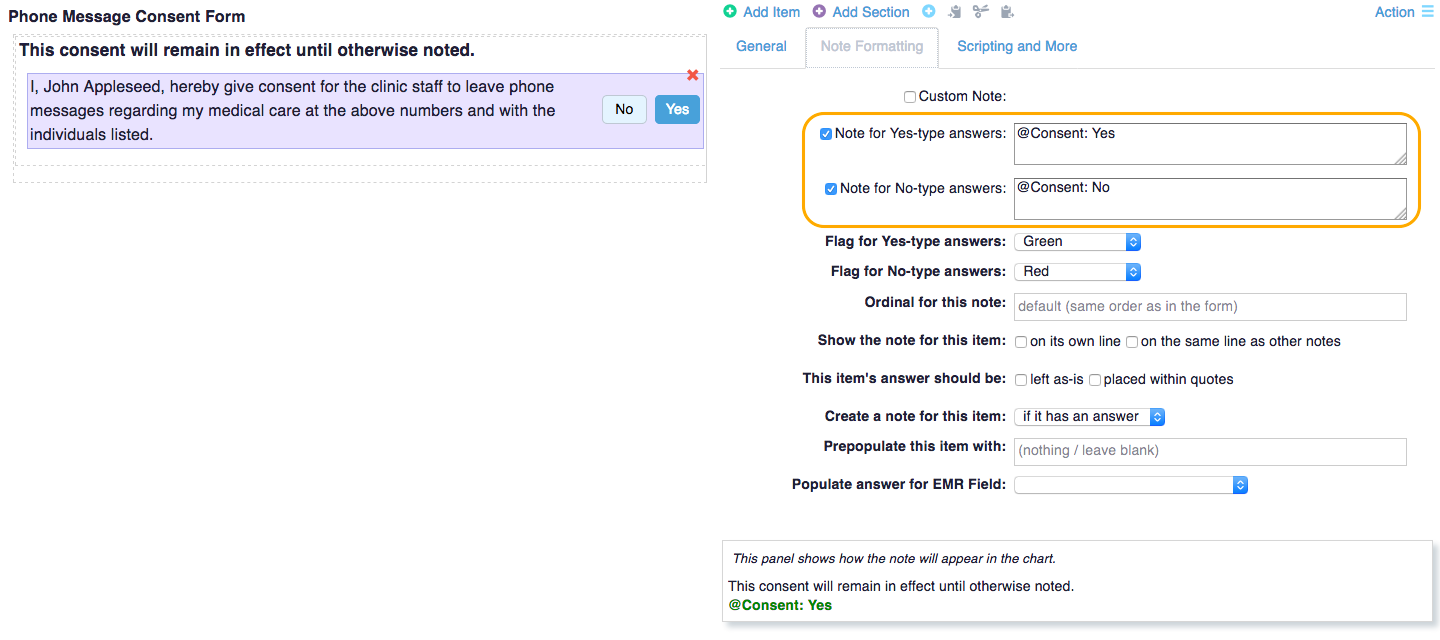
In the case of a custom form that should be populated based on answer to an Ocean eForm, the Ocean Toolbar will detect that a custom form or other form is desired, automatically inserting the custom form into the chart and populating its values.
Some other fields, such as surname, are not updated automatically for safety reasons. However, the Ocean Toolbar can instead automatically send a message ("yellow sticky") to the administrative team to request the field update.
Summary of TELUS API Field Limitations
EMR Field | Accessible to Ocean | Updatable by Ocean | Comments |
---|---|---|---|
Surname | Y | using Ocean Toolbar | |
First Name | Y | using Ocean Toolbar | |
Health number province | Y | using Ocean Toolbar | |
Health number | Y | using Ocean Toolbar | |
Health number version code | Y | using Ocean Toolbar | |
Health number expiry date | Y | using Ocean Toolbar | |
Health number eligibility code | N | using Ocean Toolbar | |
Preferred method of contact | N | using Ocean Toolbar | |
Next of kin / Emergency contact | N | using Ocean Toolbar | |
Emergency contact relationship | N | using Ocean Toolbar | |
Emergency contact is POA | N | using Ocean Toolbar | |
Note: The demographic fields not listed above (phone number etc.) are generally fully supported. |
|||
Custom forms | N | using Ocean Toolbar | |
PS Suite messages / tasks / "yellow stickies" | N | N | |
CPP Field: FH | Y | N | |
CPP Field: PROB | Y | N | |
CPP Field: HPH | Y | N | |
CPP Field: RX | Y | N | |
CPP Field: ALLR | Y | N | |
CPP Field: IMMU | Y | N | |
CPP Field: PERS | Y | N | |
CPP Field: REMIND | N | N | |
CPP Field: RISK
|
Y | using Ocean Toolbar | Recreational drug use cannot be updated directly in the "RISK" CPP field. |
Balance owing ($) | N | N | Status of the patient's private billing balance, as indicated by the green "$" in the appointment schedule (e.g. an overdue private payment). Since the API does not provide access to any billing-related information for patients, Ocean cannot access this value. |
Custom vitals (e.g. @MyVital: 123) | N | Y | |
Core vitals (e.g. BP) | N | Y |
PS Suite: Ocean Clinical Resource Installation Instructions
CognisantMD's Clinical Resource Library resources are designed for use with TELUS PS Suite EMR (PS Suite), unless specified otherwise.
A few small steps are required to import them into your EMR system:
- First, find the resource you like, click on the form name to see the expanded form details, and click Download.
- A pop-up window will open requiring you to sign in to your Ocean account.
- The download will start once you are logged in. Wait for the download to finish and then check the name of the file.
- The extension of the file (the part of the file name that comes after the ‘.’) determines the type of PSS resource.
- Open PS Suite EMR and navigate the main EMR window.
- Follow the instructions below to upload the resource in PSS.
Select the extension the resource file ends with:
This is a custom form file.
- From the Settings menu, choose Edit Custom Forms.
- Drag and drop the .cfm file(s) from your computer’s Downloads folder into the list of custom forms.
- When you want to use the form for a patient, choose Data > New Custom Form (Cmd-Shift-I) to insert it into a chart.
- Alternatively, you can choose View > Custom Form (F2) to view it in a popup dialog.
Zip files are compressed collections of other files.
- Usually you can just double-click a .zip file to expand it. If not, use a Zip expanding program for your operating system.
- With each of the expanded files, consult this list for import instructions.
This is a flowsheet file.
- From the EMR, choose View > Flowsheet.
- From the flowsheet’s File menu, choose Utilities > Import Flowsheet Template
- Select the .flowsheet file to import it.
- To test it out, open a patient’s chart.
These files can be imported as either PSS searches or PSS reminders.
- To import a search, choose Settings > Edit Searches. From the dialog’s Edit menu, choose Import Searches.
- Reminders can be imported by choosing Settings > Edit Reminders. From the dialog’s Edit menu, choose Import Reminders.
- Reminders automatically appear in the “Reminders” box of the CPP when their criteria are fulfilled.
- Searches can be run by choosing the Patient menu, then Search.
- Reminders can be run like searches by choosing the Patient menu then Reminder Report.
PDFs are “portable document files” that be viewed directly by double-clicking the file.
- You may wish to import a PDF as a Handout for easy access from the EMR.
- To import a handout, click on Handouts from the main toolbar.
- Drag and drop the file into the list on the left-hand side of the dialog.
- You can also choose Edit > Import Handout from the Handouts dialog.
PS Suite: Changing Ocean Settings Through the Ocean Custom Form
- The PS Suite configuration settings for Ocean are managed using the Ocean custom form. This custom form, when opened, presents a "Settings" button that users may click to view or change these settings.
- We recommend that you open a "dummy" patient chart when opening up the Ocean custom form to change any of your Ocean-related settings.
Note: The Ocean custom form may present an error message if it is inserted directly into a patient chart using the "New Custom Form" option in the "Data" menu. To work around this error message, open the Ocean custom form using the "View Form..." menu item (i.e. keyboard shortcut F2).
PS Suite: Finding Your PS Suite Version Number
PS Suite: Minimum User Permissions Required for PSS Users to Use Ocean
To load forms into Ocean using the Ocean custom form, a user needs to be able to access the patient's chart with permissions to at least see and enter their own notes (because the Ocean custom form is technically a note in PS Suite).
Most roles have these privileges by default. However, some sites may have restricted their receptionist and data entry clerk role permissions.
To use Ocean, these users need to at least have their "View Privileges" set to "Only Profile, Own Notes and Messages" (to be able to view the Ocean toolbar, Ocean-generated notes, and messages) and their "Action Privileges" set to "Notes" (to be able to edit Ocean notes).
PS Suite: Determining the Initials Associated with Ocean Notes
Note: This is only applicable for PS Suite users who are not connected to the TELUS National API. (For those users who are on the API, the initials will match the initials of the user linked to your Ocean Connect or Cloud Connect account, which is typically "OCN")
PS Suite will use the current user's initials with a "/OCN" suffix. For example, if receptionist Bob adds the Ocean custom form, and social worker Sally Smith opens the chart after the patient is done, the note will be added with the initials "SS/OCN".
There is an option in the PS Suite Ocean custom form "Advanced" settings to disable automatic note downloads for online questionnaires. In this case, the above rule would still apply, but now, a user can open the chart without triggering the download for online questionnaires. The user who clicks "Download" will have their initials attached to the note.
PS Suite: Using Custom Vitals to Track eForms or eForm Answers
PS Suite automatically detects and records vitals typed within free-text chart notes. There are standard vitals and you can also create your own custom vitals. All vitals can be searched, queried in a reminder, graphed, embedded within flowsheets, and/or extracted for research/quality improvement purposes.
Built-in, standard vital tags include: BP, HR, T, Ht, Wt, HC, BMI.
To make a custom vital, put an @ symbol in front of a tag and use the same answer format for that tag. PSS will log anything in this format as a custom vital. For example, @MyCustomVital: OneWordResult. Be careful to watch out for spaces!
Examples of VALID Custom Vitals:
@PHQ-9: 20
@ExerciseMinutesPerWeek: 30
@EmailConsent: Granted
Examples of INVALID Custom Vitals:
VitalWithoutPrecedingTag: 1
@Vital Name With Spaces: 1
@VitalResultWithSpaces: My Result
-
Capturing eForm Answers as a Custom Vital
- In order to ensure that your value is captured in PS Suite as a custom vital, simply format the clinical note associated with the question you want to track in custom vital format.
- Note: If only "@MyCustomVital" is appears in the clinical note, it won't be logged as a custom vital. You can still search for this text within the chart, but it may be more useful to invent a simple value to place after a vital, such as: @MyCustomVital: Done. Also note that custom vitals can only be a single word - you can't have any spaces in the value.
PS Suite: Upgrading the Ocean Custom Form
-
Download the new custom form file.
- Insert the Ocean custom form into a dummy patient chart by clicking on the Ocean logo on the toolbar.
- Click the "Settings" button on the Ocean custom form and enter your Ocean username and password to access the administration menu.
- Choose "Update Ocean Custom Form". This will automatically download the latest custom form onto your computer's "Downloads" folder (or wherever your browser normally downloads files).
- If you don't have an Ocean username/password you can also download the custom form from by clicking the button to the right.
- Download the Ocean Custom Form
-
Import the new custom form file into PS Suite.
Checking your new Ocean custom form version:
- PS Suite will keep old versions of any existing custom forms in charts, so if you have an inserted the Ocean custom form into a patient's chart in the past, you'll need to remove the old custom form (by clicking "Remove") and re-insert the Ocean custom form. The new version number should appear in the bottom left of the custom form, between the Ocean logo and the site number.
PS Suite: How to Easily Track Email Consent
As part of the email consent process, we have developed a way to easily view email consent status in the patient record in the EMR. The email consent toolbar for TELUS PS Suite allows physicians to see at a glance if a patient has provided email consent. When used with the Ocean email consent questionnaire, the patient status is automatically updated as soon as the patient provides consent. The toolbar can also be used to manually track email consent in PS Suite independent (by selecting the "Grant" or "Deny" options).
You can view a screenshot of the toolbar below. The full toolbar can be downloaded from our Clinical Resource Library and installed into your PS Suite by following the instructions outlined in "Ocean Clinical Resource Installation Instructions".
PS Suite: Managing Blue-Barred Ocean Notes
If a specific user has "Data Entries Require Review" selected in their PS Suite user settings, any notes they write will get blue barred and assigned to their supervising doctor for review. This would include Ocean notes, if that user happens to be the first one to enter a patient chart when an Ocean note is ready to download. As the user's initials are getting tied to the downloaded Ocean note, the note gets blue barred and sent to their supervising doctor for review.
Follow the steps below to prevent these blue-barred notes from downloading when a user with this "needs review" setting enters a patient chart.
PS Suite: When Custom Forms Download as .zip Files
If you are downloading clinical tools (e.g. PS Suite Custom Forms) from the CognisantMD Clinical Resource Library and they arrive on your desktop as .zip files, this is due to a quirk in the way certain versions of Internet Explorer download .cfm files.
It's easy to work around this issue:
- You can import the files into PS Suite as-is (they will work fine, even as .zip files), or
- You can rename the file to have a .cfm as the suffix of the file name, instead of .zip.
PS Suite: Enabling Auto-Downloading of Ocean Notes
After a patient completes an Ocean eForm, the resultant clinical note should auto-populate into their chart in PS Suite.
If you find that the notes are not auto-downloading into the patient's chart, you may need to enable the auto-download settings in your Ocean custom form by following the steps below.
- Enter a test patient's chart in PS Suite.
- Insert the Ocean custom form by clicking the Ocean logo on the Ocean toolbar.
PS Suite: Using Quick Links to Automatically Add Ocean eForms
There are several options for automatically queuing eForms from PS Suite.
Ocean "Add Form" and "Add Favourite" Custom Forms
Search in our Clinical Resource Library to download and install the following custom forms in PS Suite:
- Ocean - Add Form - phq9|gad7
- this form can queue a list of individual eForms
- Ocean - Add Favourite - PHE
- this form will queue an Ocean favourite
To learn how to install a custom form in PS Suite once it's been downloaded, please refer to our Ocean Clinical Resource Installation Instructions.
Once imported, you can insert these custom forms into a patient's chart in PS Suite, which will instantly insert the Ocean custom form and queue the corresponding eForms or favourites and then automatically remove itself from the chart.
Configuring the Custom Form to Add Specific eForms
If you would like to configure the "Ocean - Add Form" custom form to add specific eForms, simply rename it and add the eForm references ("refs") to the name at the end. eForm refs can be found in the eForm's URL when previewing it.
Example
For example, the eForm URL for the PHQ-9 is: https://ocean.cognisantmd.com/questionnaires/preview/QuestionnairePreview.html?ref=phq9; therefore, its eForm ref is "phq9". So, if you wanted to automatically add the PHQ-9, change the form's name to "Ocean - Add Form - phq9". If you'd like to add more than one form, use the pipe ("|") character to separate the multiple eForm references.
If you want to add one of your favourite eForms, called "My Favourite", change the "Ocean - Add Favourite - PHE" form to "Ocean - Add Favourite - My Favourite".
Adding Ocean Forms from Encounter Assistants
If you would like to be able to add these forms automatically from an Encounter Assistant (EA), add an 'Action' item to the EA to "Insert Form", and point it to your custom form configured above.
Adding Ocean eForms from PS Suite Toolbars
It is not recommended that you add custom links to add Ocean eForms to your Ocean Toolbar. Once the Ocean Toolbar has been installed and activated, any custom links to Ocean on your toolbar will not be supported. We are constantly improving the Ocean Toolbar and may ask you to upgrade to a newer version of the toolbar at any time, which will overwrite any customizations you have made to your toolbar.
PS Suite: Inserting the Ocean Custom Form into a Patient's Chart
Our Clinical Resource Library contains several downloadable clinical resources, including custom forms.
Once you've downloaded and imported your desired custom form(s) into PS Suite, you can start using them for any of your patients.
Follow the steps below to insert a custom form into a patient's chart.
PS Suite: Test the Ocean Custom Form
-
Insert the Ocean custom form into a test patient chart.
- Open a patient chart (preferably a "dummy" or test chart, or an empty chart).
-
Test out an Ocean feature.
- On the Ocean custom form, you should see a bold three or four-digit code (e.g. 855). This number is a temporary access code to access the patient in Ocean.
- Now that the patient is in Ocean, you can perform a number of different actions:
- Add Ocean forms for the patient to complete.
- Enter the numeric code on an Ocean tablet to retrieve this patient.
- Click "Email Patient" to send this patient an email invitation to complete a questionnaire securely from home.
- View health services in the patient's region and/or send an eReferral by selecting "Find Health Service".