About Ocean Cloud Connect
If you use an integrated EMR, Ocean Cloud Connect enables total configuration of your EMR integration from a secure instance in the cloud that is accessible from any internet-connected device. No on-site device acting as a server is needed to keep Ocean and your EMR synchronized and active.
If your EMR does not have an integration with Ocean or you do not use an EMR, Ocean Cloud Connect can still be used to safely store your Ocean Site's Shared Encryption Key. This enables you to take advantage of additional Ocean functionalities, including automatic appointment reminders based on booked eReferral appointment dates.
Prerequisites
- Ensure you have completed Steps 1 through 5 of the TELUS PS Suite Integration Set-Up guide.
- You must have Site Admin access and Two Factor Authentication (2FA) enabled on your Ocean Site in order to sign into Ocean Cloud Connect.
- You must have EMR Administrator access in order to update EMR system settings.
- It is highly recommended that you make use of an Ocean Credential Reference Card to record your relevant integration credentials for organization and safekeeping.
- Ensure you have already Configured the Ocean Integration Module.
- You must have Site Admin access and Two Factor Authentication (2FA) enabled on your Ocean Site in order to sign into Ocean Cloud Connect.
- You must have EMR Administrator access in order to update EMR system settings.
- It is highly recommended that you make use of an Ocean Credential Reference Card to record your relevant integration credentials for organization and safekeeping.
-
If you are connecting multiple Ocean sites to the same EMR instance, please ensure that QHR has provided you with unique API Usernames and API Passwords for each Ocean Site.
The API username can only be connected to one Cloud Connect instance at a time.
- YYou must have Site Admin access and Two Factor Authentication (2FA) enabled on your Ocean Site in order to sign into Ocean Cloud Connect.
- You must have EMR Administrator access in order to update EMR system settings.
- It is highly recommended that you make use of an Ocean Credential Reference Card to record your relevant integration credentials for organization and safekeeping.
- Ensure you have completed Steps 1 through 4 of the OSCAR Pro (WELL Health) Integration Set-Up guide.
- You must have Site Admin access and Two Factor Authentication (2FA) enabled on your Ocean Site in order to sign into Ocean Cloud Connect.
- You must have EMR Administrator access in order to update EMR system settings.
- It is highly recommended that you make use of an Ocean Credential Reference Card to record your relevant integration credentials for organization and safekeeping.
- You must have Site Admin access and Two Factor Authentication (2FA) enabled on your Ocean Site in order to sign into Ocean Cloud Connect.
- It is highly recommended that you make use of an Ocean Credential Reference Card to record your relevant integration credentials for organization and safekeeping.
Setting Up Ocean Cloud Connect
Log in to Ocean Cloud Connect.
- Navigate to cloudconnect.cognisantmd.com in a web browser.
- Go to Cloud Connect
- Log in using your existing Ocean user account credentials. This is the same Ocean user account that you use to log in to the Ocean Portal.

- Note: Despite using the same Ocean user account credentials, you must log in to Cloud Connect seperately. Being signed into the Ocean Portal does not automatically sign you into Cloud Connect (or vice versa).
-
Store your Shared Encryption Key in Cloud Connect.
- After logging in to Ocean Cloud Connect, click the 'Integrate my EMR' button.

- You will be prompted to enter your Shared Encryption Key. After entering it, click 'Save and Continue'.

- After logging in to Ocean Cloud Connect, click the 'Store my Encryption Key' button.

-
You will be prompted to enter your Shared Encryption Key. After entering it, click 'Save'.
At this point, your Shared Encryption Key has been successfully saved in Ocean Cloud Connect.
Skip to Step 6 below to complete the final step of enabling Cloud Connect within your Ocean Site.

-
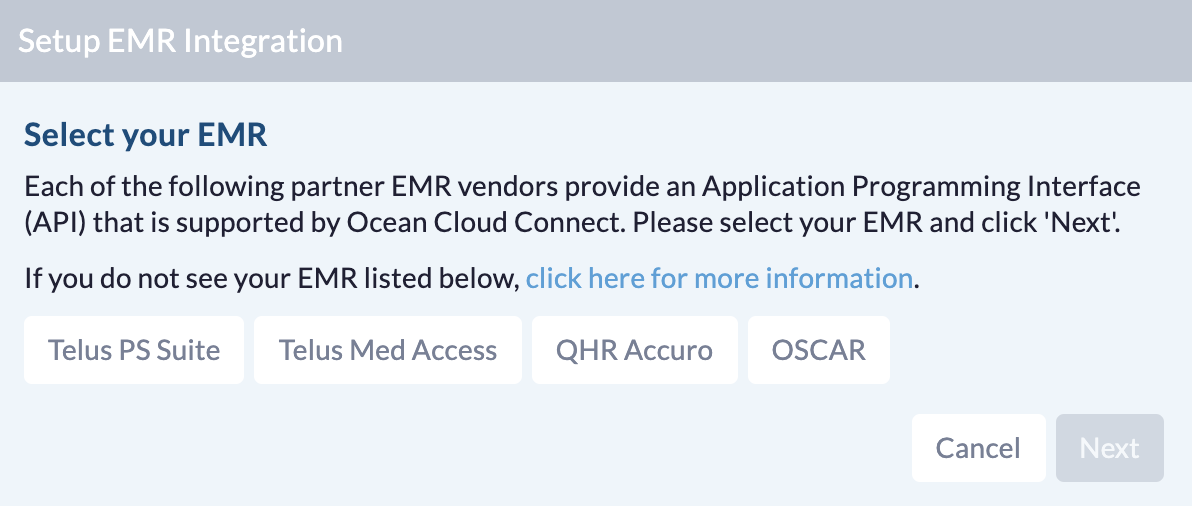
Setup Your EMR Integration.
- After storing your Shared Encryption Key, select the EMR type you would like to integrate and then click 'Next'.
-
Acquire your EMR Instance ID and EMR Secret credentials by configuring your Ocean integration module.
See module configuration instructions for PS Suite or instructions for Med Access.

- Once entered, the Ocean and TELUS servers will connect to authenticate the integration.
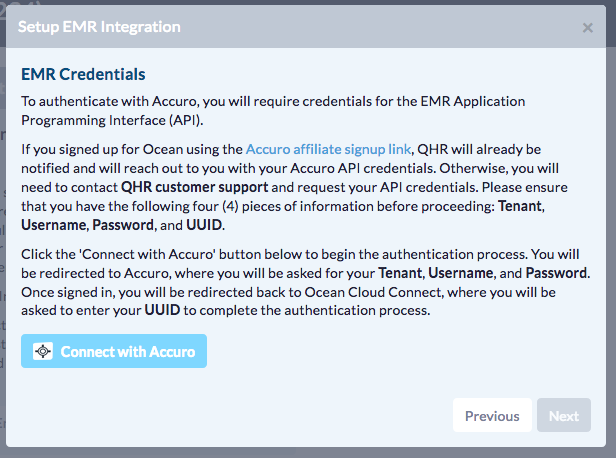
- Click on the "Connect with Accuro" button.
-
Enter the following details, supplied to you by QHR:
- Tenant ID (ALL CAPS)
- API username
- API password
Reminder: If you are connecting multiple Ocean sites to the same EMR instance, please ensure QHR has provided you unique API usernames and passwords for each site before proceeding. 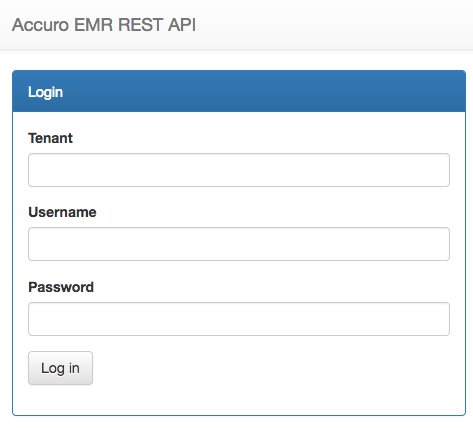
-
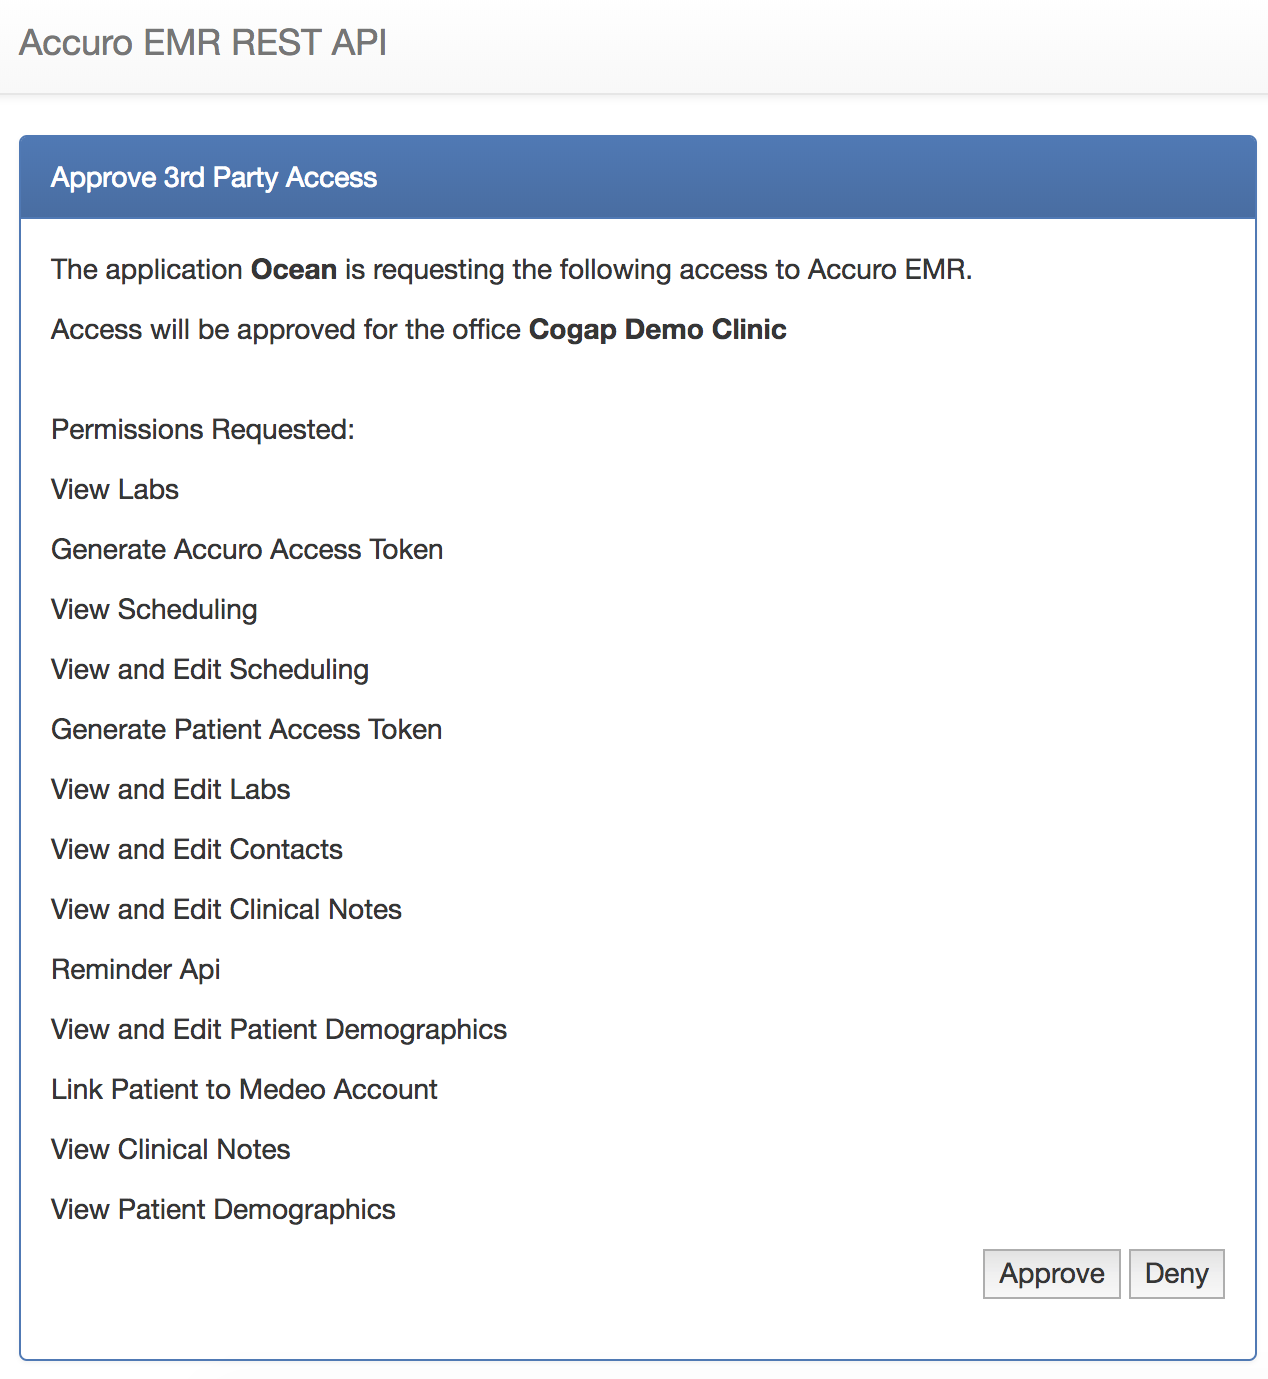
Select "Log in" and then approve Ocean's third party access to the Accuro API.
The Ocean and Accuro servers will then connect to authenticate the integration. This may take a few seconds to initialize.
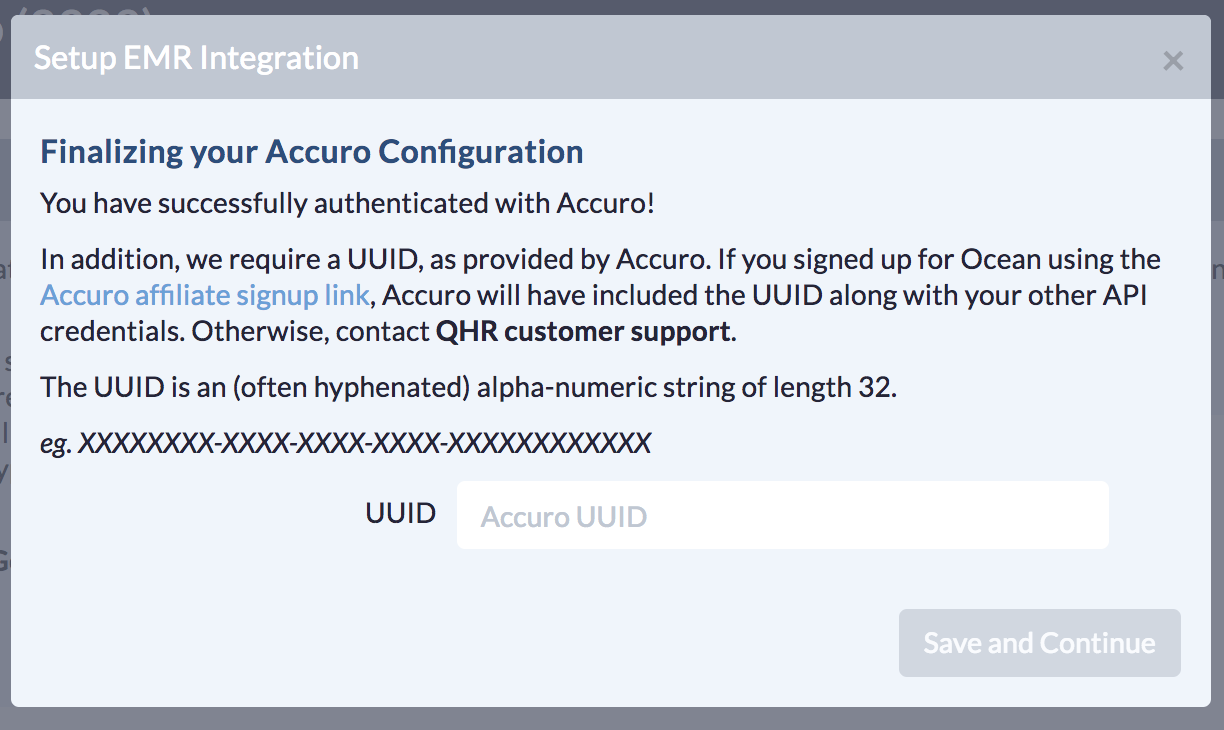
- To finalize your integration, enter your UUID (also supplied by QHR) and select "Save and Continue".
Log Out of OSCAR Pro
Please Note: Before proceeding, ensure that you are fully signed out of your OSCAR Pro EMR in any other browser windows or tabs. We recommend clicking the 'Log Out' option in the top right of the EMR to ensure the session is fully signed out.
-
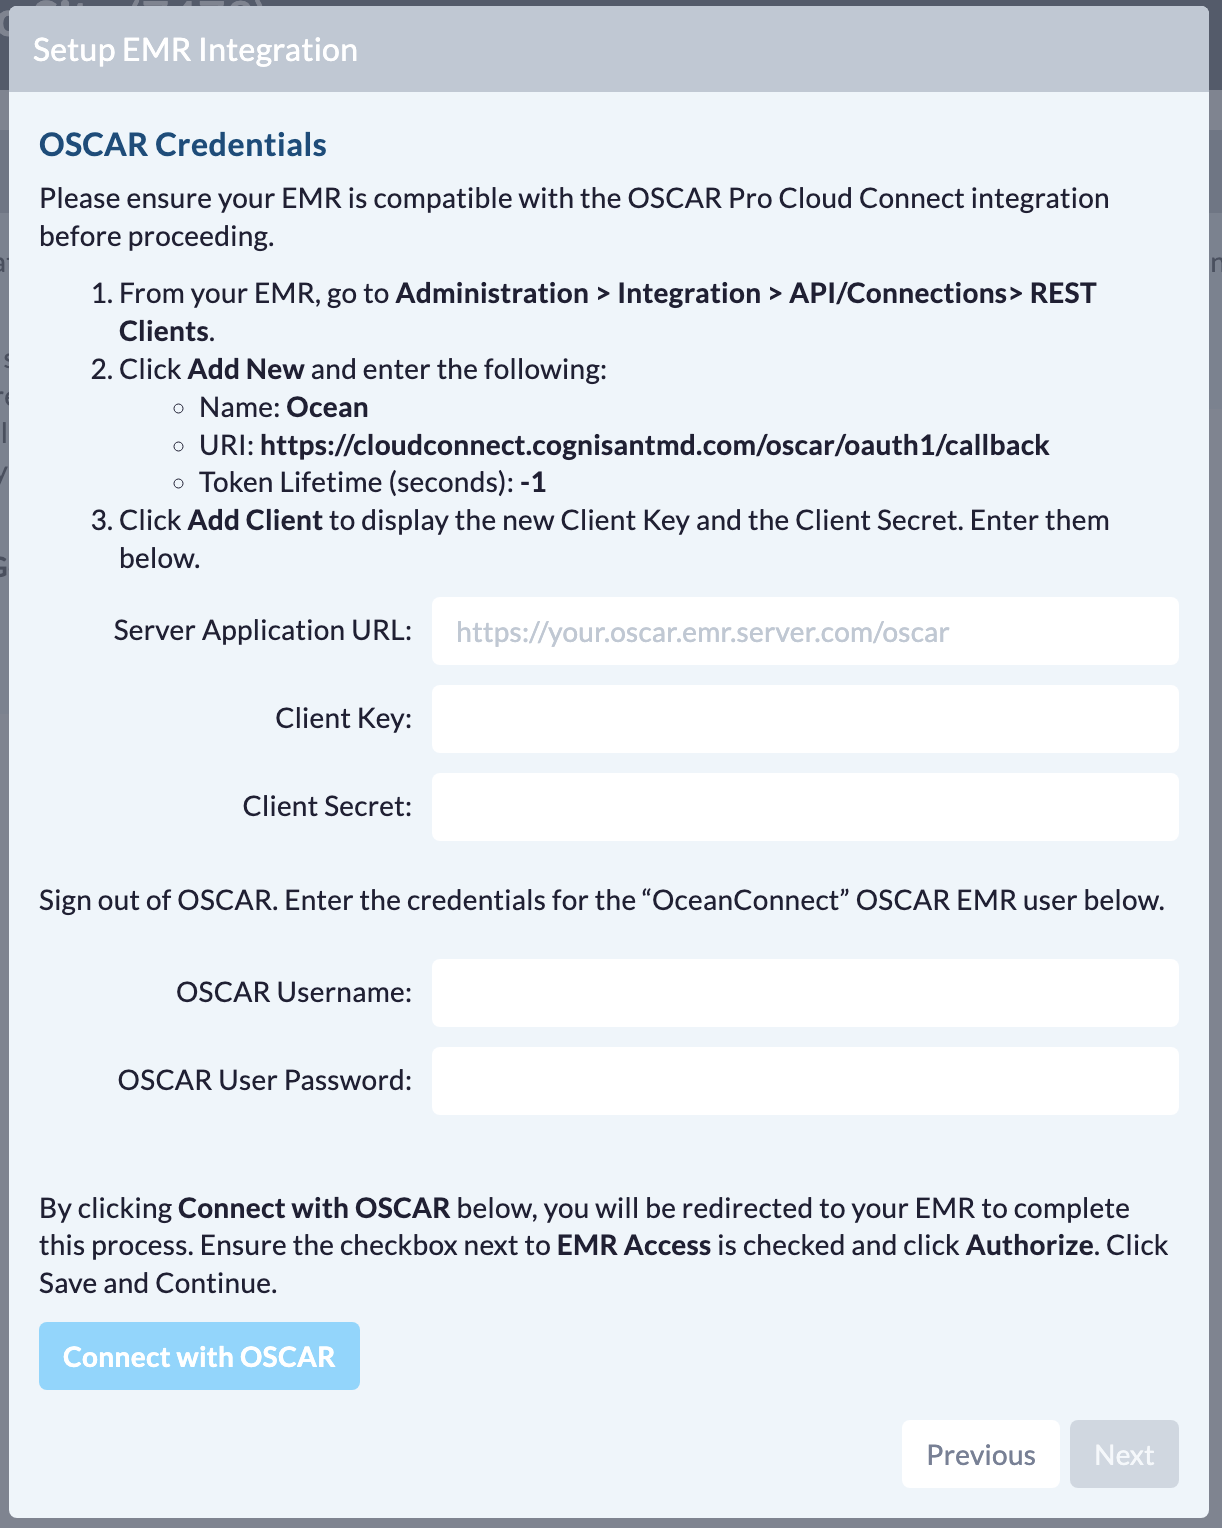
In the 'OSCAR Credentials' window, enter your OSCAR Server URL, Client Key, and Client Secret. Enter the OSCAR username and password for the newly created "Ocean Connect" user you created in step 3.
Note: Ensure that your OSCAR Server URL includes your EMR directory (e.g., the '/oscar' or equivalent component at the end of the URL).
Please also ensure there is no trailing slash at the end of the server URL - i.e. /oscar is correct, while /oscar/ is incorrect.
-
Enter the username and password for the 'OceanConnect' EMR user that you created earlier.
Please do not enter your personal EMR login credentials into these fields. If your browser pre-fills these fields with your personal details, please fully erase those values and enter the proper “OceanConnect” EMR user credentials.
- Once all credentials have been entered, click the blue 'Connect with OSCAR' button.
-
On the following screen, please re-enter your “OceanConnect” details, in addition to the pin number, and sign in.
You will be brought to a page where you will be asked to confirm Ocean's request to access your OSCAR EMR. Ensure the box next to EMR Access is checked. Click the blue 'Authorize Ocean' button.
- A window will prompt that you have successfully authenticated with OSCAR. Click 'Save and Continue'.
Configure your Cloud Connect settings.
-
From here, you can customize your configuration options. In most circumstances the default configuration will be sufficient.
Note: Ensure that all providers who plan to use Ocean are enabled within the 'Sync Appointments for Provider(s)' dropdown menu.

- Click the “Save” button to complete the setup process.
-
From here, you can customize your configuration options. In most circumstances the default configuration will be sufficient.
Notes: Ensure that all providers who plan to use Ocean are enabled within the 'Sync Appointments for Provider(s)' and 'Sync EMR User(s)' dropdown menus.
It is important to understand the impact of disabling the 'Automatically Import Attachments to EMR' setting, particularly for eReferrals. eReferral users should keep the checkbox enabled to ensure that they receive referral attachments.

- Click the “Save” button to complete the setup process.
Accuro System Setting Adjustments
Before configuring your Ocean Cloud Connect settings, please ensure the following Accuro System Settings have been enabled:
- In Accuro, navigate to: Menu → Users → Manage Security → System Settings → General

- Enable the checkbox for the 'Enable Document From Field' setting.
- Enable the checkbox for the 'Show Ocean Referral Letter Shortcut Button' setting.
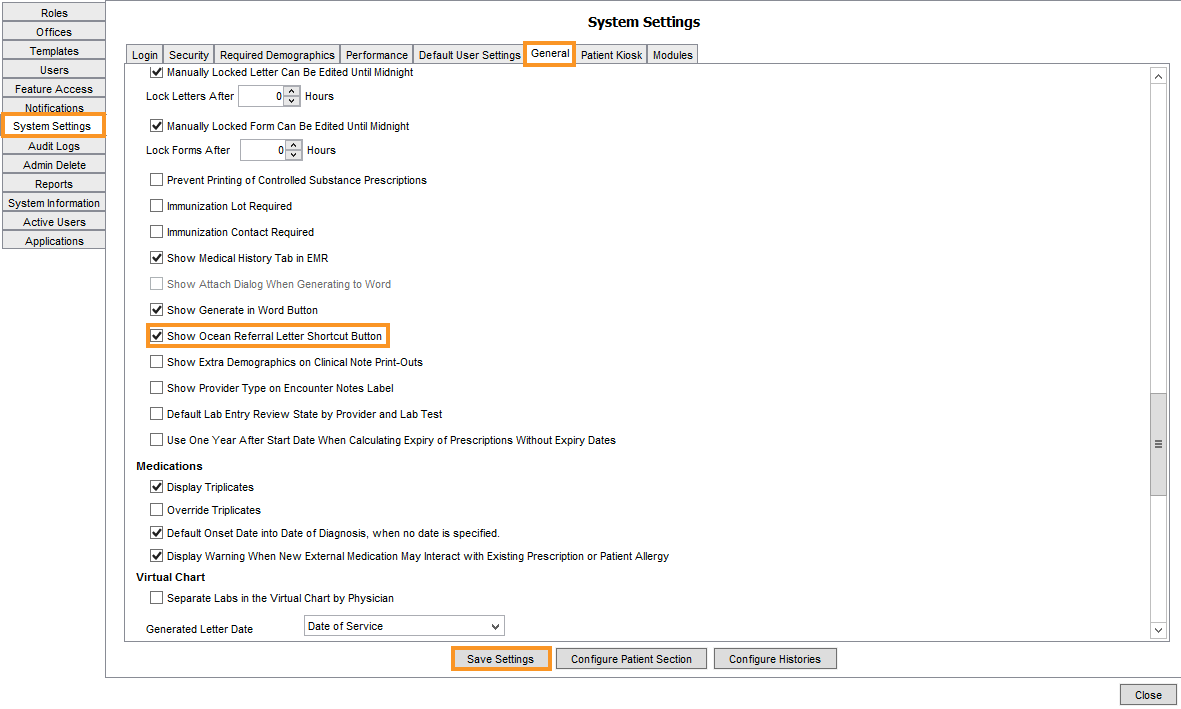
- Press 'Save Changes'.
Next, you can you can customize your configuration options:
-
Under the 'General' section, verify that the correct Accuro Providers, Accuro Offices, and Accuro EMR Users have been selected within the “Sync Appointments For Provider(s)”, “Sync Appointments For Office(s)”, and "Sync EMR User(s)" settings.
In this section you can set a 'Service Location Billing Code'. The Service Location Billing Code identifies the type of location where a service is delivered and varies by province. For more information see the article What is the 'Default Service Location Billing Code' (Accuro Clinics).
Note: QHR should automatically filter the list of providers to your specific clinic location and Ocean Site, but you can further filter or exclude certain providers and/or offices if needed.
If additional EMR providers start using Ocean in the future, ensure that you enable them within the “Sync Appointments For Provider(s)” and "Sync EMR User(s)" menus and Update the Accuro Provider Permissions for the 'OceanAPI' EMR User to include the new provider(s).

-
Under the 'Clinical Notes' section, use the 'Save secure message notes as' setting to indicate how secure messages to and from patients will save in Accuro:
When set to 'Documents', typed messages sent to and replies from patients (and any patient-submitted file attachments) will be imported into Accuro as Documents and be categorized into the specified document folder/sub-folder.
When set to 'Encounter Notes', typed messages sent to and replies from patients will be imported as Encounter Notes and categorized using the 'Letter Type' specified above. Any patient-submitted file attachments will be imported as a Document and be categorized into the specified document folder/sub-folder.
Note: For insight on optimally configuring folder/sub-folders in Accuro, please refer to the bottom of Configuring Cloud Connect Document Folders for the Ocean Health Messenger.
- If you are planning to map any Ocean eForm fields to Accuro custom fields (e.g. custom demographics, lab values), enable “Custom Fields”. For more about custom fields, please refer to: "Mapping Answers from an Ocean eForm to a Custom Demographics Field".
- Under the 'Referrals' section, please note that it is important to understand the impact of selecting Encounter Notes vs Documents, particularly for eReferral users. eReferral users should select the 'Documents' option for 'Save Sent Referrals as' and 'Save Received Referrals as' to ensure that they receive referral attachments. You will be prompted to specify your preferred Accuro document folder (and optionally subfolder) that each should be categorized into.
- For more details on the rest of the configuration options, please refer to Customize your Cloud Connect Configuration.
- Click the “Save” button to complete the setup process.
- From here, you can customize your configuration options. For most settings, the default configuration will be sufficient.

- Ensure that all providers who plan to use Ocean are enabled within the 'Sync Appointments for Provider(s)' dropdown menu.
- Click the 'Save' button to complete the setup process.
-
Note: If your clinic does not accept walk in patients, you can safely ignore the fields under the "Walk In" section of the configuration. For more information about walk ins, please consult our guide: Set Up Ocean to Support Walk-In Patients.
4. Configuration is complete!
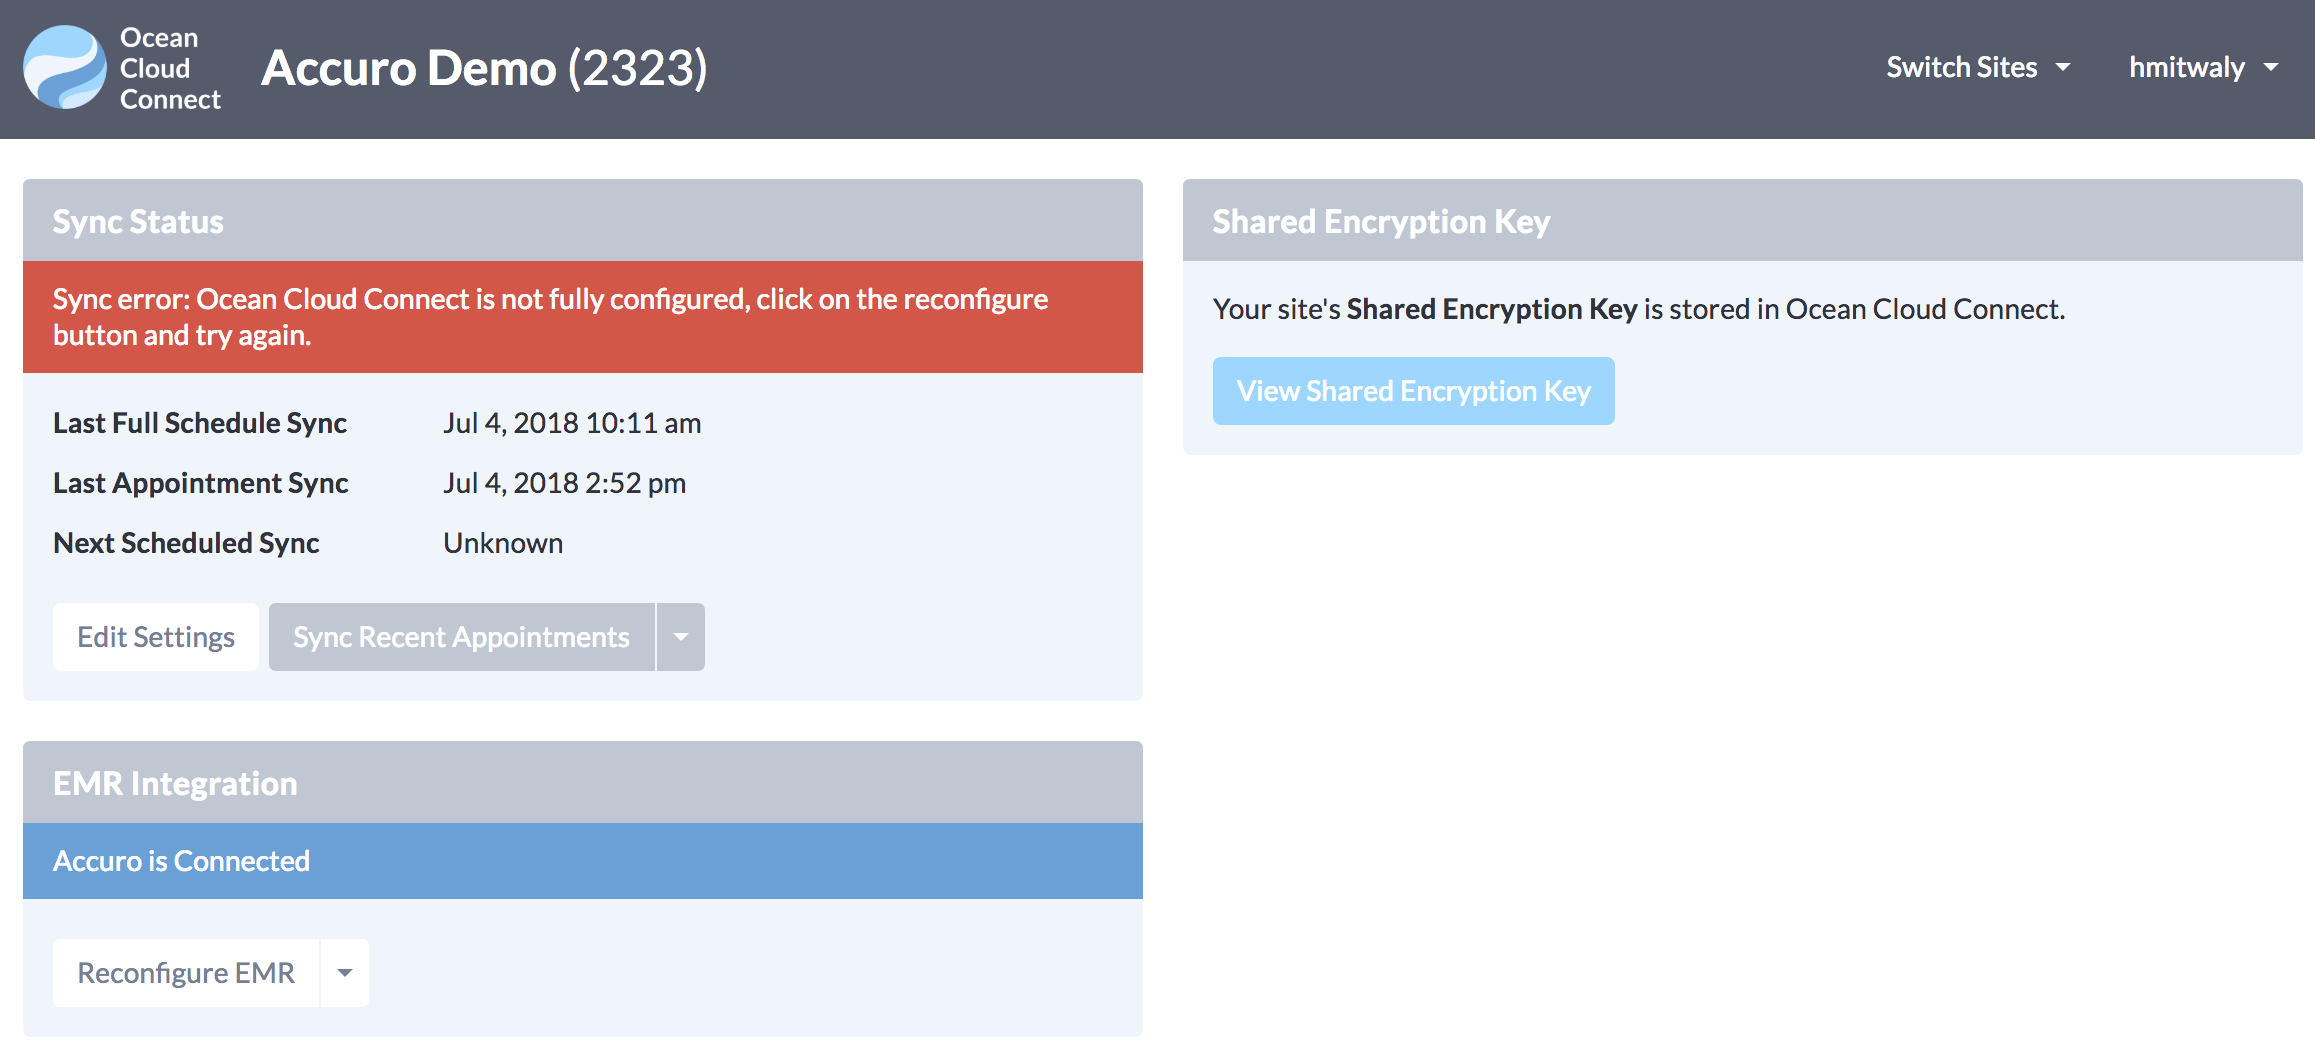
- You will now return to the main summary screen.
- The "Sync Status" panel on the left will show you if Ocean is synchronizing appointments with your EMR via Cloud Connect, when the last synchronization occurred, and when the next synchronization is scheduled for (full syncs will automatically occur once a day at midnight and appointment syncs will occur automatically every 30 minutes).

- Once an initial sync has completed, feel free to verify patients are being uploaded correctly by signing into the Ocean Portal, click the Menu button in the top left corner and click Patients.
- If there are any errors with the configuration, an alert will be displayed on the main summary screen, in the "Sync Status" panel. If this occurs, try clicking the arrow button next to "Sync Recent Appointments" and select "Sync Full Schedule". If the issue persists, contact the OceanMD Support team.
5. Ensure that Cloud Connect is enabled in your Ocean Site.
- Log in to the Ocean Portal using your Ocean user account credentials.
-

- Open the 'Menu' in the top left corner and click 'Admin'.
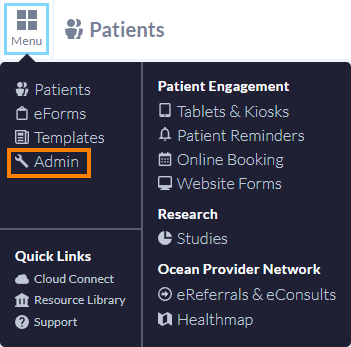
- From the Admin Settings page, click 'Site Features'.
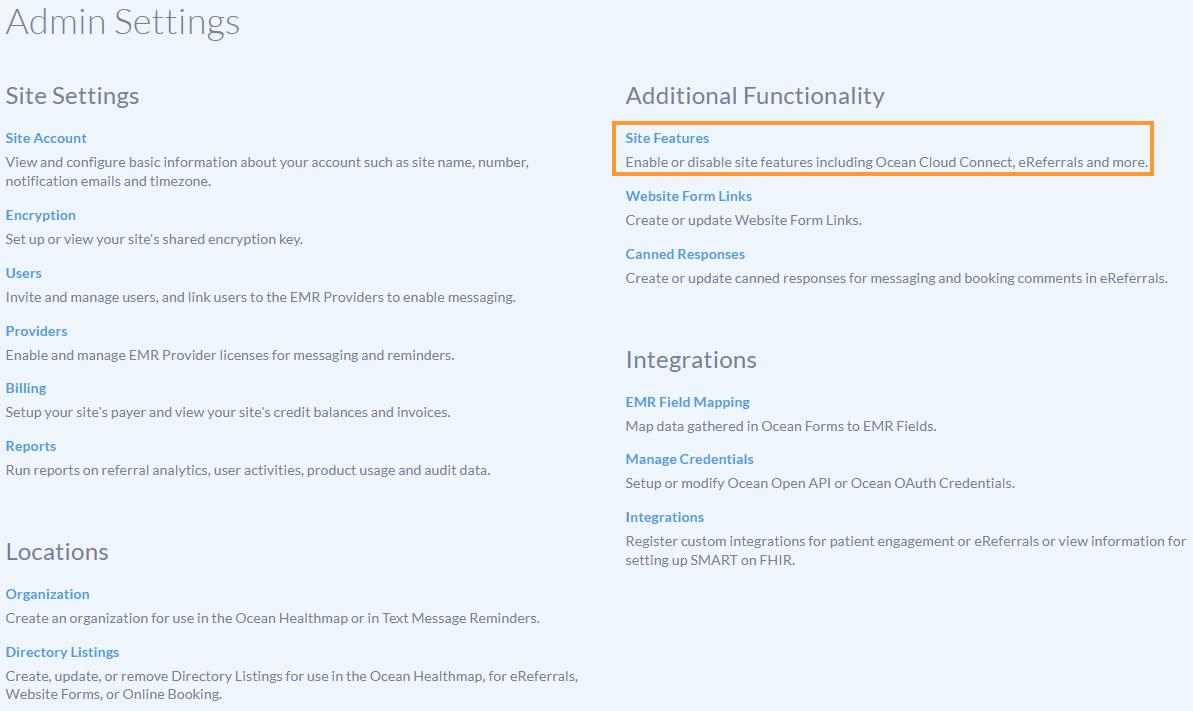
-
Ensure that the 'Enable Ocean Cloud Connect' checkbox is enabled.
Note: Ocean Sites with Non-Integrated EMRs will need to manually enable this checkbox. Ocean Sites that have completed an EMR integration will have this checkbox enabled automatically.
