You can configure these settings within the Ocean Portal, and they are worth considering when optimizing your kiosk's configuration.
1. Create a kiosk-specific device group in the Ocean Portal.
Once you've installed the Ocean Tablet app on your kiosk tablet(s) and registered the tablet, you will want to create a kiosk-specific device grouping in the Ocean Portal so that you can tell the device(s) "how to behave".
- Log in to the Ocean Portal, open the 'Menu' and select 'Tablets & Kiosks'.

- Click "Clone" on an existing device grouping.

- Click "Rename" and give the grouping a meaningful name (e.g., Kiosk Group)

- Click and drag your registered device into the new device grouping.
-


2. Set the device grouping's 'Tablet Mode' to 'Kiosk'
- Click 'Edit' on the new device grouping.

- Set the 'Tablet Mode' to 'Kiosk'.

3. Optionally configure additional device group settings
There are a variety of settings that you may want to configure for your kiosk. Learn about each setting below, and consider using them to optimize your patient kiosk experience.
Introduction Tab
-
- Always Show Introduction Screen
- We recommend keeping this option enabled to welcome your patients to your clinic and display clinic announcements or other basic information, including your clinic logo (if you choose to upload one).
- Use Birthday Validation
- We recommend keeping Birthday Validation enabled for kiosks as an added layer of security (to confirm the patient's identity upon check-in). The "Always Show Introduction Screen" checkbox must be enabled to enable Birthday Validation.
- Image to show on title screen
- Optionally upload an image file to be displayed to patients on your introduction screen (e.g., clinic logo).
- Title
- Enter a title to be shown to patients on your introduction screen.
- Message
- Enter a message to be shown to patients on your introduction screen (e.g., a welcome message).
- Privacy Disclaimer
- Enter a privacy disclaimer to be shown to patients on your introduction screen.

Demographics Tab
-
- Always Show Demographics Screen
- This option will allow patients to review and update their contact information. Many clinics choose to enable this when using tablets in Kiosk mode.
- Demographic Fields to Display
-
Select the demographic items that you would like patients to review and/or update.
Note: Not all demographic items can be accessed and/or updated for all integrated EMRs.
- Field Label Seen by Patients
- Optionally specify a different label for the demographic field shown to patients (e.g., replacing "Insurance Number" with "OHIP Number" or "Chart Number" with "Student Number")

Languages Tab
- Specify the languages that your kiosk supports.

- Ensure that you Translate your Introduction Screen and Translate your relevant eForms into the enabled languages for a seamless patient experience.
Rules Tab
-
- Tablet Rules (eForm / Trigger Table)
- To learn about tablet rules and see a few examples of helpful and commonly-used tablet rules refer to "Tablet Rules".
- Skip On Demand eForms
- To learn more about this kiosk-specific feature, please refer to our article about "Skip On Demand eForms".

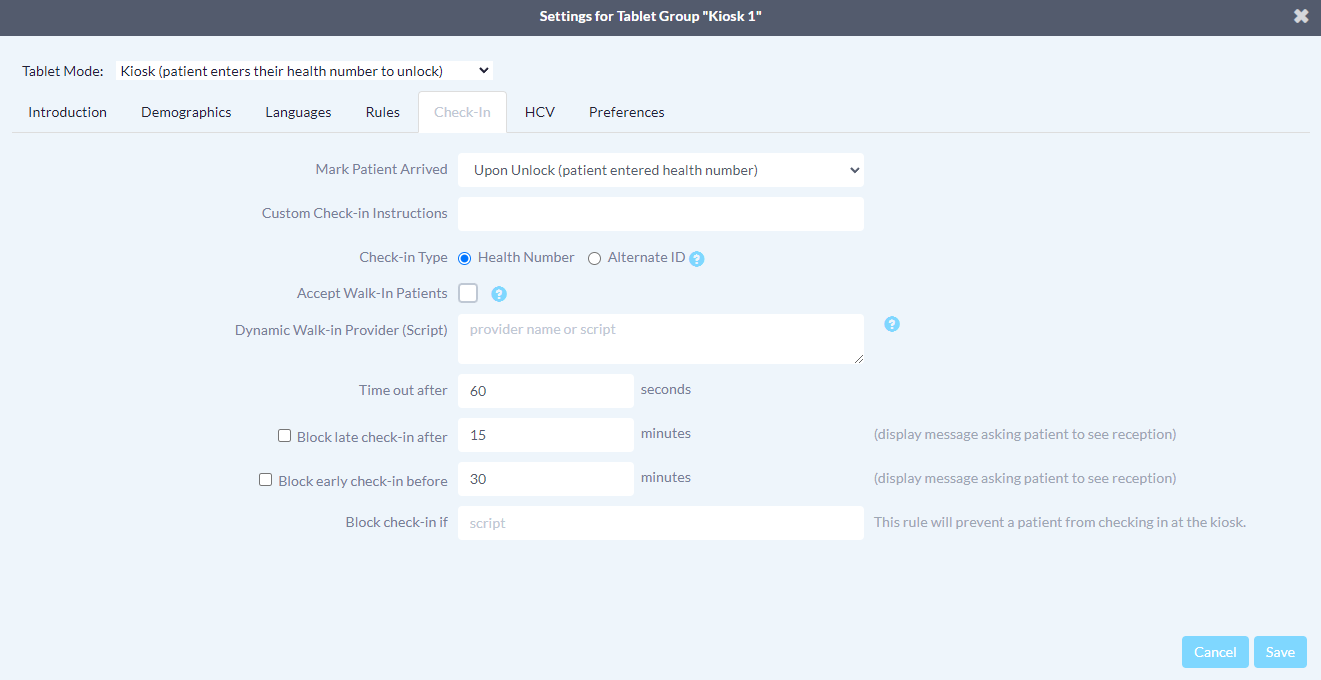
Check-In Tab
-
- Mark Patient Arrived
- Choose to mark your patients as arrived in your EMR either upon unlock (i.e., at the time the patient enters their health number or swipes their health card), or after they've finished completing all their forms on the tablet/kiosk, or never.
- If the patient has multiple appointments booked, the 'Mark appointments as Arrived in the next(hours)' Cloud Connect setting can update the arrived status for multiple appointments at once.
- Custom Check-in Instructions
- Choose to include a short instruction for patients on the check-in page.
- Check-in Type*
- Choose to use patient Health Numbers or an Alternate ID** for checking in.
- *Not supported for Med Access.
- **Alternate IDs must be numeric only.
- Accept Walk-In Patients*
- When enabled, allows patients to check-in via the Ocean Kiosk even if they do not have an appointment.
- *Not available when using Alternate IDs with Accuro.
- Dynamic Walk-in Provider (Script)*
- Override the default walk-in Provider defined in your Cloud Connect settings by entering a provider's name. See Advanced Walk-in Configurations for more detail.
- *Not available when using Alternate IDs as the Check-In Type.
- Time out after ___ seconds
- Set this to 30 seconds to reset the kiosk tablet if the patient does not interact with the kiosk for longer than 30 seconds.
- Block late check-in after ___ minutes
- Enable this setting if you'd like to prevent late patients from checking in at the kiosk. Enter the time frame after the scheduled appointment time that you would like to consider as "late".
- Block early check-in before ___ minutes
- Enable this setting if you'd like to prevent early patients from checking in at the kiosk. Enter the time frame before the scheduled appointment time that you would like to consider as "early".
- Block check-in if ___
- Enter in a JavaScript expression to prevent patients with certain characteristics from using the kiosk to check in for their appointment (similar to tablet rule triggers).
HCV Tab
Ontario Clinics Only
This tab is only applicable to Ocean Sites located in Ontario.
- To set up health card validation on your kiosk, please follow the steps outlined in Enabling Health Card Validation on Your Kiosk.

Preferences Tab
-
- Display a survey or other form after all other forms are complete
- Enable this option if you would like all your patients to complete a survey or other eForm after they have completed any other eForms.
- Display updated demographic fields for patient and front desk to review
- Enable this option if you would like the tablet to display a summary of all updated demographic fields at the end of the kiosk session for the patient and front desk to review.
- Hide Quit Button
- We recommend keeping this setting enabled to prevent patients from being tempted to quit the kiosk session before completing all their eForms.
- Completion Message
- Customize the message that your patients will see after they've finished completing all checking in and providing all their information at the kiosk. Generally, this message will be something like "Thank you for checking in. Please take a seat and wait for your name to be called."
