If your clinic accepts walk-in patients, you can also set up your kiosk to check-in walk-in patients who don't have a scheduled appointment.
Notes
- This is an optional step in setting up your kiosk.
- Ocean Kiosks do not support real-time health card validation for walk-in patients.
Ocean Kiosks support check-in for walk-in patients. To enable this feature, please follow the steps below.
1. Create your walk-in provider-specific schedule (Optional)
Some clinics choose to set up a dedicated provider in their EMR to handle all walk-ins that come through the Ocean Kiosk. If you would prefer to use an existing provider schedule in your EMR, please skip this step and proceed to Step 2.
- Open the Appointment screen from the PS Suite dashboard.

- From the Appointments menu, hover over "Add Provider" and select "Another Resource".

- You will then see a warning against changing provider setups. Click "Continue" to proceed.

- Next you will see the "Add Provider" window.

- Type in your walk-in provider name and initials.
- Leave the "Billing MD" field empty and match your interval to the same as your other providers' schedules.
- Set the "Missing bills" field to "Appointments in this schedule are billed by any doctor".
- Click "OK" to save your changes.
- You can now view your new provider's appointment schedule by selecting "All Providers" or your walk-in provider's name from the Providers menu on the PS Suite appointment schedule.

If you would like to define a specific walk-in schedule for use with Ocean kiosk, you will need to add the provider in Med Access. Then, the EMR admin user has to create a new user account associated with that provider, making the schedule available.
For details on creating additional schedules, and/or providers for walk-ins, please consult the Med Access help guide or contact Telus Support for further information.
If you would like to define a specific walk-in schedule for use with the Ocean kiosk, you can do so by creating a new appointment schedule in Accuro.
For details on creating additional schedules, and/or providers for walk-ins, please consult your Accuro help documentation or contact QHR Customer Support for further information.
If you would like to define a specific walk-in schedule for use with the Ocean kiosk, you can do so by creating a new appointment schedule in OSCAR Pro.
For details on creating additional schedules, and/or providers for walk-ins, please consult your OSCAR Pro help documentation or contact WELL Health Customer Support for further information.
2. Set your walk-in provider details in Ocean
- Sign into Ocean Cloud Connect and then click "Edit Settings".
-

- Click on the dropdown menu for "Walk-in Provider" and select the name of your provider.
-

-
Click on the dropdown menu for "Walk-In Create Appointments at" and choose between having your walk-in patients' appointments slotted into your walk-in provider's schedule close to the time at which they check-in on the kiosk (i.e. "Near Check-In Time") or at the start of your walk-in provider's day (i.e. "Beginning of Schedule").
Note: For OSCAR Pro, this setting is non-customizable. Ocean will always create the walk-in appointment in the OSCAR Pro schedule using the 'Near Check-In Time' option.
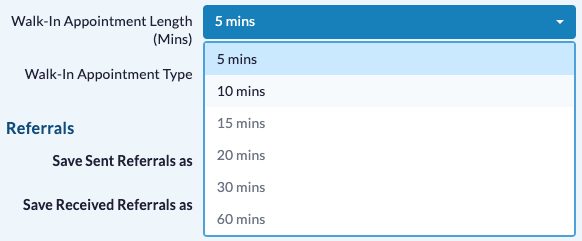
- If you would like to define the length of a walk-in appointment, you can do so via the "Walk-In Appointment Length (Mins)" field. By default, walk-in appointments will be 5 minutes in length, but can be adjusted to 10, 15, 20, 30, and 60 minute increments.
-
-
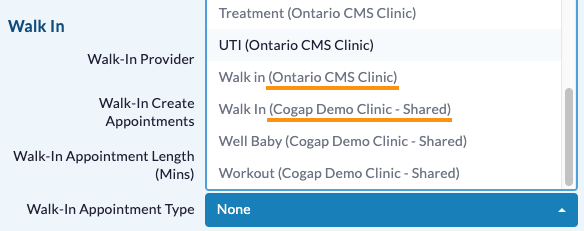
To specify a specific appointment type for walk-ins, you can adjust the dropdown field labelled "Walk-In Appointment Type". Cloud Connect will pull a list of available appointment types from your EMR configuration.
For Telus clinics, this corresponds to the list of "Type" values available via dropdown when scheduling an appointment in the EMR.For Accuro clinics, this corresponds to the values under the "Type" dropdown when booking a new appointment. Selecting by appointment "Reason" is not supported.
Please note: Ocean lists the appointment types by Office. Ensure you are selecting the correct appointment type for the office you wish to use (See screenshot).For OSCAR Pro clinics, this corresponds to the list of "Type" values available via dropdown when scheduling an appointment in the EMR.If you prefer to not set appointment types for walk-ins bookings, simply set the value to "None".
-
- Click "Save" when finished.
3. Enable walk-in patients in the Ocean Portal.
- Login to the Ocean Portal. Click the "Menu" button in the top left corner and select "Tablets & Kiosks".

- Click the "Edit" button on the tablet grouping you would like to use to accept walk-in patients.
- Ensure your Tablet Mode is set to "Kiosk Mode"
-
Open the "Check-In" tab and check the "Accept Walk-In Patients" checkbox.
Note: This option is not available for Accuro sites when the 'Check-in Type' is set to 'Alternate ID'.
- Save your changes.
-
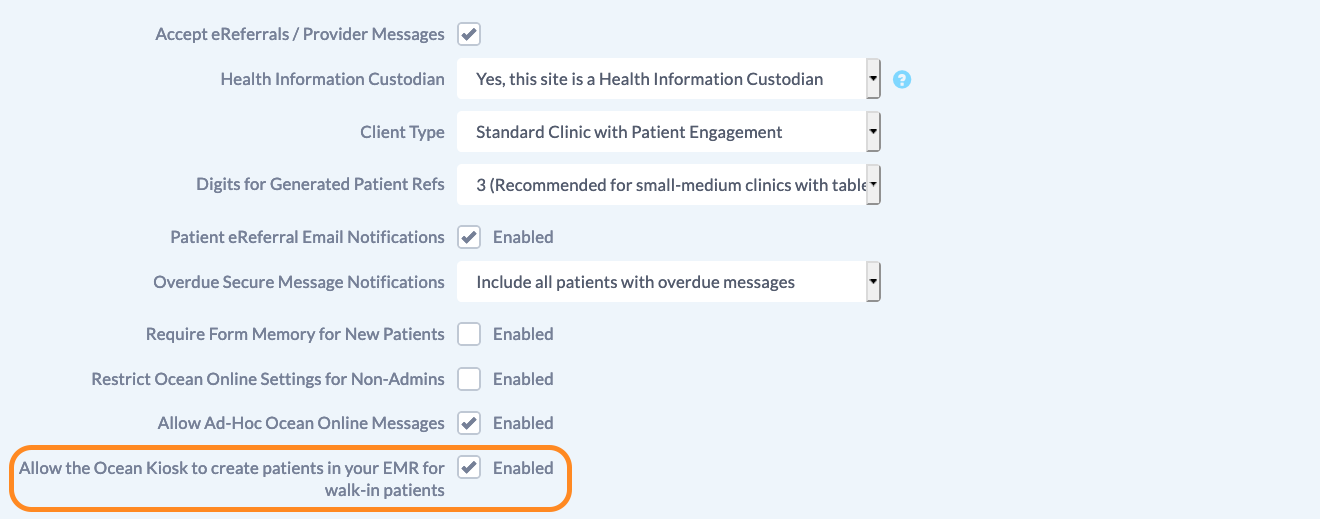
Navigate to Site Features from the Admin Settings page and enable the box labeled "Allow the Ocean Kiosk to create patients in your EMR for walk-in patients".
Note: Ocean does not support the ability to create new patient charts when the 'Check-in Type' is set to 'Alternate ID'.
- Save your changes.
For Med Access users
TELUS sets the status for newly created patients by Ocean as "Unconfirmed". Please ensure you login to your EMR, search for the newly created patient and change their status to "Active".
For Accuro users
Site Admins can access a configuration to set a single default Service Location Billing Code for all appointments booked in the EMR, this also applies to tablet/kiosk Walk-in appointments. For more information see the article What is the 'Default Service Location Billing Code' (Accuro Clinics).
4. Advanced Walk-in Configurations
This is an optional step for clinics that wish to support multiple kiosk configurations each tied to a different walk-in provider's schedule.
-
If you would like to over-ride the default walk-in provider defined in Cloud Connect during Step 1 of this guide, you can do so by entering a provider's name in the "Walk In Provider" field in the "Check-In" tab.

-
Clicking inside the "Walk In Provider" text field will generate a dropdown of the existing provider schedules to choose from. Simply select a provider name to associate their schedule with the selected kiosk tablet grouping.
-
Repeat this process for each tablet grouping that has been enabled for walk in use to assign different walk-in providers to different kiosks.
This is an optional step for clinics that wish to select the walk-in providers based upon patient criteria.
Similar to Tablet Rules, you can use Ocean Keywords to create conditional logic to define which provider's schedule can be used for walk-ins.
Click inside the "Walk In Provider" text field to write your condition.
For example, if you wished for a specific doctor to only see patients over the age of 18, you could use the following:
pt.getAge() > 18 ? 'provider 1' : 'provider 2'In this example, if a patient was over 18, they would be assigned to provider 1's walk-in schedule. Otherwise, patients 18 and younger would be assigned to provider 2's walk-in schedule.
Please refer to the support article Using Keywords to Automatically Insert Content for a list of available options.
In many clinics, physicians may be responsible for walk-in patients on certain days of the week. In these situations, the following rules could be used.
Note: In javascript, the days of the week are handled by numerical values starting at 0. The following list shows how each day needs be defined in javascript:
0 = Sunday1 = Monday
2 = Tuesday
3 = Wednesday
4 = Thursday
5 = Friday
6 = Saturday
Example #1
(new Date().getDay() == 0 || new Date().getDay() == 2) ? 'provider 1' : 'provider 2'In this example, provider 1's schedule would accept walk-ins on Sunday and Tuesday only, with all other days of the week being handled by provider 2.
Example #2
(new Date().getDay() >= 3) ? 'provider 1' : 'provider 2'In this example, provider 1 handles walk-ins starting at Wednesday up until Saturday. Provider 2 handles the days with numerical values lower than 3 (Sunday - Tuesday.)
Example #3
(new Date().getDay() != 3 && new Date().getDay() != 6 ) ? 'provider 1' : 'provider 2'In this example, provider 1's schedule will be used for walk-ins for all days except Wednesday and Saturday.
If you have a more advanced workflow at your clinic for provider walk-in assignment based on days of the week, please feel free to contact support and our team can assist you with crafting the appropriate javascript condition.
5. Start accepting walk-in patients!
Now, if a walk-in patient checks in on the kiosk, an appointment will be created for them in the walk-in provider's schedule in the EMR. From there, you can either move the appointment to other providers' schedules or have your walk-in providers consult the new walk-in provider appointment schedule.
If they are an existing patient at the clinic, the appointment will be tied to their chart in the EMR.
If the patient is new to the clinic, they will be prompted to provide their first and last name (in addition to the usual demographic information), and their appointment status will automatically be marked as Arrived .