Introducing Patient Authentication for Website Forms

Website Forms allow clinics to host Ocean forms on a URL so patients can securely complete self-referrals, new patient intake, prescription renewals, appointment requests, and more. This website form URL can be hosted on a clinic website, or sent to a patient via email. 

What are Patient Authenticated Website Forms?

Ocean can restrict access to a website form to patients with an existing chart in the clinic’s EMR. Ocean does this by adding a Patient Authentication (PA) feature as the initial step. When used with the Inbound Message eForm, patients can also submit files & documents to their healthcare provider.

Key Benefits:

  • Easy for Patients - Patients are not required to create an account or log into a patient portal in order to securely submit information & files
  • EMR-integrated - Notes from accepted submissions can be imported directly into the patient’s chart with a single click
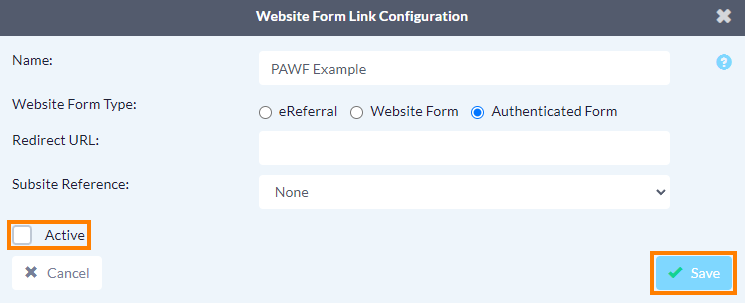
  • Customizable - As with all of Ocean’s patient-facing tools, the Website Form can be customized to suit your clinic’s needs (eg. clinic logo, welcome message, etc.)

How it works for Patients:

  1. Patient navigates to your Website Form.

    • A patient navigates to your clinic’s website and finds your Website Form. This can be hyperlinked as a button (eg. “Contact the Family Health Team"), or displayed directly on a webpage (using an iframe). If you choose not to display your Website Form on your clinic website, the URL can be shared directly with your patient using Ocean’s secure patient messaging.
  2. Patient enters information to authenticate.

    • The patient enters their first and last name, date of birth, and health card number into the PA screen and submits.
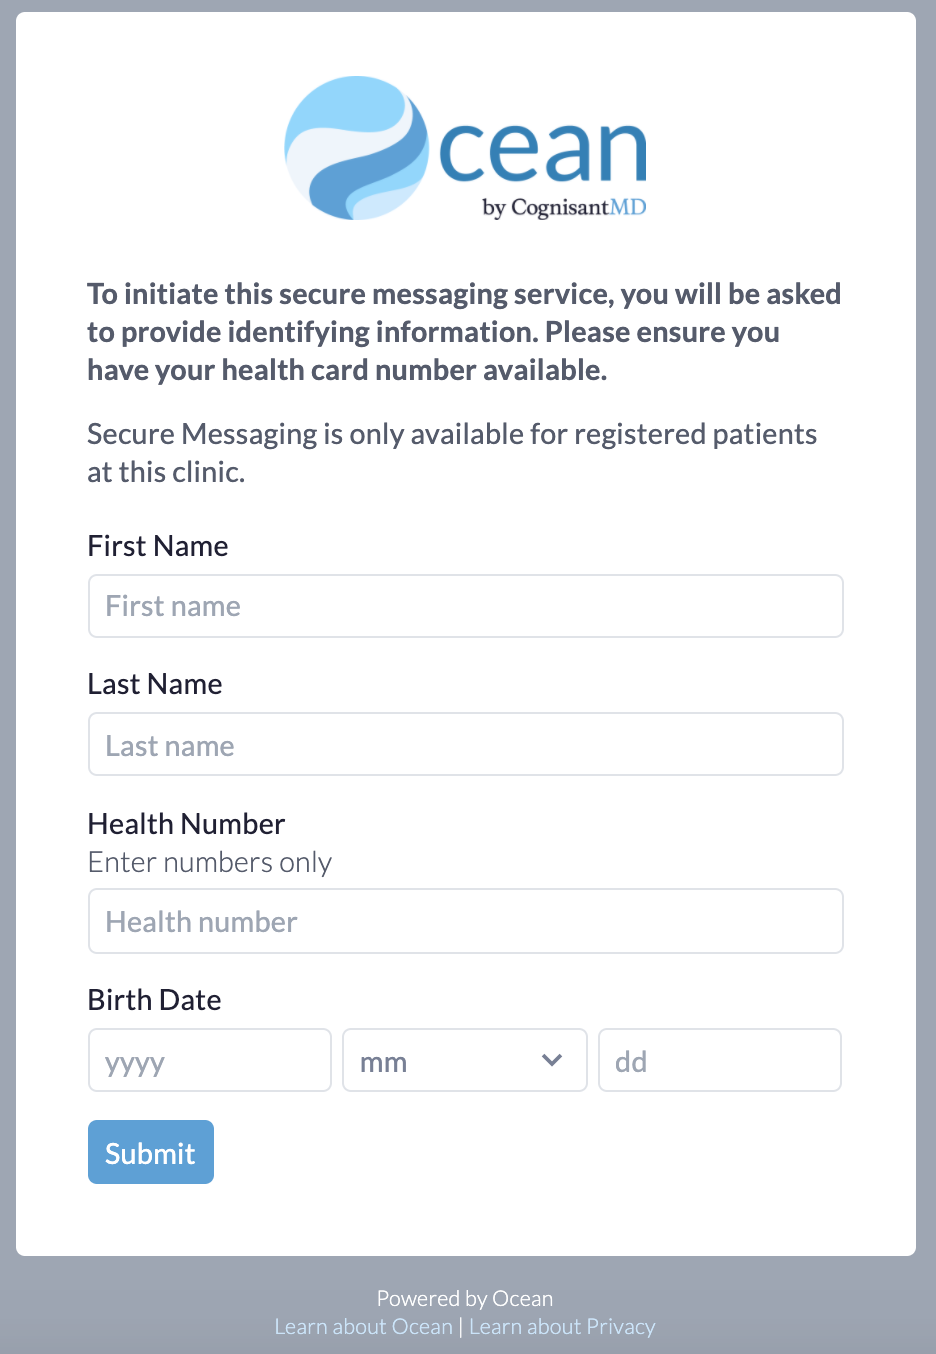
    • In order to authenticate the patient, Ocean will search the EMR for a matching chart based on this information. If there is a match, the patient can proceed to the next step.
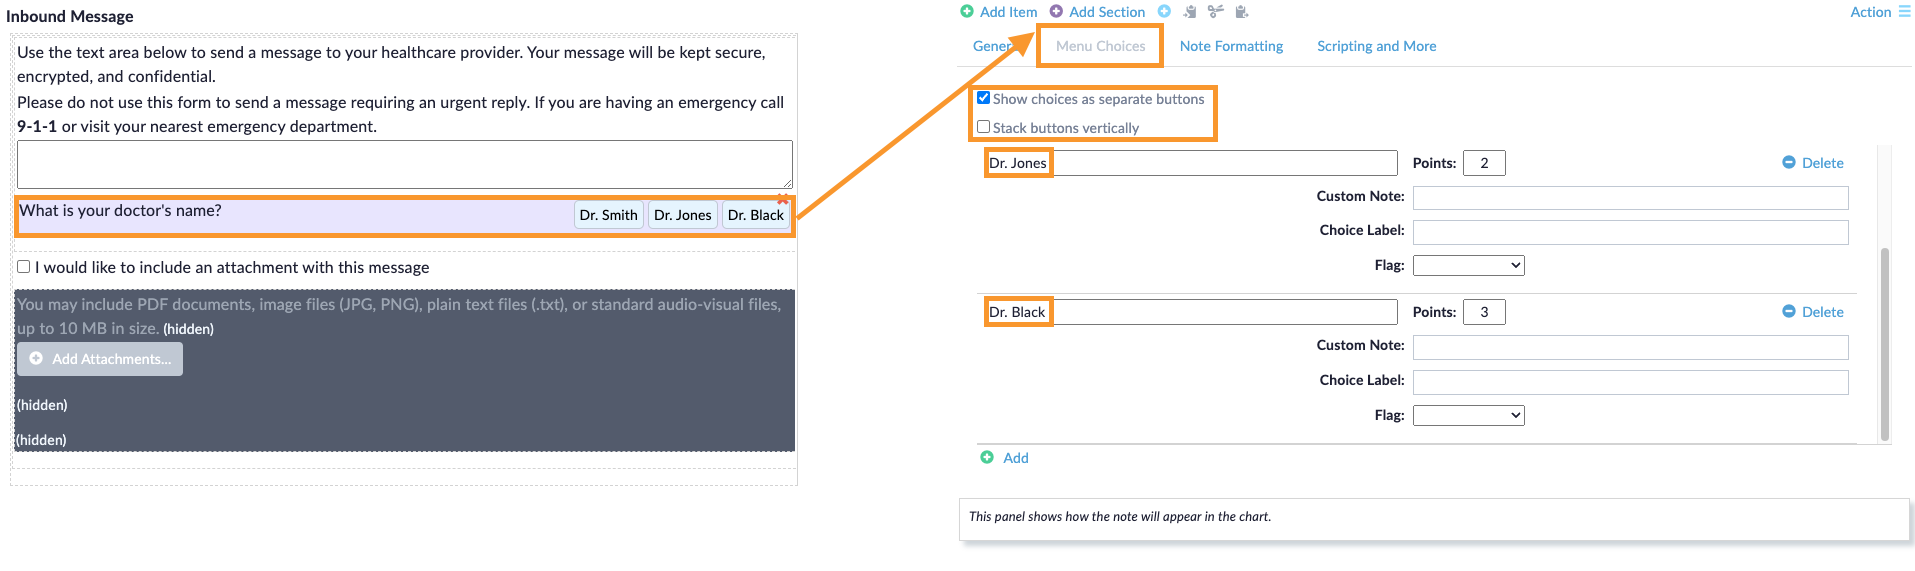
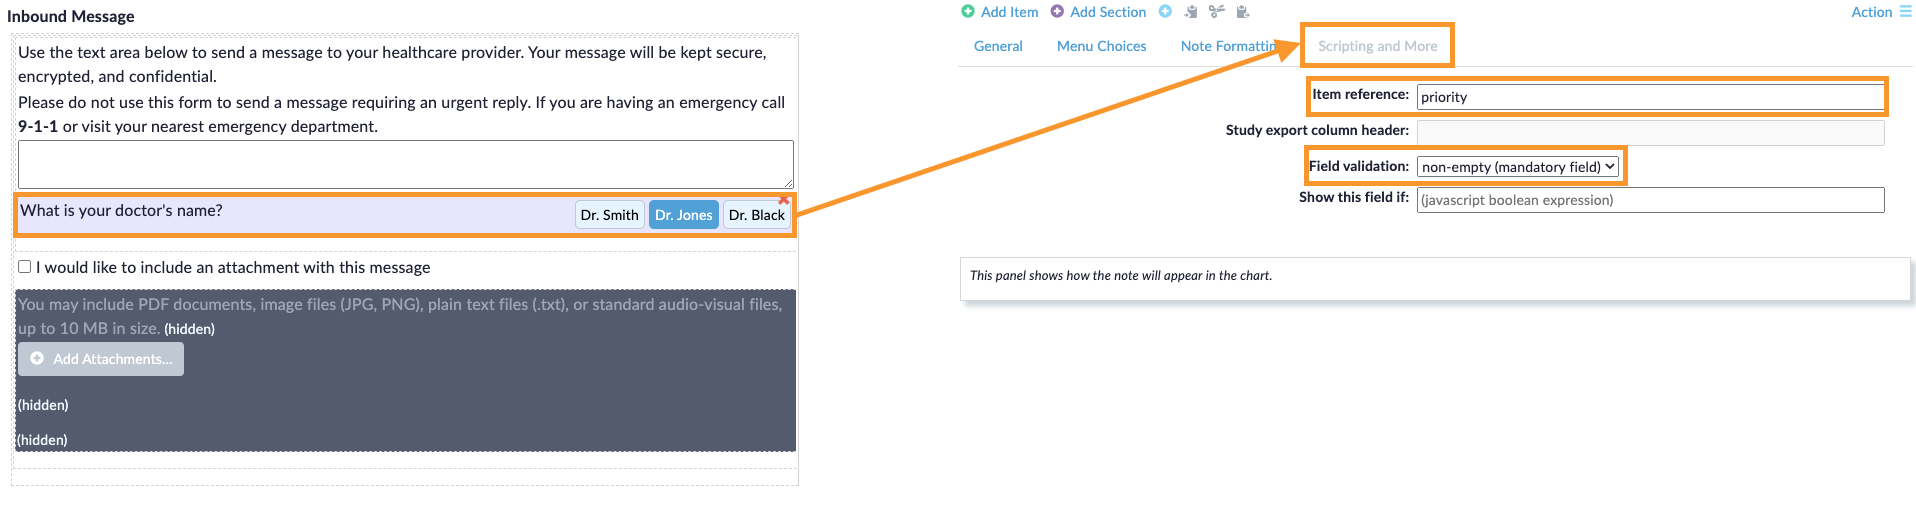
  3. Patient completes form and optionally adds attachments.

    • The patient can now complete the "Inbound Message" eForm. If the patient would like to include an attachment, they can click the +File upload button to attach a file from their device. Ocean will accept attachments with a size limit of 10MB per attachment and up to 50MB total for all attachments. Ocean also has a limitation on certain file types (.jpg, .jpeg, .png, .tiff, .tif, .mp3, .mp4, .txt, .pdf). If a patient uploads a file type that is not supported or that is too large, Ocean will give them the appropriate size or type error message.
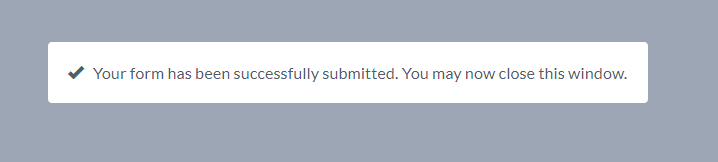
  4. Success notification shown.

    • The patient is notified that their submission was successfully submitted and they can exit the session.

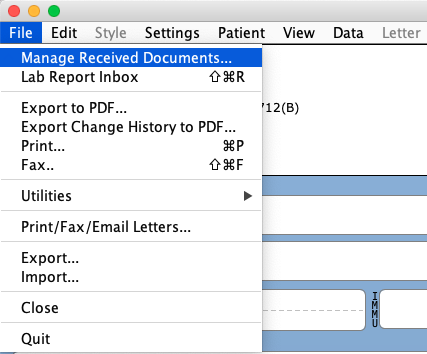
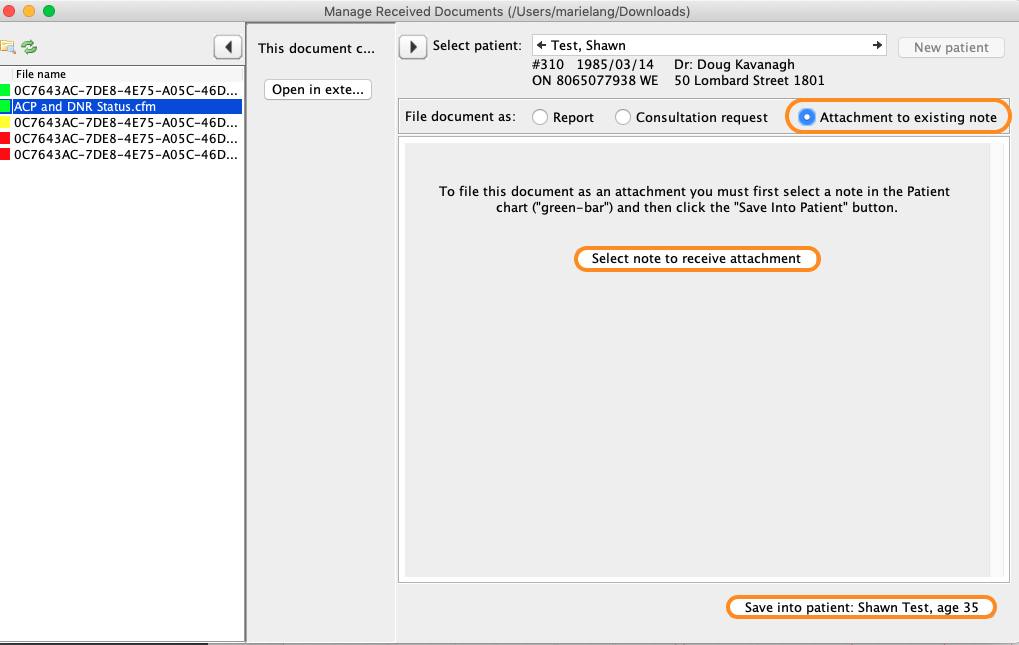
To learn how these attachments are then downloaded into your EMR, learn how to download an attachment submitted through a Website Form.

Want to get started? Learn how to set up a Website Form to allow patients to securely send attachments.


How can I set up a Website Form to allow patients to securely send attachments?

Prerequisites

Ocean supports the use of a dedicated Website Form to allow patients to securely send a message with an attachment(s) to the clinic.

  1. Create a new Website Form configuration.

    • Login to the Ocean Portal. Click the "Menu" button in the top left corner and select "Admin".
    • From the Admin Settings page, click "Website Form Links".
    • Click the "New Website Form Link Configuration" button at the bottom righthand corner of the screen.
  2. Configure your Website form settings.

    • Name
      The name of your Website form (for tracking purposes.)
      Directory Listing
      Clinical location that you listed and/or claimed (a.k.a. your clinic/site name).
      Website Forms Type
      Select "Authenticated Form" as your Website Form Type.
      Redirect URL (optional)
      This will take the patient to a specific URL once they have completed and sent the inbound message. You can use this to redirect patients back to your own website.
      Subsite Reference (optional)
      This will only apply if you have Website Form fees covered by different payers. More information about subsites can be found in "Creating Separate Bills for Different Ocean Services".
    • Once the “Active” button is enabled, billing will begin for the Website Form link. If you are not ready to activate the form yet, simply disable this option.
    • Click "Create" to finish configuring your Website Form.
  3. Activate your Website Form.

    • Once you've finished creating and configuring your Website Form Link, you can change the "Active" status at any time. Through the "Website Form Links" section, you can also access and manage your existing links, configure your settings, or create new Website Forms at any time.

Note: Set a Referral Notification Email in your Site Account settings if you would like to receive email notifications about new patient authenticated website form submissions.


How do I download an attachment submitted through a Website Form?

1. How to access and review your attachment

Once you have received a new inbound message via an Ocean Website Form Link, it will appear in the Ocean portal as a new Website Form Submission.

PS Suite Med Access Accuro OSCAR Pro

Please note: Telus PS Suite cannot directly attach files to patient charts/notes. Files must be manually copy/pasted from Ocean into your EMR. Please refer to the instructions in this guide for steps on uploading downloaded attachments into the EMR chart. 

    • To review your new requests and download your file attachments and note, navigate to the "Website Form" view in the portal. Select the "New" option from the sidebar. Select the appropriate submission to view its details.

    • The patient's file attachment will be displayed under the "Messaging" panel on the righthand side of the request. Click the preview icon and copy the image by right clicking and selecting copy or using the keyboard shortcut control/command + C.

    • After copying the attachment, ensure you click the "Completed" option at the bottom of the screen. This will initiate an EMR import and download the corresponding note from the request into the patient's chart.

      Note: The file attachment itself will not be downloaded with the note. See Step 2 of this guide for more information.

If you need to re-download the attachment, you can locate the request in the "Completed" folder on the lefthand sidebar.

For more detailed information on the full website form submission workflow, please refer to this guide: Basic Website Forms Management Workflow

2. How to import your attachment into the EMR

PS Suite Med Access Accuro OSCAR Pro

Manual Download Workflow

    • Open the corresponding patient chart in PS Suite.
    • Locate and select the corresponding Ocean note in the patients chart (You will see the note contains the term "Attachment Included.").
    • Use the keyboard shortcut control/command + V to paste the image into the progress note. Repeat the steps if your are importing more than one image.
    • In the attachment preview window, click the "Save" button
    • The attachment will now be associated with the note via a paperclip icon next to the date. Clicking the paperclip icon will allow you to review the attachment.

"Manage Received Documents" Workflow

PS Suite has a built in "Manage Received Documents" workflow. This workflow allows PS Suite users to point their EMR to a specific folder on their computer, give the EMR access to downloaded files from that folder, and immediately delete them after being downloaded into the EMR. This saves the important manual step of having to delete files containing PHI from a computer. In the clinic, this functionality is typically used by admins to import faxed documents, but can also be useful when managing these attachments through Ocean.

    • From a patient's chart, choose File, and select Manage Received Documents from the menu
    • Enter the patient's name in the Select Patient box. Next, select the Attachment to Existing Note radio button option. Finally, click the Select Note to Receive Attachment button.
    • In the patient's record, choose the note which you want to attach the document by clicking the checkbox next to the date to green bar it (you can only attach the document to one note.) Leave the patient record open and navigate back to the "Manage Received Documents" window. If required, modify the users to notify who need to review this document. Click the Save into Patient button.
    • The attachment will now be associated with the note via a paperclip icon next to the date. Clicking the paperclip icon will allow you to review the attachment. The document also disappears from the "Manage Received Documents" list and it is securely deleted from the source folder on your workstation.

Routing Patient Authenticated Website Forms to a Provider

Multi-provider clinics receiving inbound messages and content from patients can benefit from being able to identify and route the submission to the relevant provider. This article describes the steps for adding the provider's name to the website eForm and routing the website form submission to a specific provider for review.  

1. Identifying the Patient's Primary Provider

PS Suite Med Access Oscar Accuro Other EMR
  • For PS Suite users, the name of the patient's primary provider, as assigned within your clinic's EMR, will appear in the Priority column automatically. 

2. Routing To A Specific Provider

    • Administrative staff can review website form submissions in the Ocean portal and route submissions to specific providers. These providers must be an Ocean user on the Ocean site to review these website form submissions. The website form submission will appear in the "For Me" folder of the intended Ocean user.

    • Log in to the Ocean Portal. Click the Menu button and select "Website Forms". Check for new submissions in the "New" inbox. 
    • Click on a website form submission. In the 'Needs Review' option at the bottom-left of the website form page, access a drop-down list of providers associated with your site.
    • Select the intended provider and click the 'Notify' button

3. Reviewing website form submissions (as a provider)

    • The provider will receive an email notification that the website form submission has been assigned to them.
    • When the provider logs into Ocean and access the Website Form view, they can select the "For Me" folder in the left side bar to display the website form submissions routed to them.

For guidance on how to view the attachment submitted by the patient and how to import website form submissions and attachments into the EMR, please see this article.