Any individual that requires access to Ocean must have a free Ocean user account.
Please refer to the article Adding a New User to Your Site.
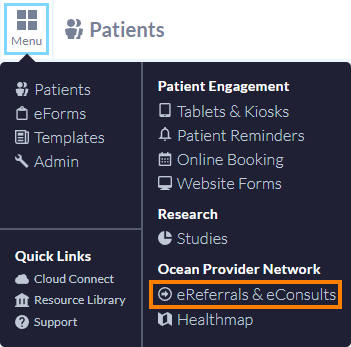
Get started with sending eReferrals through Ocean by reading through this handy getting started guide.
Any individual that requires access to Ocean must have a free Ocean user account.
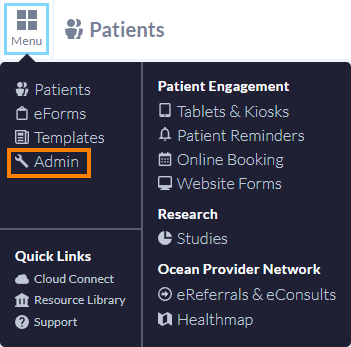
Update your eReferral & eConsult settings to indicate that you are Sending Referrals.

Under the "Welcome to Ocean eReferrals!" section, select 'Sending Referrals'.
This hides the 'Configure Referrals' button that is shown when either the 'Receiving Referrals' or 'Sending & Receiving Referrals' option is selected, as those receiver-specific configuration options are not relevant to Ocean Sites who exclusively send referrals.

Note: If you plan to both send and receive eReferrals/eConsults, please complete both the Set Up Your Site to Send eConsults and/or eReferrals guide, and the Set Up Your Site to Receive eConsults and/or eReferrals guide.
Configure which email addresses receive email notifications when eConsults and/or eReferrals that you've sent are changed or updated.
This article describes locations where you can configure your email addresses for eConsult and/or eReferral notifications. To learn more about the rules/logic that Ocean uses to determine which email address to send the notifications to, please refer to "Where do eReferral notification emails get sent to?".


This is the personal email address associated with each user with an Ocean account.
This is the email address that generally receives clinical notifications, such secure message notifications (patient responses, eForm completions, etc.).
This is the email address of the sender that will be sent consults and/or referral notifications, such as eReferral booking updates.
You have 4 preferred language options to choose from when receiving referral email notifications as a sender. Select: English Only, French Only, Bilingual (English Frist), Bilingual (French Frist).
If you work with an MOA, receptionist, nurse, resident, or student who will be sending eConsults/eReferrals on your behalf, you can to invite them to your Ocean Site and set them as a Clinical Delegate.
*This step is an optional step in setting up your Ocean Site to send Ocean eConsults/eReferrals. The steps in this article only need to be followed if you would like to set up another Ocean user who will be sending eConsults and/or eReferrals on another user's behalf.
If you do not have Ocean Site Admin access, but would like to manage the Clinical Delegates associated with your own individual Ocean user account, please see: How do I set a Clinical Delegate user for my Ocean user account?
A Clinical Delegate has the ability to send eReferrals/eConsults on behalf of another Ocean user. There is no limit to the number of Clinical Delegates that an Ocean user can have.


Each person who will be sending Ocean eConsults and/or Ocean eReferrals will need to link their EMR and Ocean user accounts.
This is especially important for auditing and tracking purposes.
Each sender must link their EMR user account to their Ocean user account by following the steps below.
This will allow individual users to send Ocean eConsults and/or Ocean eReferrals as well as enable alerts and track activity.
Note: This process is only applicable if your EMR is integrated with Ocean. If your EMR is not integrated with Ocean, you can skip these steps.


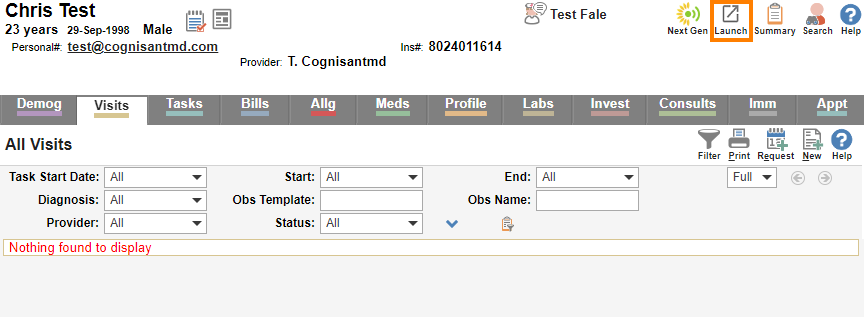


After successfully signing in, your EMR username will be linked to your Ocean user account.
Tip: You can confirm the linkage between your Ocean user account and your EMR user account within your Ocean user account settings.
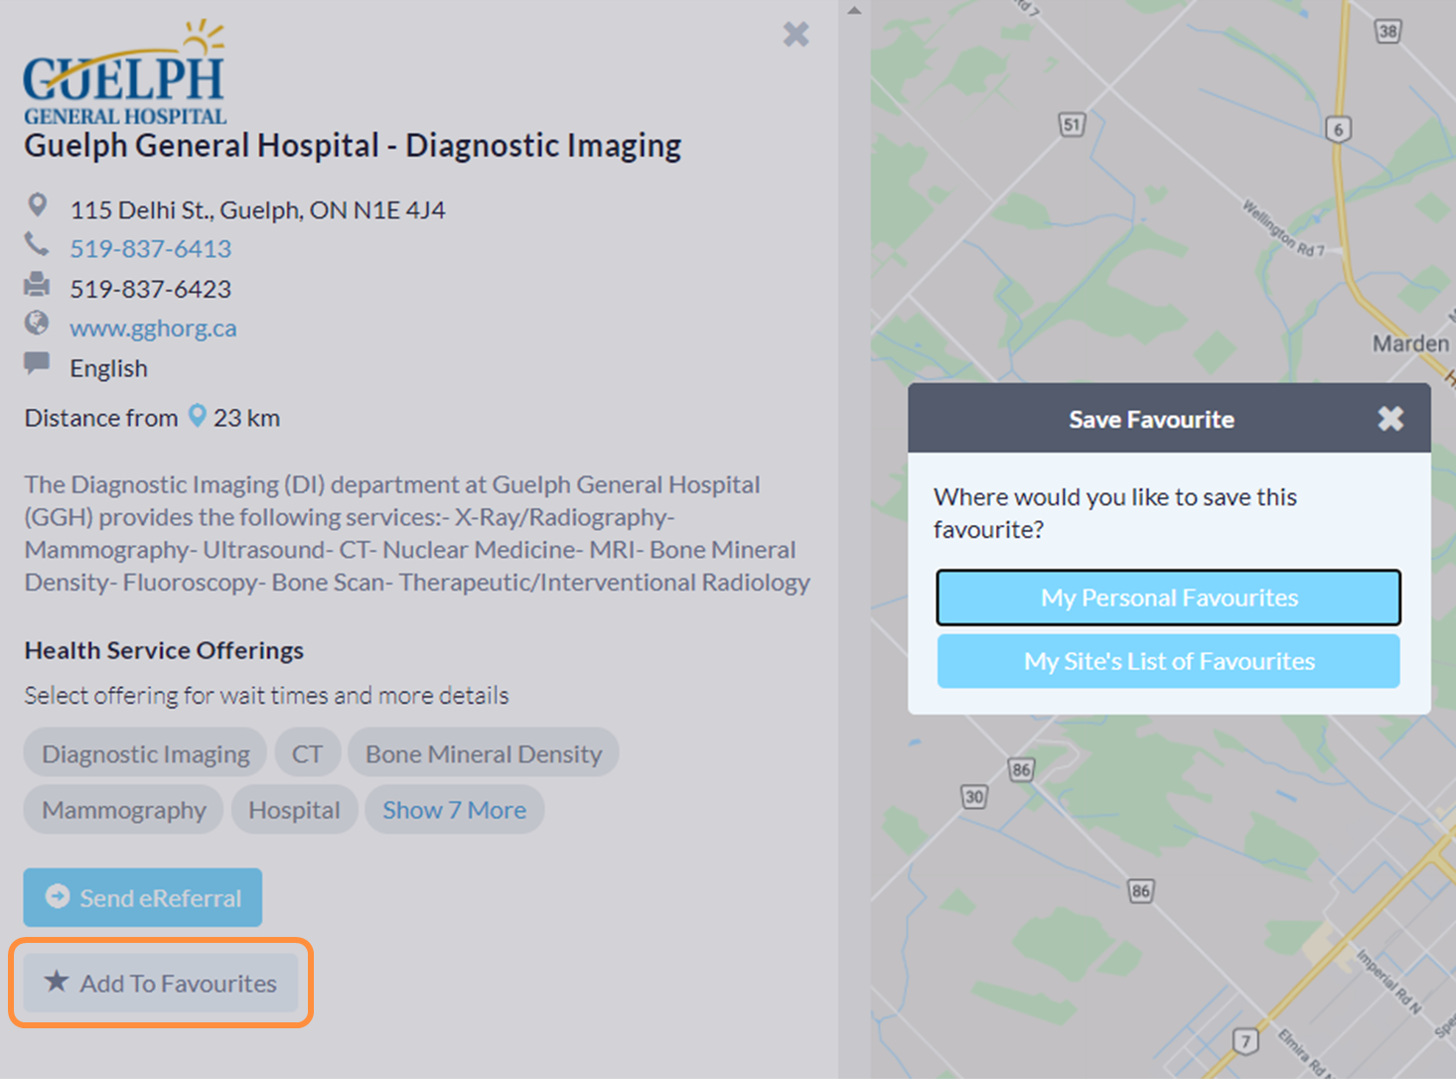
If your clinic most often sends eConsults and/or eReferrals to a specific destination clinic or group of clinics, you may want to save these sites as Favourites. This will allow for easy and efficient sending of Ocean eConsults and/or eReferrals to your preferred clinics.
*This step is an optional part of setting your site up to easily and efficiently send Ocean eConsults and/or eReferrals to preferred destination clinics.
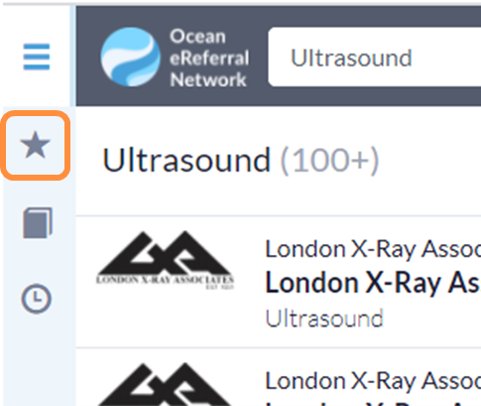
To begin, navigate to the Ocean Healthmap.
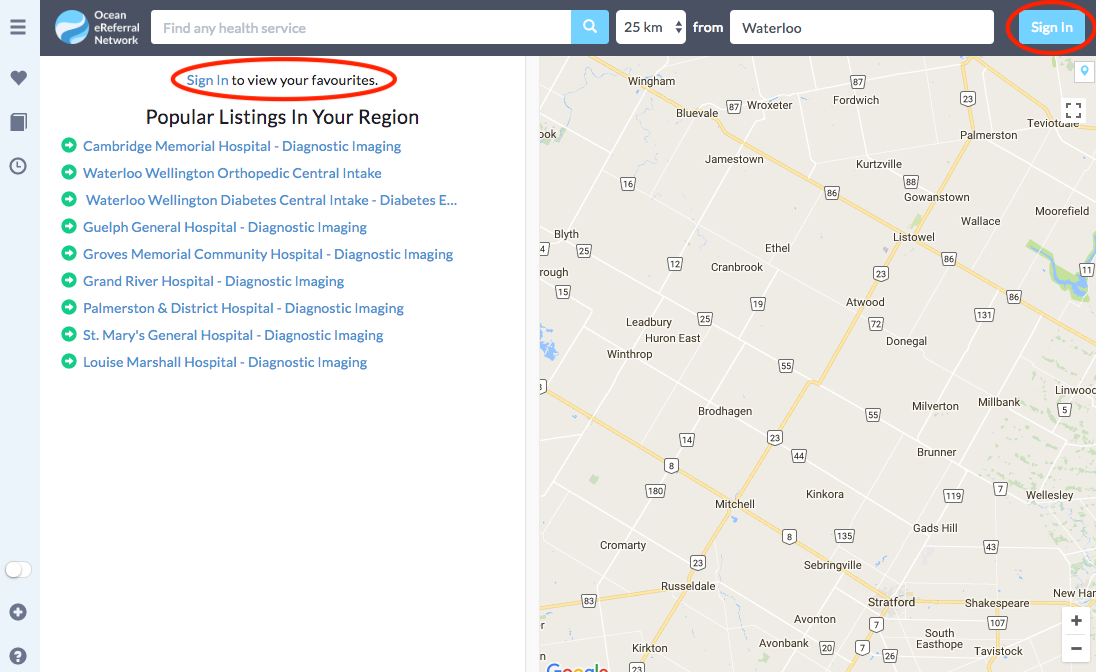
Note: You will not be able to add or manage favourite listings if you are not logged into your Ocean account.
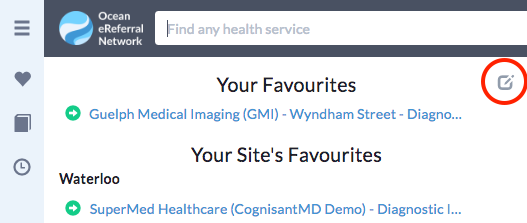
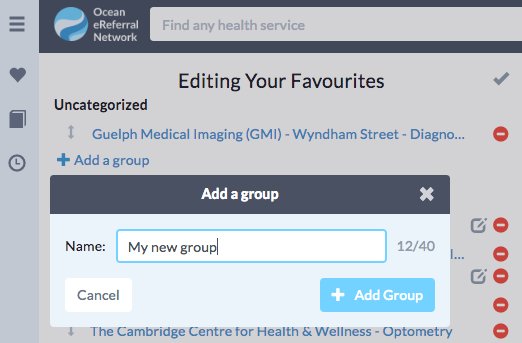
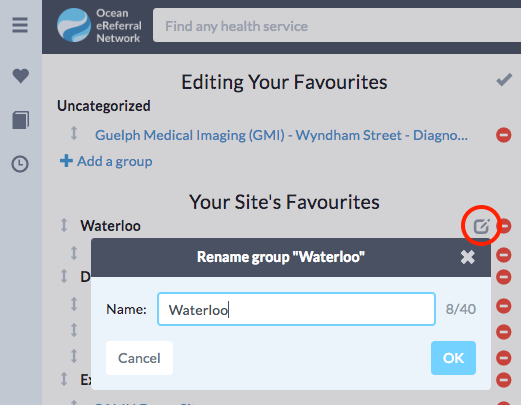
Favourites in any category (“Your Favourites” or “Your Site’s Favourites”) can be reordered, grouped, or deleted by selecting the “Edit” (pencil and paper) icon located in the top right corner of the Favourites panel.
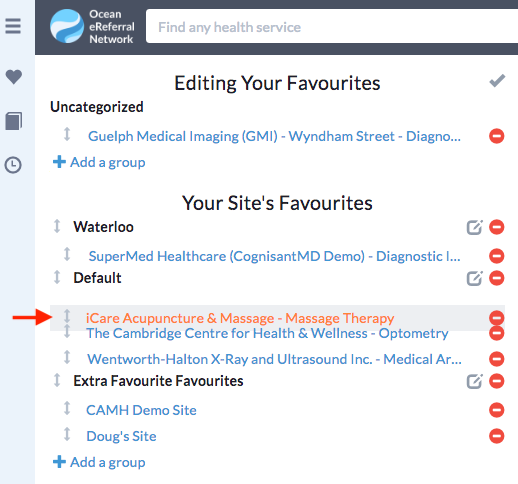
By default, Favourites will be grouped under an “Uncategorized” heading.
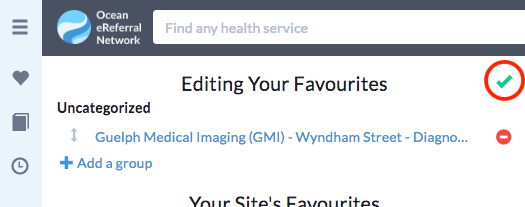
When you are finished making changes to your Favourites, click the “Finish editing” checkmark icon located in the top right of the "Editing Your Favourites" panel. You will then return to the default view state of the Favourites panel.
Review to the relevant guides to learn how to send eReferrals and/or eConsults.
Now that you have finished setting up your Ocean Site to send eConsults and/or eReferrals, check out the Guide to Sending eReferrals and/or the Guide to Sending eConsults.
Any individual that requires access to Ocean must have a free Ocean user account.
Update your eReferral & eConsult settings to indicate that you are Sending Referrals.
Under the "Welcome to Ocean eReferrals!" section, select 'Sending Referrals'.
This hides the 'Configure Referrals' button that is shown when either the 'Receiving Referrals' or 'Sending & Receiving Referrals' option is selected, as those receiver-specific configuration options are not relevant to Ocean Sites who exclusively send referrals.
Note: If you plan to both send and receive eReferrals/eConsults, please complete both the Set Up Your Site to Send eConsults and/or eReferrals guide, and the Set Up Your Site to Receive eConsults and/or eReferrals guide.
Configure which email addresses receive email notifications when eConsults and/or eReferrals that you've sent are changed or updated.
This article describes locations where you can configure your email addresses for eConsult and/or eReferral notifications. To learn more about the rules/logic that Ocean uses to determine which email address to send the notifications to, please refer to "Where do eReferral notification emails get sent to?".
This is the personal email address associated with each user with an Ocean account.
This is the email address that generally receives clinical notifications, such secure message notifications (patient responses, eForm completions, etc.).
This is the email address of the sender that will be sent consults and/or referral notifications, such as eReferral booking updates.
You have 4 preferred language options to choose from when receiving referral email notifications as a sender. Select: English Only, French Only, Bilingual (English Frist), Bilingual (French Frist).
If you work with an MOA, receptionist, nurse, resident, or student who will be sending eConsults/eReferrals on your behalf, you can to invite them to your Ocean Site and set them as a Clinical Delegate.
*This step is an optional step in setting up your Ocean Site to send Ocean eConsults/eReferrals. The steps in this article only need to be followed if you would like to set up another Ocean user who will be sending eConsults and/or eReferrals on another user's behalf.
If you do not have Ocean Site Admin access, but would like to manage the Clinical Delegates associated with your own individual Ocean user account, please see: How do I set a Clinical Delegate user for my Ocean user account?
A Clinical Delegate has the ability to send eReferrals/eConsults on behalf of another Ocean user. There is no limit to the number of Clinical Delegates that an Ocean user can have.
Each person who will be sending Ocean eConsults and/or Ocean eReferrals will need to link their EMR and Ocean user accounts.
This is especially important for auditing and tracking purposes.
Each sender must link their EMR user account to their Ocean user account by following the steps below.
This will allow individual users to send Ocean eConsults and/or Ocean eReferrals as well as enable alerts and track activity.
Note: This process is only applicable if your EMR is integrated with Ocean. If your EMR is not integrated with Ocean, you can skip these steps.
After successfully signing in, your EMR username will be linked to your Ocean user account.
Tip: You can confirm the linkage between your Ocean user account and your EMR user account within your Ocean user account settings.
If your clinic most often sends eConsults and/or eReferrals to a specific destination clinic or group of clinics, you may want to save these sites as Favourites. This will allow for easy and efficient sending of Ocean eConsults and/or eReferrals to your preferred clinics.
*This step is an optional part of setting your site up to easily and efficiently send Ocean eConsults and/or eReferrals to preferred destination clinics.
To begin, navigate to the Ocean Healthmap.
Note: You will not be able to add or manage favourite listings if you are not logged into your Ocean account.
Favourites in any category (“Your Favourites” or “Your Site’s Favourites”) can be reordered, grouped, or deleted by selecting the “Edit” (pencil and paper) icon located in the top right corner of the Favourites panel.
By default, Favourites will be grouped under an “Uncategorized” heading.
When you are finished making changes to your Favourites, click the “Finish editing” checkmark icon located in the top right of the "Editing Your Favourites" panel. You will then return to the default view state of the Favourites panel.
Review to the relevant guides to learn how to send eReferrals and/or eConsults.
Now that you have finished setting up your Ocean Site to send eConsults and/or eReferrals, check out the Guide to Sending eReferrals and/or the Guide to Sending eConsults.