Learn how to add appointment details to eReferrals in order to update patients and referring providers with appointment dates, times, mediums, and other scheduling details.
Appointment information can be added, edited, or removed by referral recipients at any point in an eReferral's lifecycle. This allows for patient and referring providers to stay up to date with the latest appointment dates, times, mediums, and other scheduling details.
Note: The patient must have a valid Health Number associated with their referral for Ocean to sync the correct appointment details from PS Suite via the Custom Form.
Download and Install the Custom Form
Note: Downloading and installing the custom form is a one-time step for each workstation.
- Download the "Ocean eReferral Appointment Notification Custom Form" (.cfm file) by clicking the following button:
Ocean eReferral Appointment Notification Custom Form - Install the custom form in PS Suite. For instructions on adding a custom form file, refer to the steps outlined in our instructions for installing the Ocean Toolbar and Custom Form: Download & Install the Ocean Custom Form and Toolbar)
Schedule the Appointment and Update the eReferral
- Book the patient's appointment into the PS Suite schedule.
-
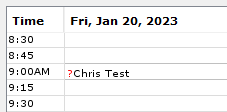
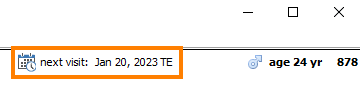
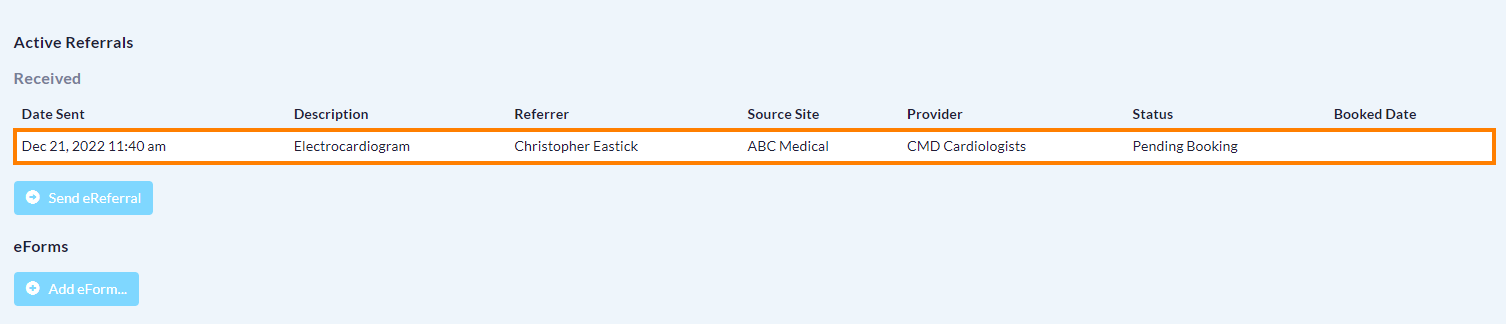
- Open the patient's chart and verify that the "next visit" area in the top of the chart lists the date of the newly booked appointment.
-
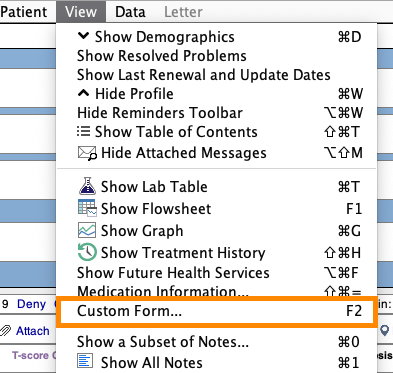
- From the menu bar in the chart, select "View" > "Custom Form" (or use the keyboard shortcut F2) to open the custom form window
-
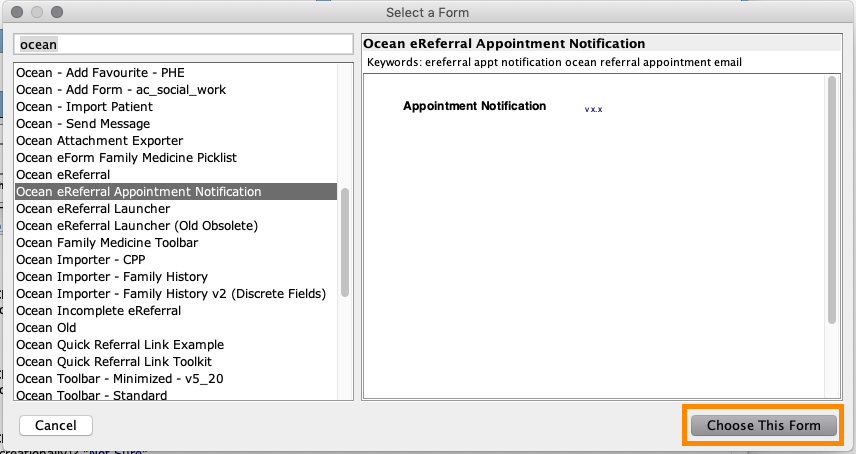
- Locate and select "Ocean eReferral Appointment Notification" from the list and click the "Choose This Form" button.
-
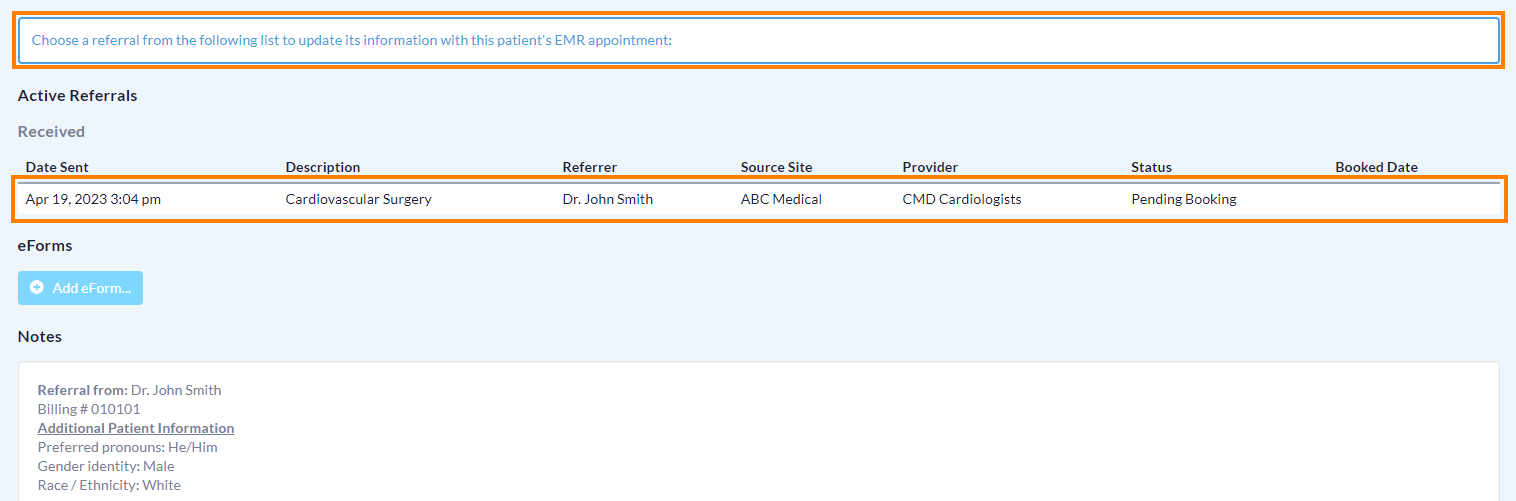
- The custom form will open a new browser window showing the Patient's Dashboard and their relevant referrals. Select the appropriate referral.
-

-
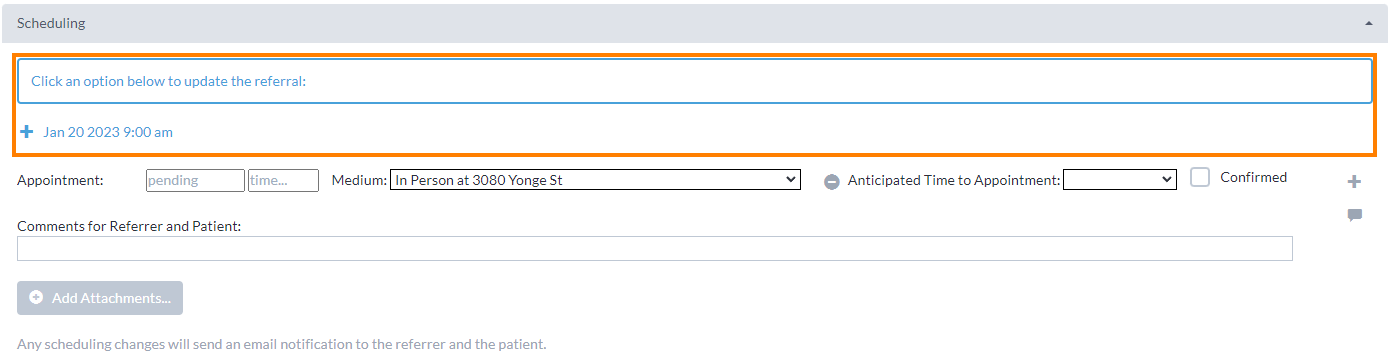
The details from the appointment booked in the EMR will automatically be available for selection within the 'Scheduling' area. Select the appointment date to add it to the referral.
Alternatively, if an appointment cannot be scheduled right away you can communicate an anticipated wait time to the patient and referrer by using the 'Anticipated Time to Appointment' function.
Note: Referrals must be accepted in order to specify an anticipated wait time. The referrer and patient will receive an email notification informing them of the anticipated wait time.
-
-
Optionally, update the 'Appointment Label', the 'Medium', and the 'Confirmed' checkbox if the date and time were confirmed by the patient at the time of booking.
Tip: You can customize your Appointment Labels and the set a default Medium in your Directory Listing settings.
-

- To add more than one appointment, press the '+' button on the right hand side. To cancel or remove an appointment, select the '-' button.
-

-
Type any comments for the referrer and patient into the text box, and press 'Add Attachments' to include any file attachments.
Tip: You can create canned booking comments to increase efficiency.
-

-
Select either 'Save' or 'Save & Close'.
The referral will automatically move to the either 'Booked Unconfirmed' or 'Booked Confirmed' folder depending on the confirmation status, and an email notification will be sent to the referrer and/or patient containing the details of the scheduled appointment, the comments and attachments, and the ability to confirm the appointment (if applicable).
-

Schedule the Appointment
- Book the patient's appointment into the Med Access schedule.
-

Update the Referral
- Open the patient's chart in the EMR, and press the 'Launch' button.
-

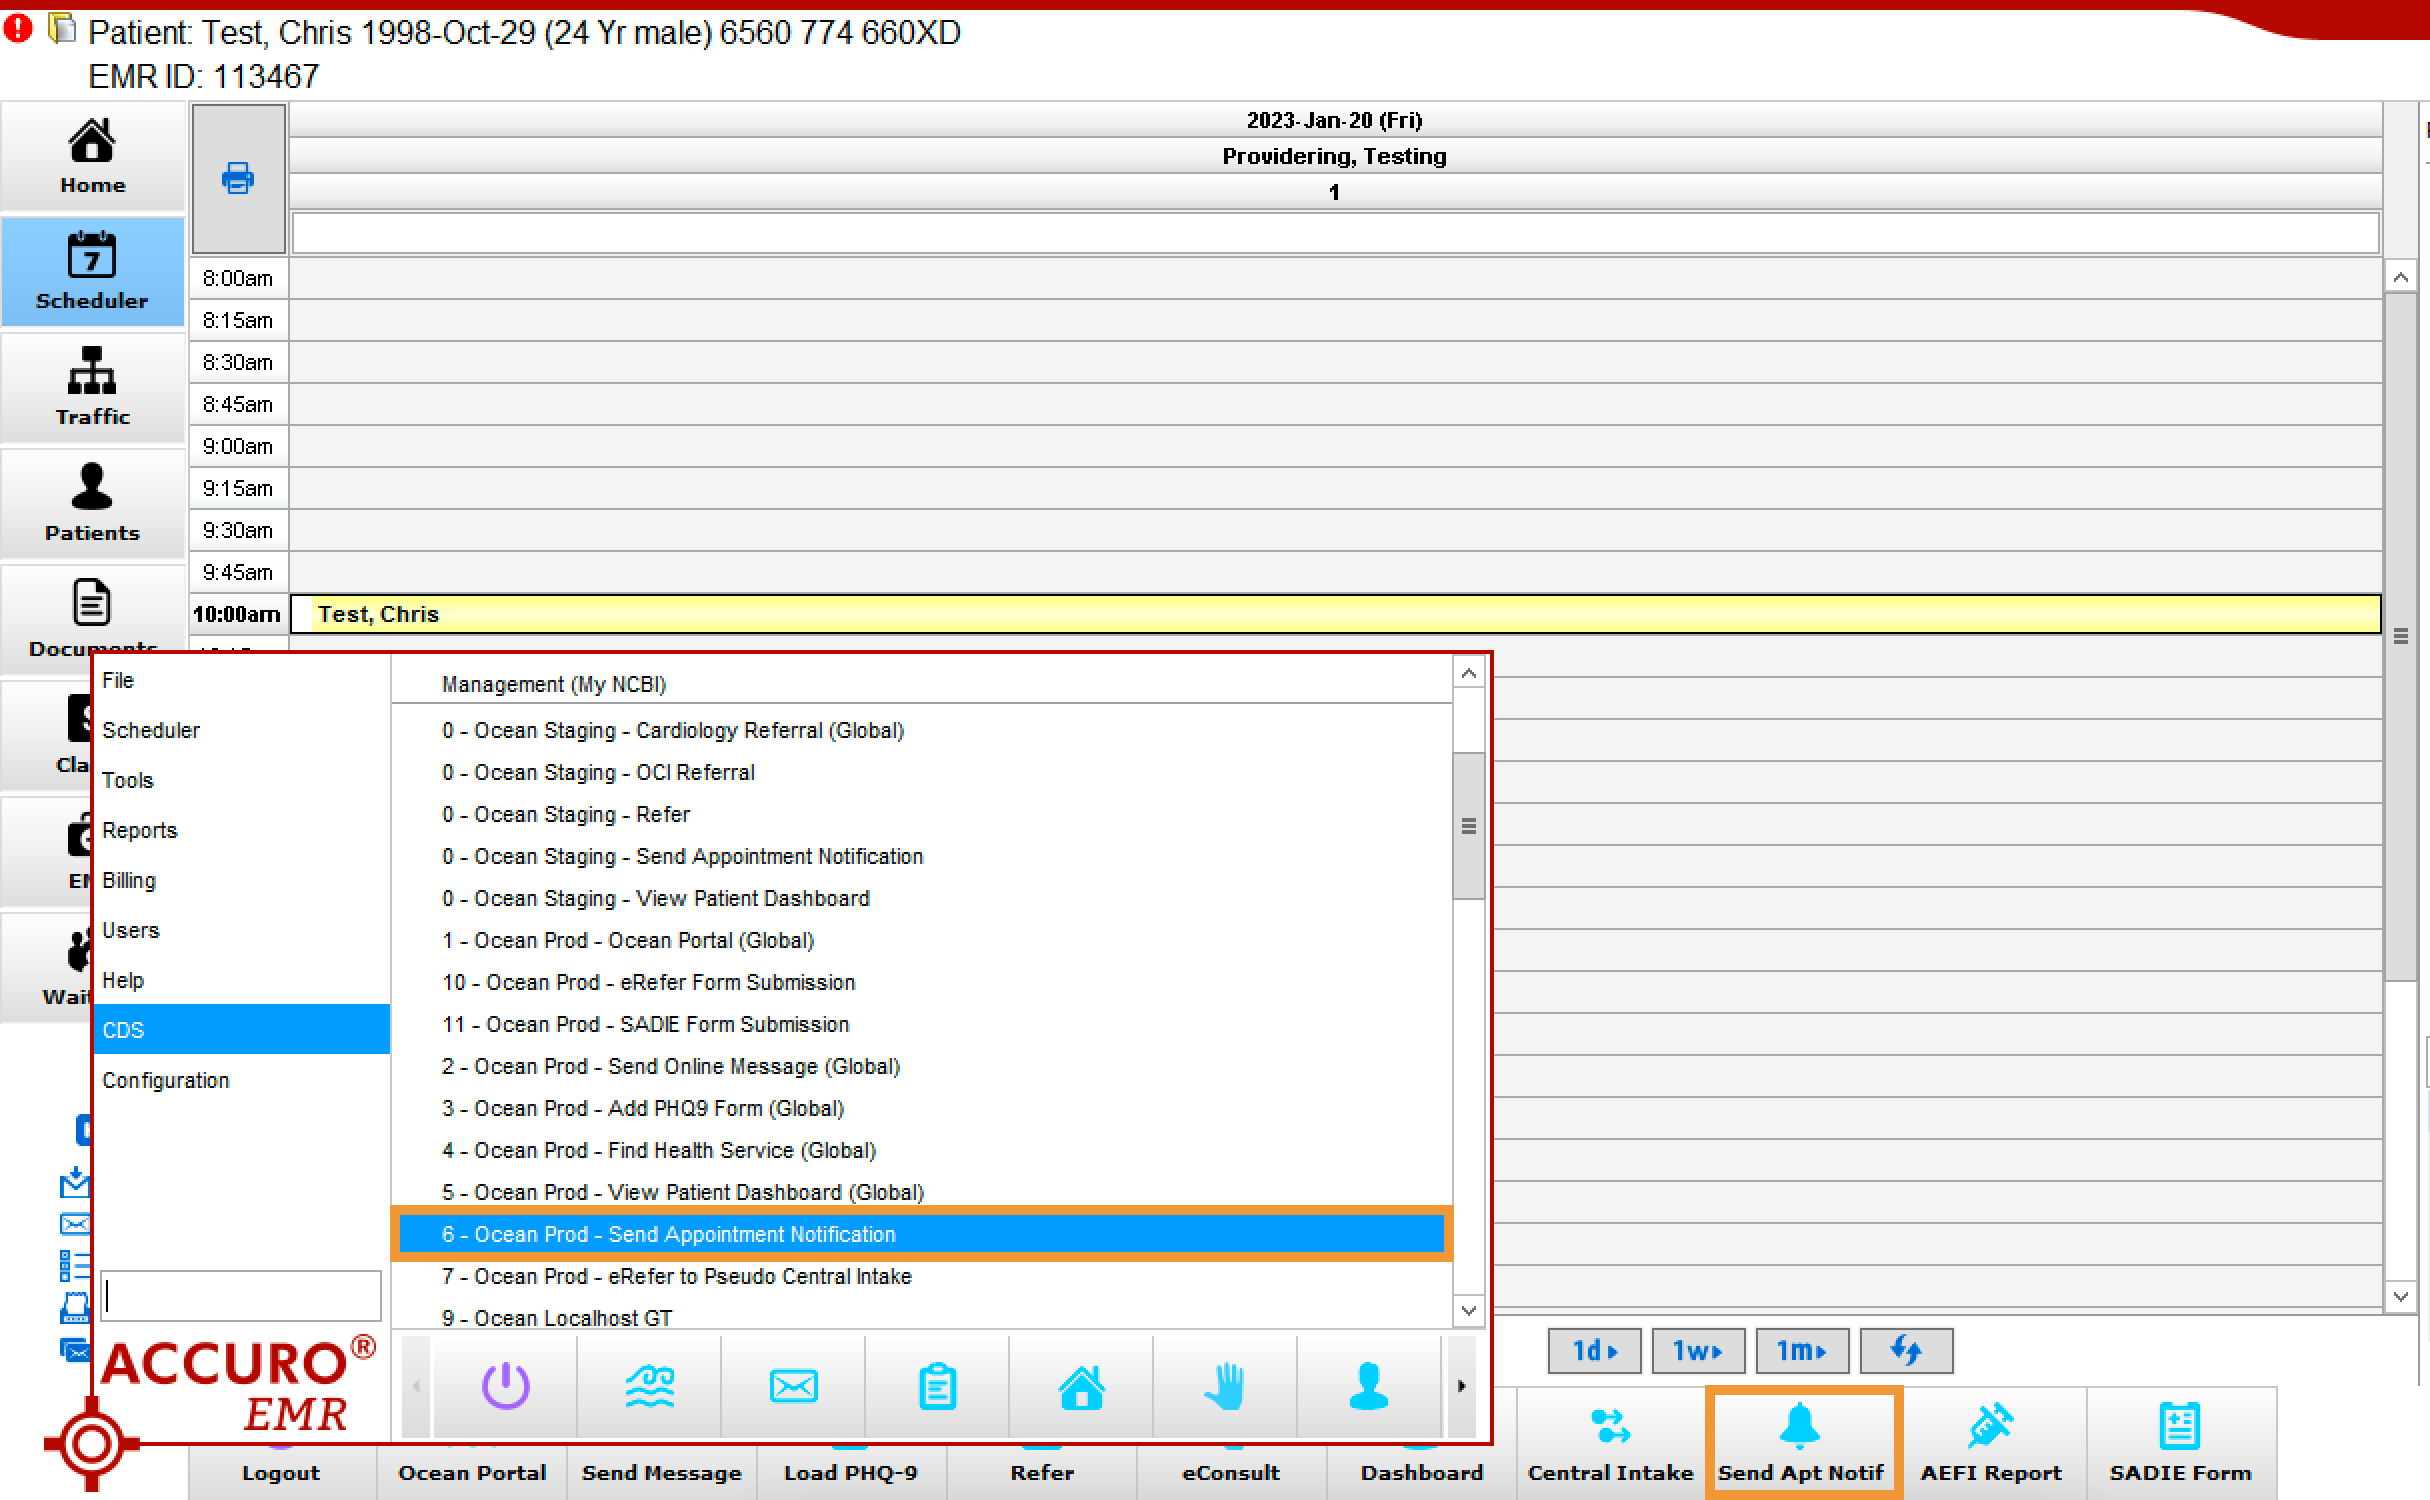
- Locate the 'Ocean' extension module, press the three dots on the right, and then select 'Send Appointment Notification'.
-

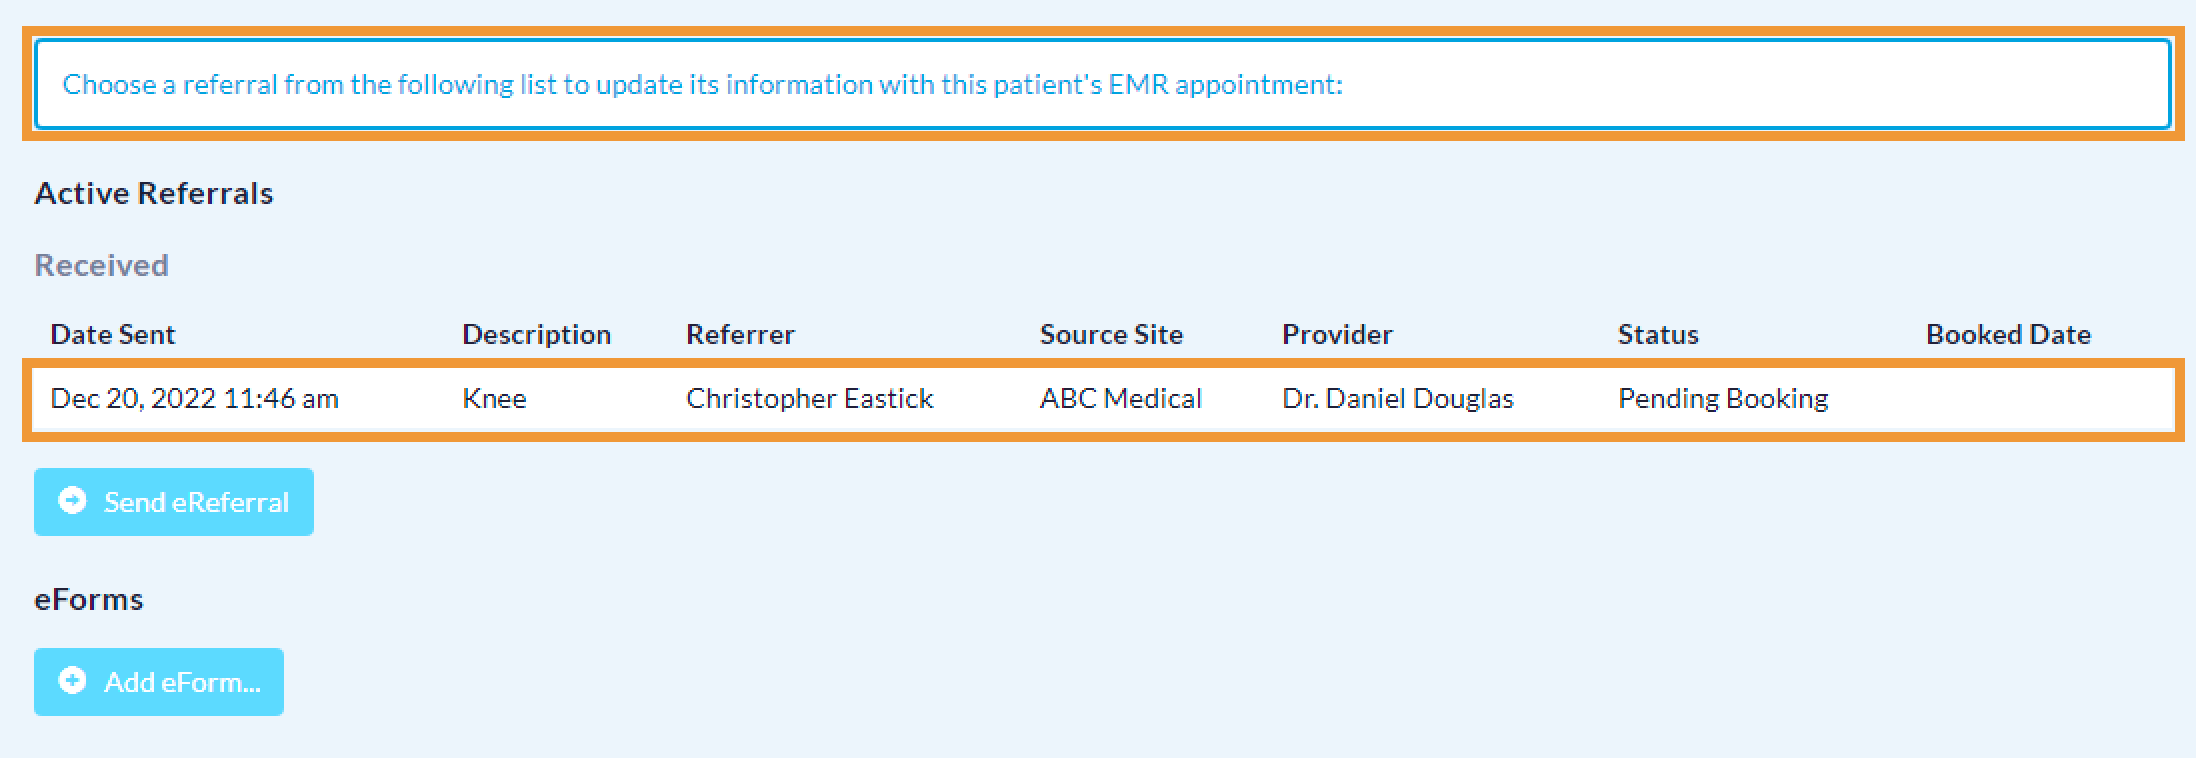
- A new tab will open showing the Patient's Dashboard and their relevant referrals. Select the appropriate referral by clicking on it.
-
-
The details from the appointment booked in the EMR will automatically be available for selection within the 'Scheduling' area. Select the appointment date to add it to the referral.
Alternatively, if an appointment cannot be scheduled right away you can communicate an anticipated wait time to the patient and referrer by using the 'Anticipated Time to Appointment' function.
Note: Referrals must be accepted in order to specify an anticipated wait time. The referrer and patient will receive an email notification informing them of the anticipated wait time.
-

-
Optionally, update the 'Appointment Label', the 'Medium', and the 'Confirmed' checkbox if the date and time were confirmed by the patient at the time of booking.
Tip: You can customize your Appointment Labels and the set a default Medium in your Directory Listing settings.
-
- To add more than one appointment, press the '+' button on the right hand side. To cancel or remove an appointment, select the '-' button.
-
-
Type any comments for the referrer and patient into the text box, and press 'Add Attachments' to include any file attachments.
Tip: You can create canned booking comments to increase efficiency.
-
-
Select either 'Save' or 'Save & Close'.
The referral will automatically move to the either 'Booked Unconfirmed' or 'Booked Confirmed' folder depending on the confirmation status, and an email notification will be sent to the referrer and/or patient containing the details of the scheduled appointment, the comments and attachments, and the ability to confirm the appointment (if applicable).
-
Configure the Send Appointment Notification CDS Link
Note: Configuring the CDS link is a one-time step for each EMR user.
For instructions on setting up the 'Send Appointment Notification' CDS link, refer to this support article.
Schedule the Appointment and Update the eReferral
- Select the relevant patient in Accuro.
-
- Book the patient's appointment in the Accuro schedule.
-
- Select the Send Appointment Notification CDS link or the equivalent user-friendly button.
- The Patient Dashboard will launch in a new window, and you will be prompted to select the relevant referral to update.
-
The details from the appointment booked in the EMR will automatically be available for selection within the 'Scheduling' area. Select the appointment date to add it to the referral.
Alternatively, if an appointment cannot be scheduled right away you can communicate an anticipated wait time to the patient and referrer by using the 'Anticipated Time to Appointment' function.
Note: Referrals must be accepted in order to specify an anticipated wait time. The referrer and patient will receive an email notification informing them of the anticipated wait time.
-
-
Optionally, update the 'Appointment Label', the 'Medium', and the 'Confirmed' checkbox if the date and time were confirmed by the patient at the time of booking.
Tip: You can customize your Appointment Labels and the set a default Medium in your Directory Listing settings.
-
- To add more than one appointment, press the '+' button on the right hand side. To cancel or remove an appointment, select the '-' button.
-
-
Type any comments for the referrer and patient into the text box, and press 'Add Attachments' to include any file attachments.
Tip: You can create canned booking comments to increase efficiency.
-
-
Select either 'Save' or 'Save & Close'.
The referral will automatically move to the either 'Booked Unconfirmed' or 'Booked Confirmed' folder depending on the confirmation status, and an email notification will be sent to the referrer and/or patient containing the details of the scheduled appointment, the comments and attachments, and the ability to confirm the appointment (if applicable).
-
Create a Shortcut to the Ocean eForm on the OSCAR Pro Schedule
Note: Creating the shortcut to the Ocean eForm is a one-time step.
For instructions on creating a shortuct to the Ocean eForm on the schedule, refer to this supprt article.
Schedule the Appointment and Update the eReferral
- Book the patient's appointment into the OSCAR Pro schedule.
-
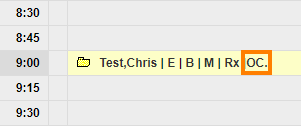
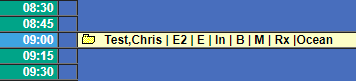
- Press the 'Oc.' shortcut on the appointment to open the Ocean eForm.
- Select 'Update Referral'.
-

- The Patient Dashboard will launch in a new window, and you will be prompted to select the relevant referral to update.
-

-
The details from the appointment booked in the EMR will automatically be available for selection within the 'Scheduling' area. Select the appointment date to add it to the referral.
Alternatively, if an appointment cannot be scheduled right away you can communicate an anticipated wait time to the patient and referrer by using the 'Anticipated Time to Appointment' function.
Note: Referrals must be accepted in order to specify an anticipated wait time. The referrer and patient will receive an email notification informing them of the anticipated wait time.
-
-
Optionally, update the 'Appointment Label', the 'Medium', and the 'Confirmed' checkbox if the date and time were confirmed by the patient at the time of booking.
Tip: You can customize your Appointment Labels and the set a default Medium in your Directory Listing settings.
-
- To add more than one appointment, press the '+' button on the right hand side. To cancel or remove an appointment, select the '-' button.
-
-
Type any comments for the referrer and patient into the text box, and press 'Add Attachments' to include any file attachments.
Tip: You can create canned booking comments to increase efficiency.
-
-
Select either 'Save' or 'Save & Close'.
The referral will automatically move to the either 'Booked Unconfirmed' or 'Booked Confirmed' folder depending on the confirmation status, and an email notification will be sent to the referrer and/or patient containing the details of the scheduled appointment, the comments and attachments, and the ability to confirm the appointment (if applicable).
-
Schedule the Appointment
- Book the patient's appointment into the OSCAR schedule.
-
Update the Referral
- Open the patient's chart in the EMR, and press the 'Patient Summary' button on the Ocean Toolbar.
-

- A new tab will open showing the Patient's Dashboard and their relevant referrals. Select the appropriate referral by clicking on it.
-
-
Within the 'Scheduling' area of the referral, manually add the appointment date and time that matches the appointment booked in the OSCAR schedule.
Alternatively, if an appointment cannot be scheduled right away you can communicate an anticipated wait time to the patient and referrer by using the 'Anticipated Time to Appointment' function.
Note: Referrals must be accepted in order to specify an anticipated wait time. The referrer and patient will receive an email notification informing them of the anticipated wait time.
-

-
Optionally, update the 'Appointment Label', the 'Medium', and the 'Confirmed' checkbox if the date and time were confirmed by the patient at the time of booking.
Tip: You can customize your Appointment Labels and the set a default Medium in your Directory Listing settings.
-
- To add more than one appointment, press the '+' button on the right hand side. To cancel or remove an appointment, select the '-' button.
-
-
Type any comments for the referrer and patient into the text box, and press 'Add Attachments' to include any file attachments.
Tip: You can create canned booking comments to increase efficiency.
-
-
Select either 'Save' or 'Save & Close'.
The referral will automatically move to the either 'Booked Unconfirmed' or 'Booked Confirmed' folder depending on the confirmation status, and an email notification will be sent to the referrer and/or patient containing the details of the scheduled appointment, the comments and attachments, and the ability to confirm the appointment (if applicable).
-
Schedule the Appointment
- Book the patient's appointment into your non-integrated EMR.
Update the Referral
- Log in to the Ocean Portal, and navigate to the 'eReferrals & eConsults' area.
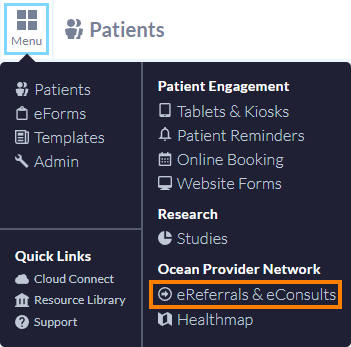
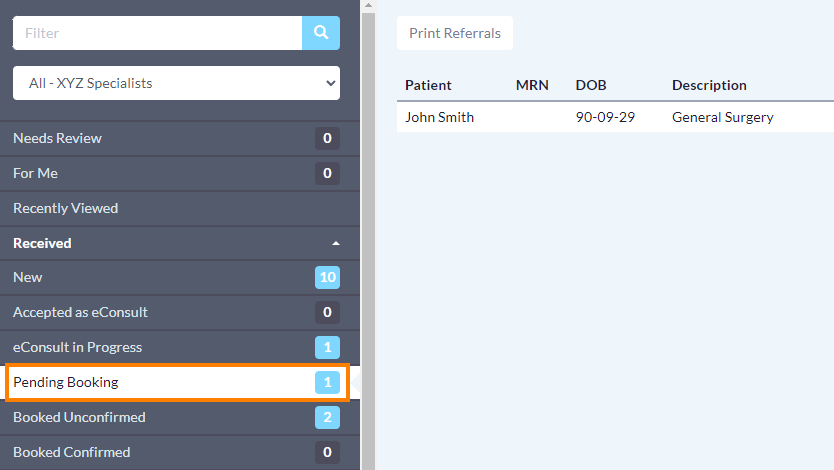
- Locate the relevant patient referral in the 'Pending Booking' folder. Click on it to open it.
-
Within the 'Scheduling' area of the referral, manually add the appointment date and time that matches the appointment booked in the EMR schedule.
Alternatively, if an appointment cannot be scheduled right away you can communicate an anticipated wait time to the patient and referrer by using the 'Anticipated Time to Appointment' function.
Note: Referrals must be accepted in order to specify an anticipated wait time. The referrer and patient will receive an email notification informing them of the anticipated wait time.
-
-
Optionally, update the 'Appointment Label', the 'Medium', and the 'Confirmed' checkbox if the date and time were confirmed by the patient at the time of booking.
Tip: You can customize your Appointment Labels and the set a default Medium in your Directory Listing settings.
-
- To add more than one appointment, press the '+' button on the right hand side. To cancel or remove an appointment, select the '-' button.
-
-
Type any comments for the referrer and patient into the text box, and press 'Add Attachments' to include any file attachments.
Tip: You can create canned booking comments to increase efficiency.
-
-
Select either 'Save' or 'Save & Close'.
The referral will automatically move to the either 'Booked Unconfirmed' or 'Booked Confirmed' folder depending on the confirmation status, and an email notification will be sent to the referrer and/or patient containing the details of the scheduled appointment, the comments and attachments, and the ability to confirm the appointment (if applicable).
-