Please refer to the article Understanding the eReferrals & eConsults View.
Guide to Receiving eReferrals: FHIR Integrations
-
Understanding the eReferrals & eConsults View
Please refer to the article Understanding the eReferrals & eConsults View.
-
Review Incoming eReferrals
Learn how to review incoming eReferrals from your FHIR-integrated EMR or the Ocean Portal.
Review New eReferrals
There are a few ways to review incoming eReferrals, either from the Ocean Portal or through your EMR.
From the EMR
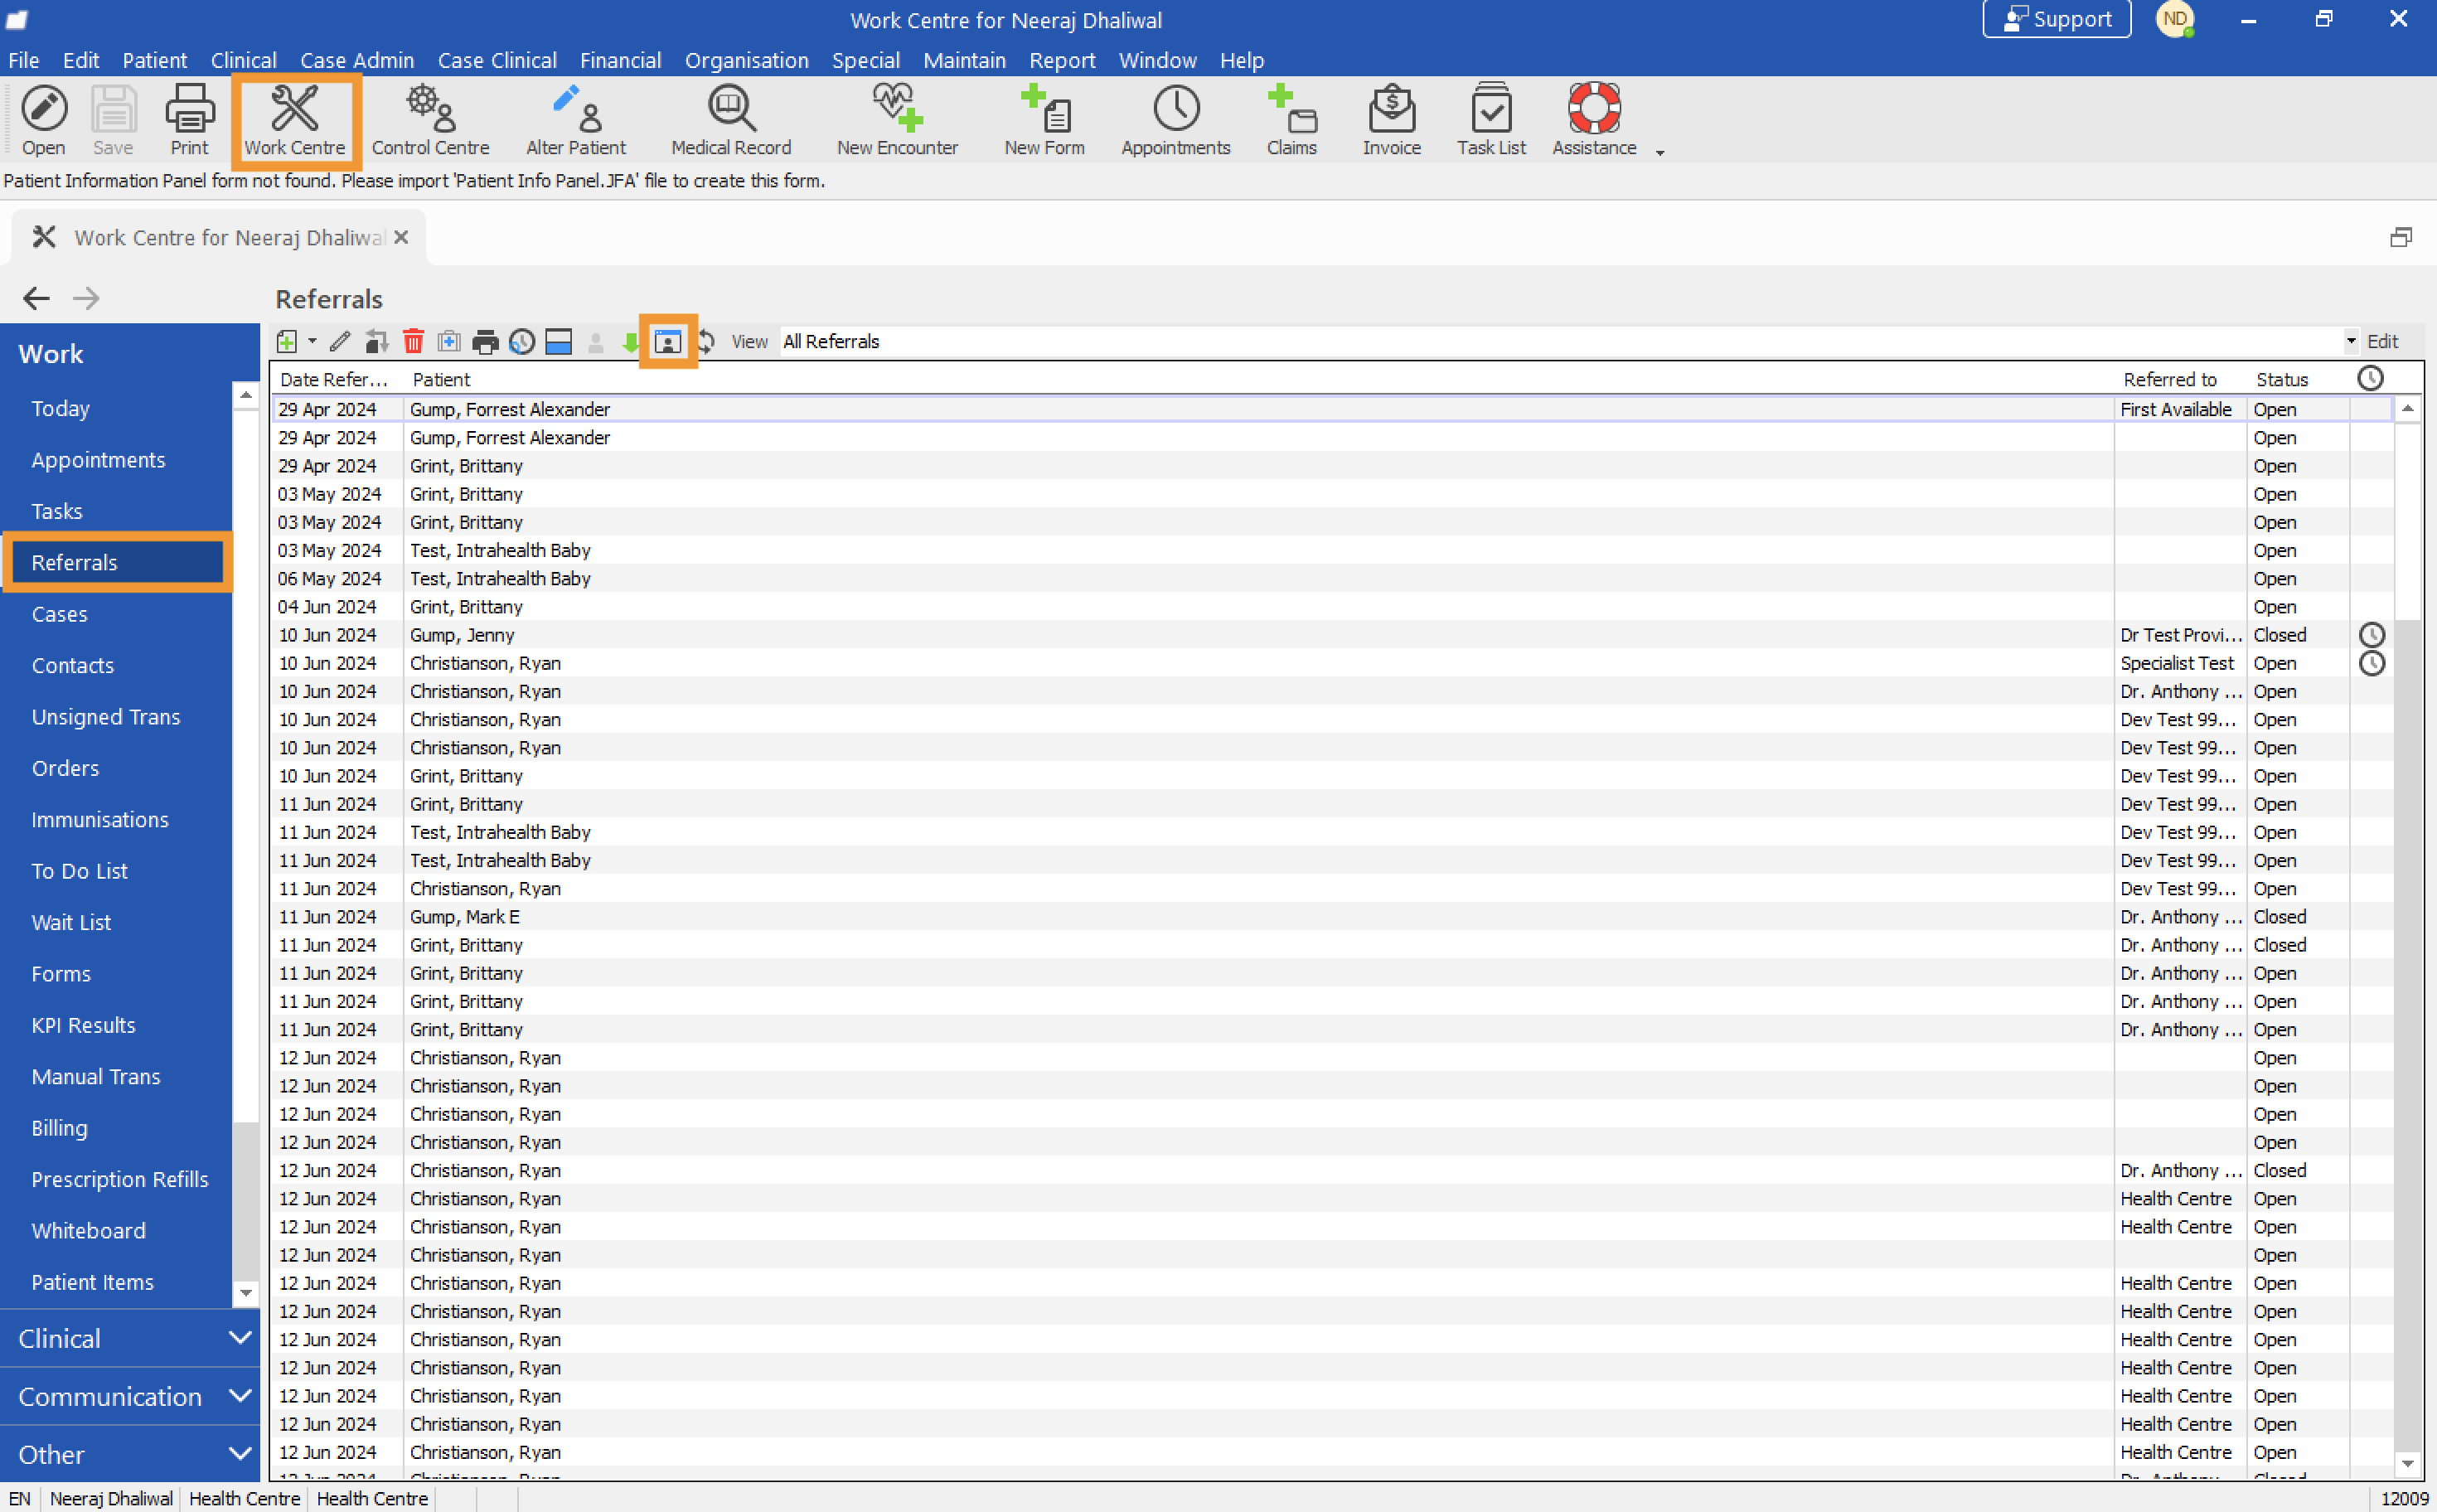
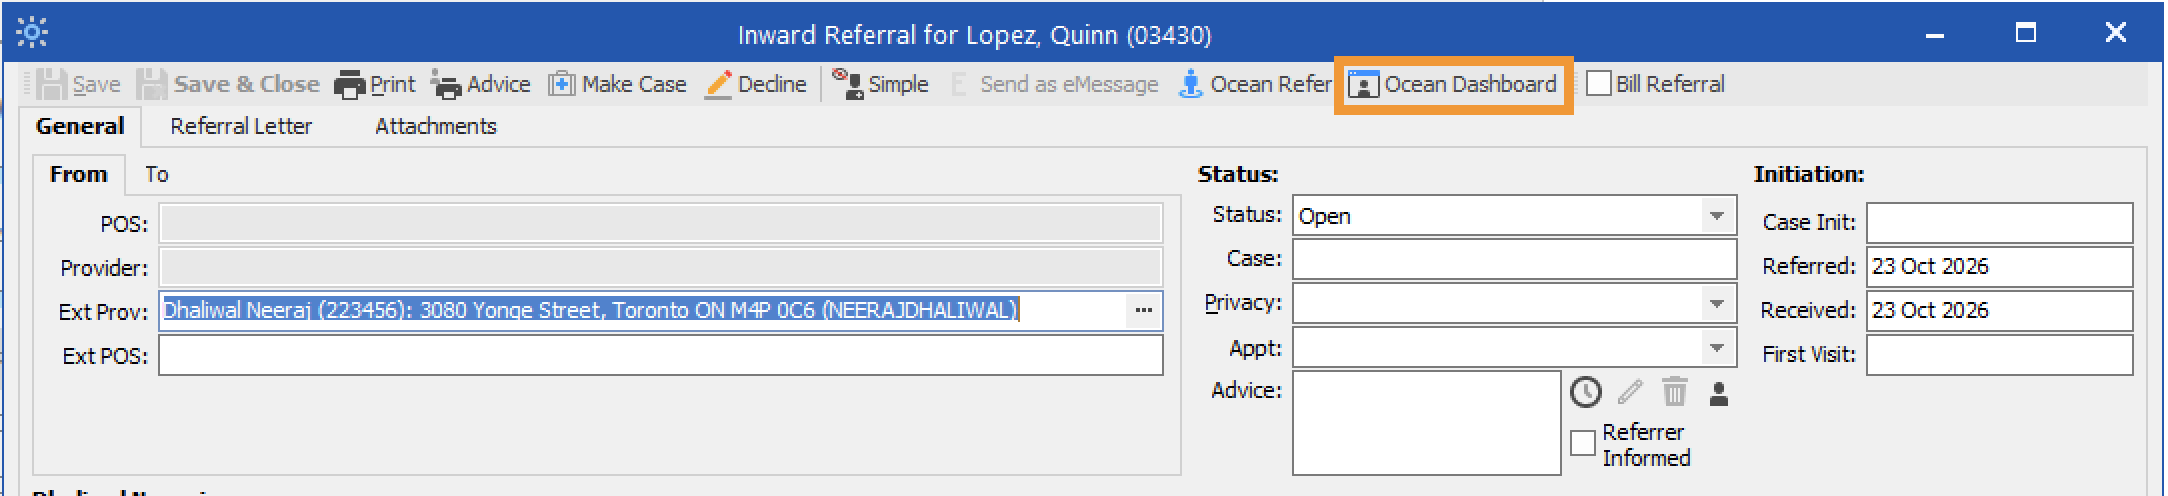
- In Profile, open the Work Centre and select Referrals. Click the 'Ocean Dashboard' icon to access the eReferrals & eConsults area in the Ocean Portal.
From the Ocean Portal
- When you receive a new eReferral, you will receive an email notification based on your notification configuration. Click the link in the email to sign in to the Ocean Portal and view your received eReferrals.

-
Sign in to the Ocean Portal from your web browser and use the menu to navigate to the eReferrals & eConsults area.
Locate the eReferral under the Received tab and in the New status folder. Click the referral to open it and view more details.
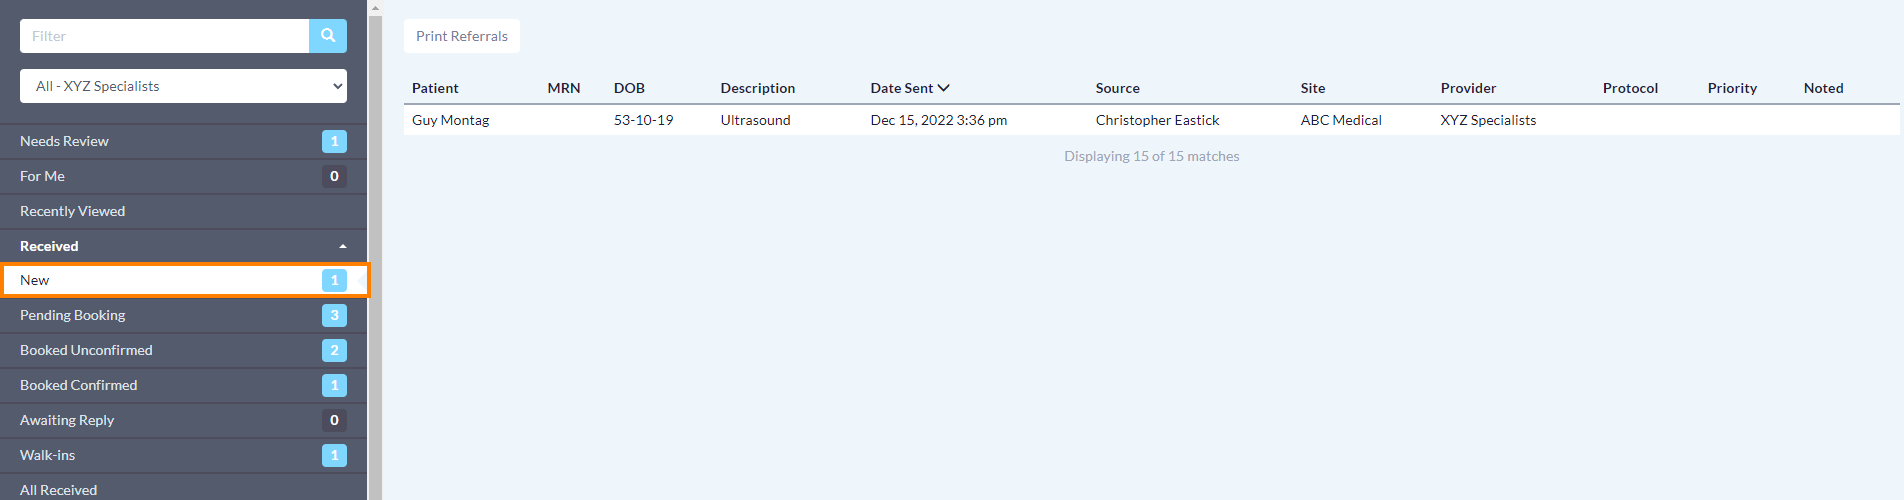
Tip: Certain columns can be used to sort your referrals in ascending or descending order. Click a column header to change the sorting order.
Match Incoming eReferrals to Patients in the EMR
Before actioning an eReferral, check that it is matched to the correct patient chart in Profile. A referral will be unmatched if the patient does not yet have a chart in the EMR or if identifying information is missing.
Review Unmatched Referrals
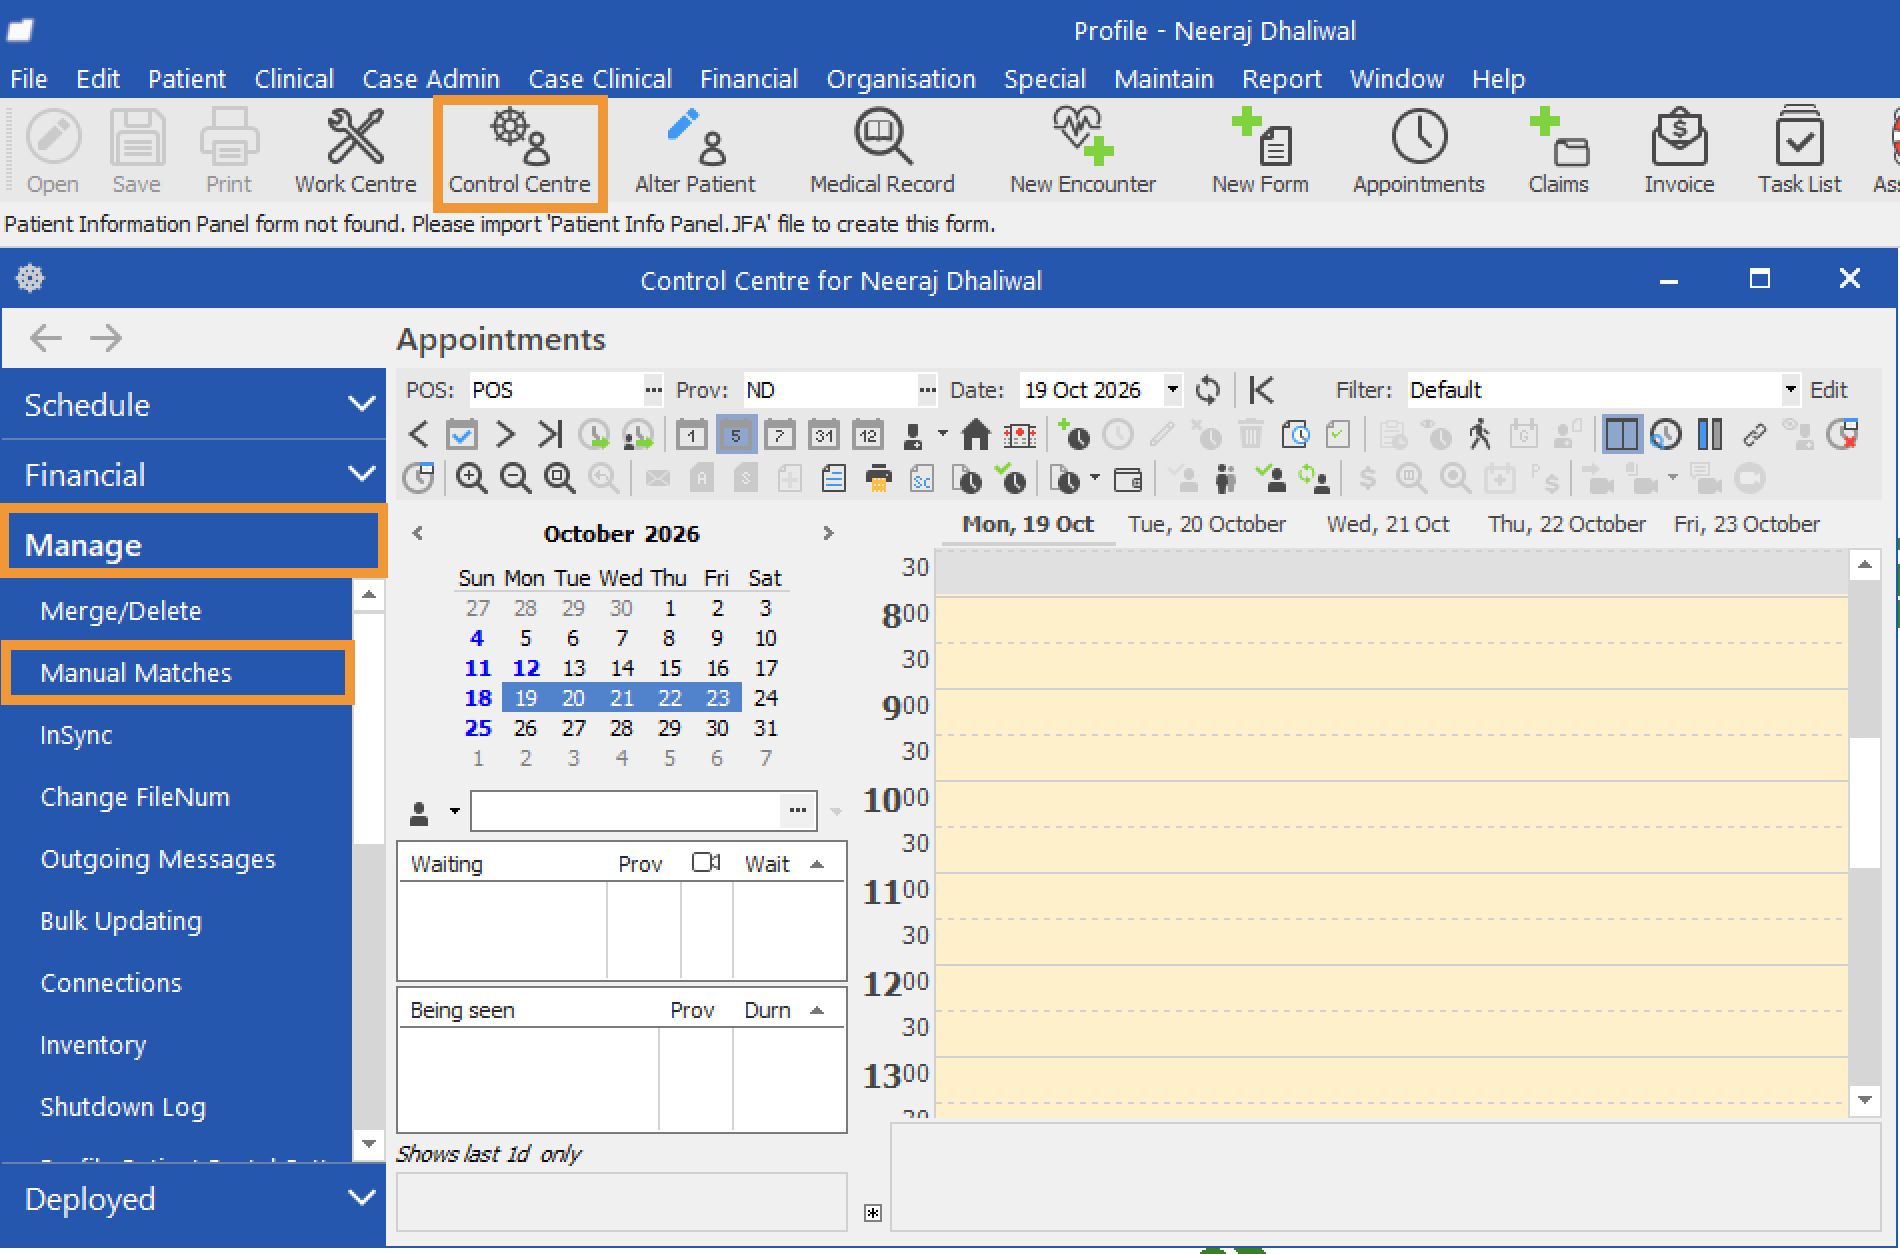
- Open the Control Centre in Profile. Open the 'Manage' dropdown in the left sidebar and select 'Manual Matches'.
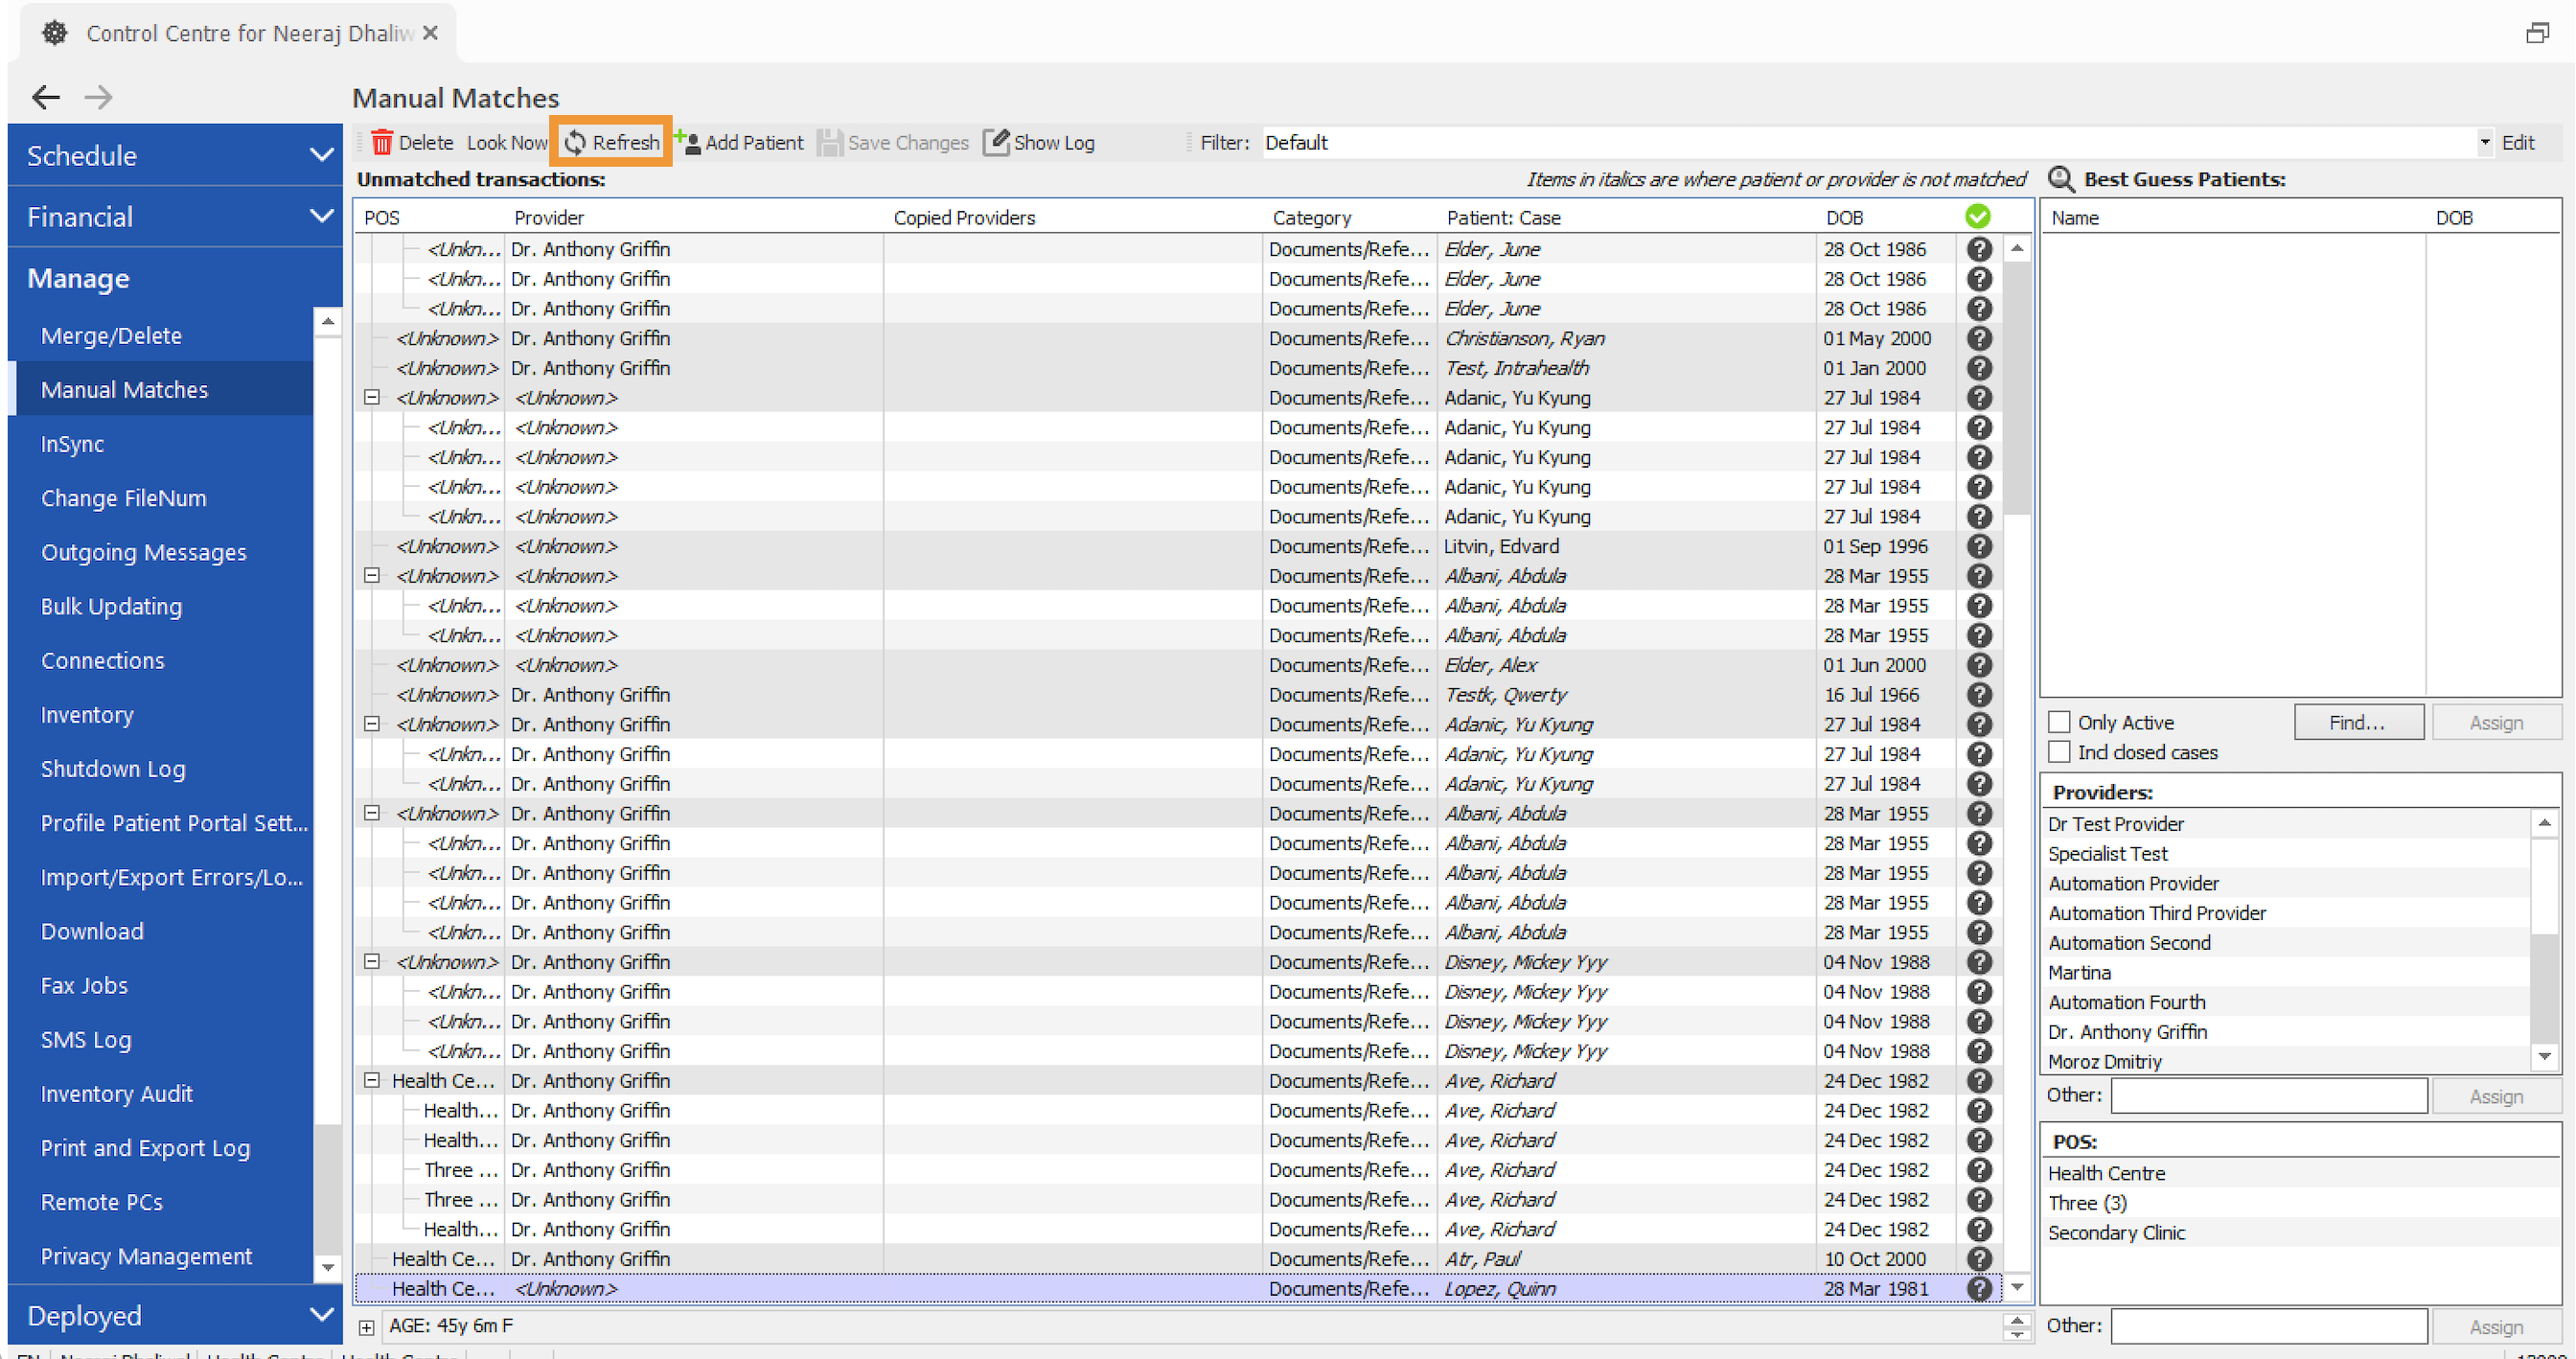
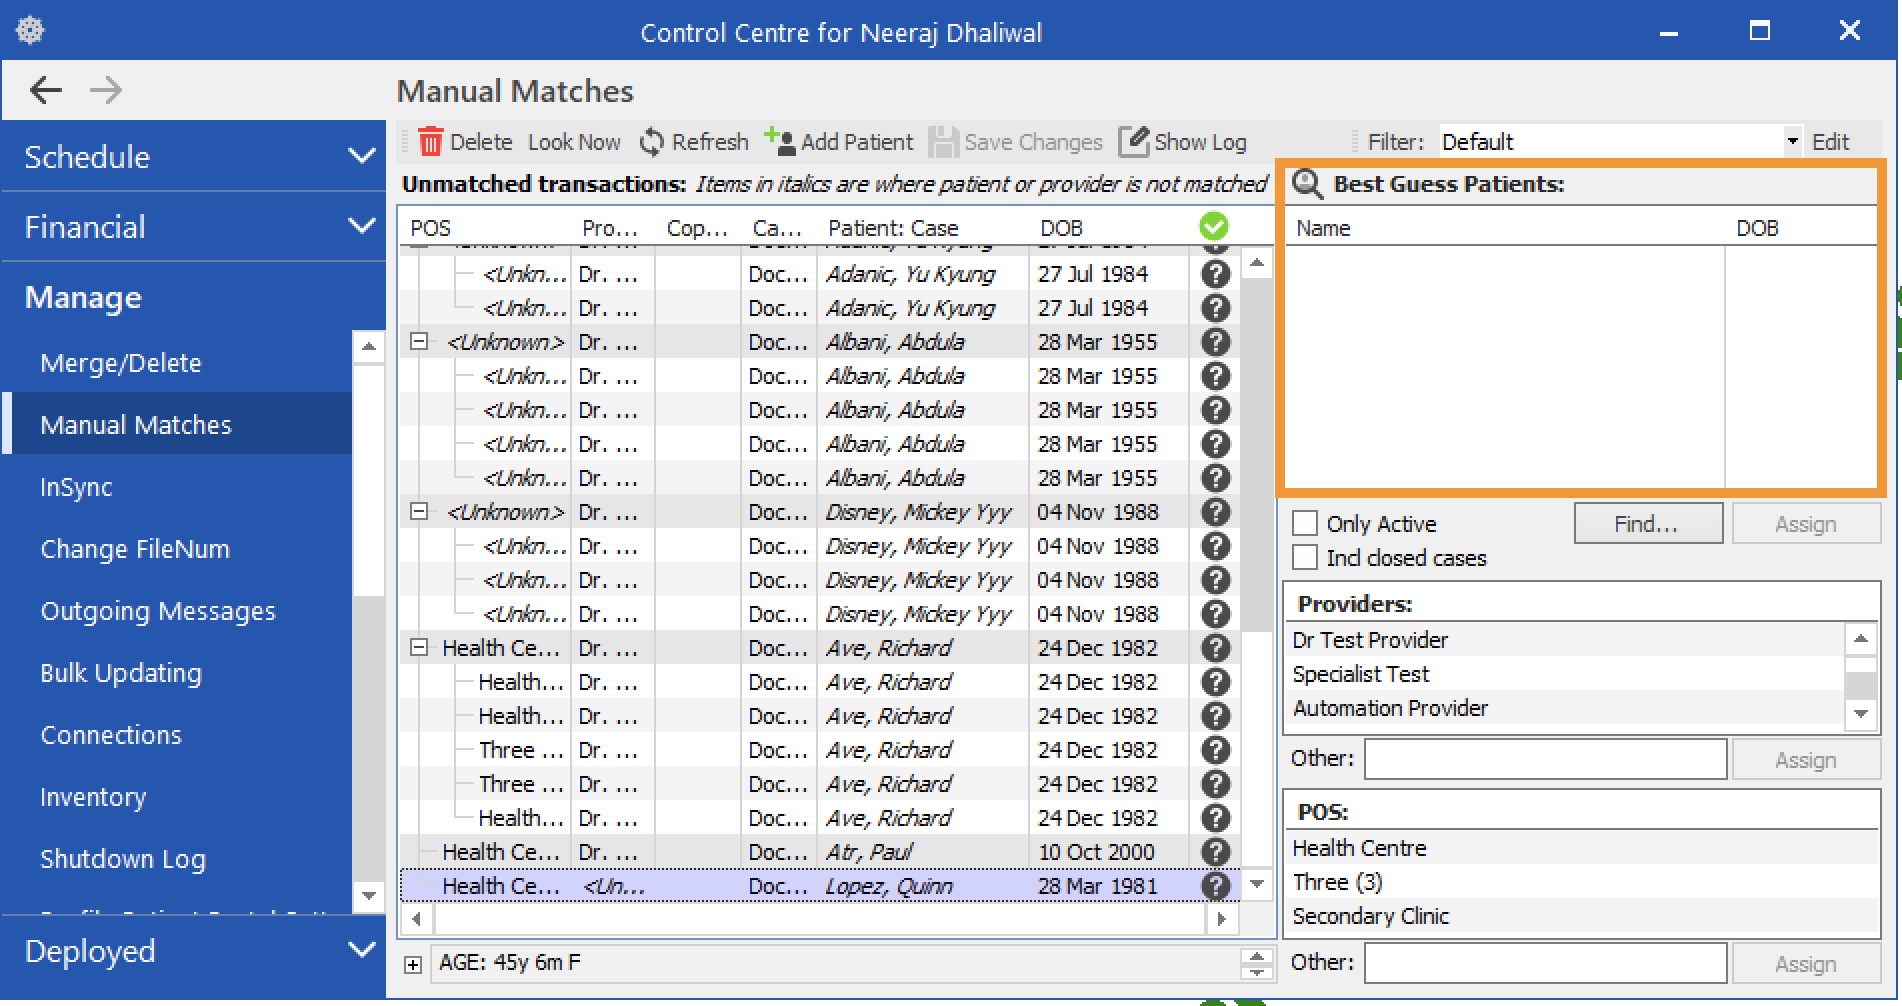
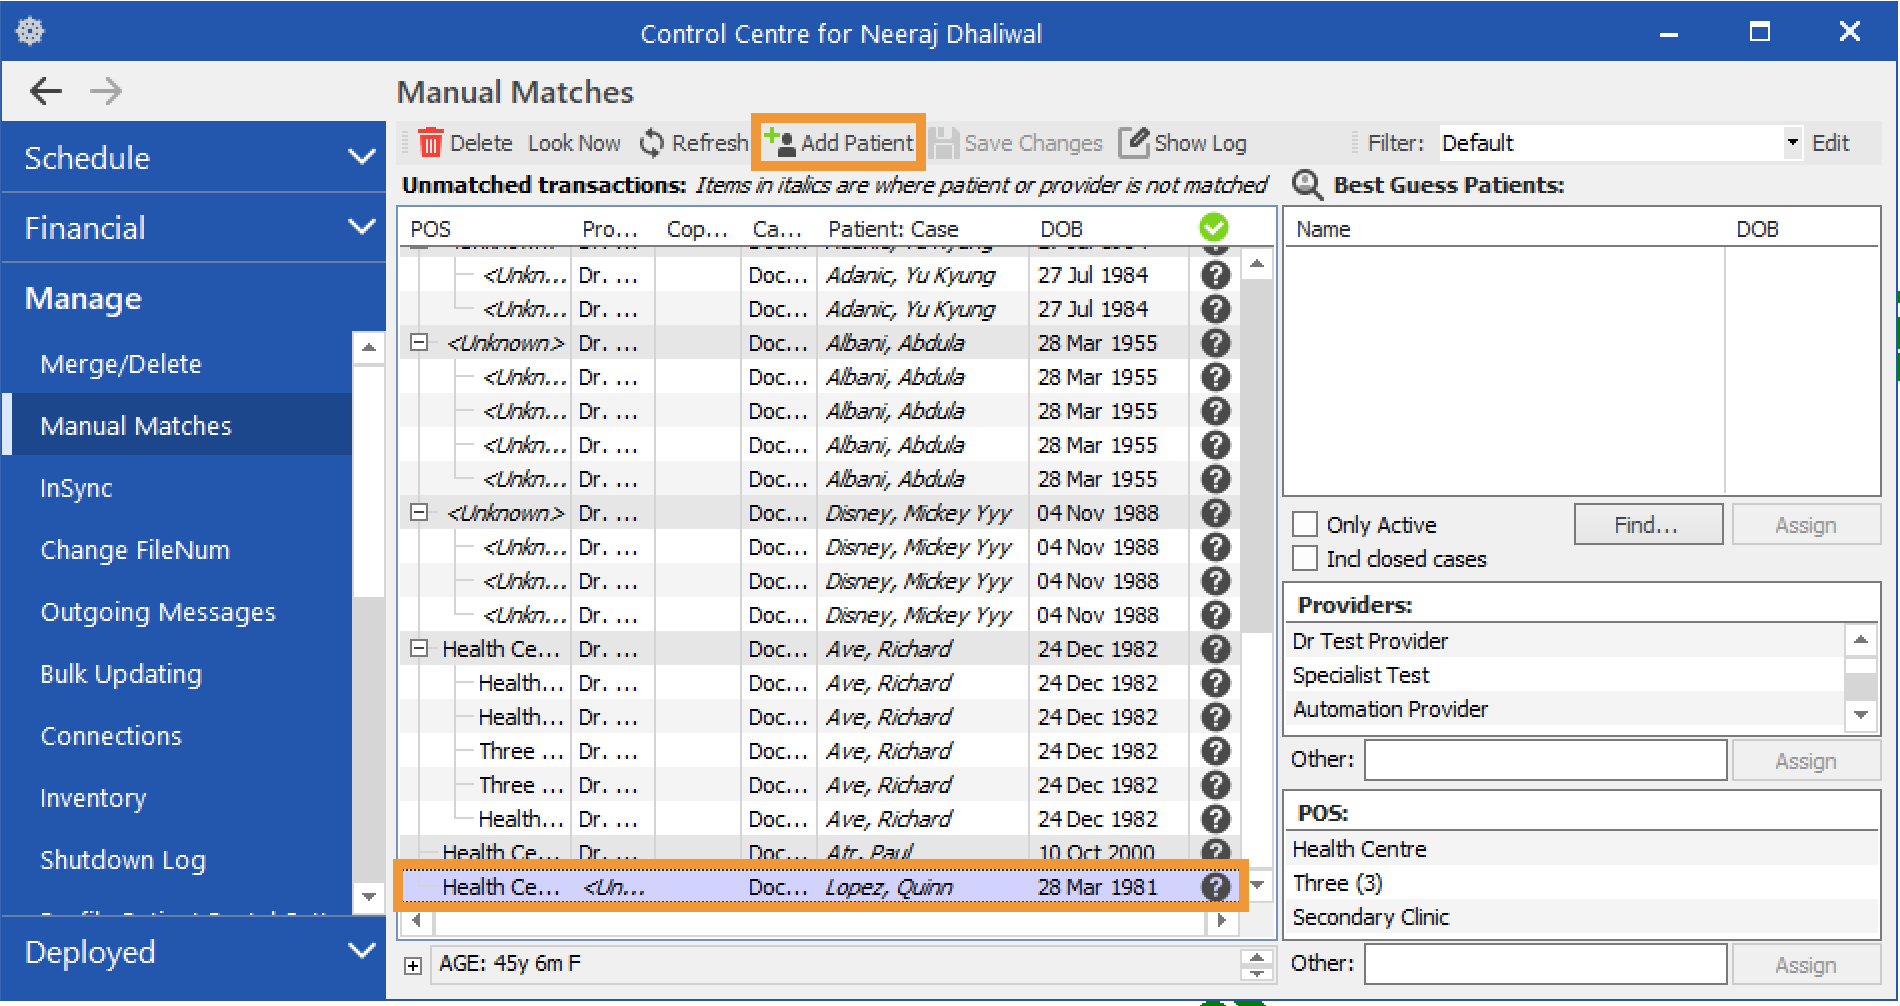
- Under Unmatched transactions, locate the eReferral you want to process using the patient's name or date of birth. If the referral is not listed, click 'Refresh'. Click the applicable row so that it is highlighted in purple.
Create a Patient Chart When Needed
- If the patient's name appears in the Best Guess Patients section, they have a matching chart in Profile and you can skip this section. If the section is empty, the patient does not have an existing chart in Profile.
To create a patient chart, follow these steps:
- Ensure that the patient's referral is selected, and then click 'Add Patient'.
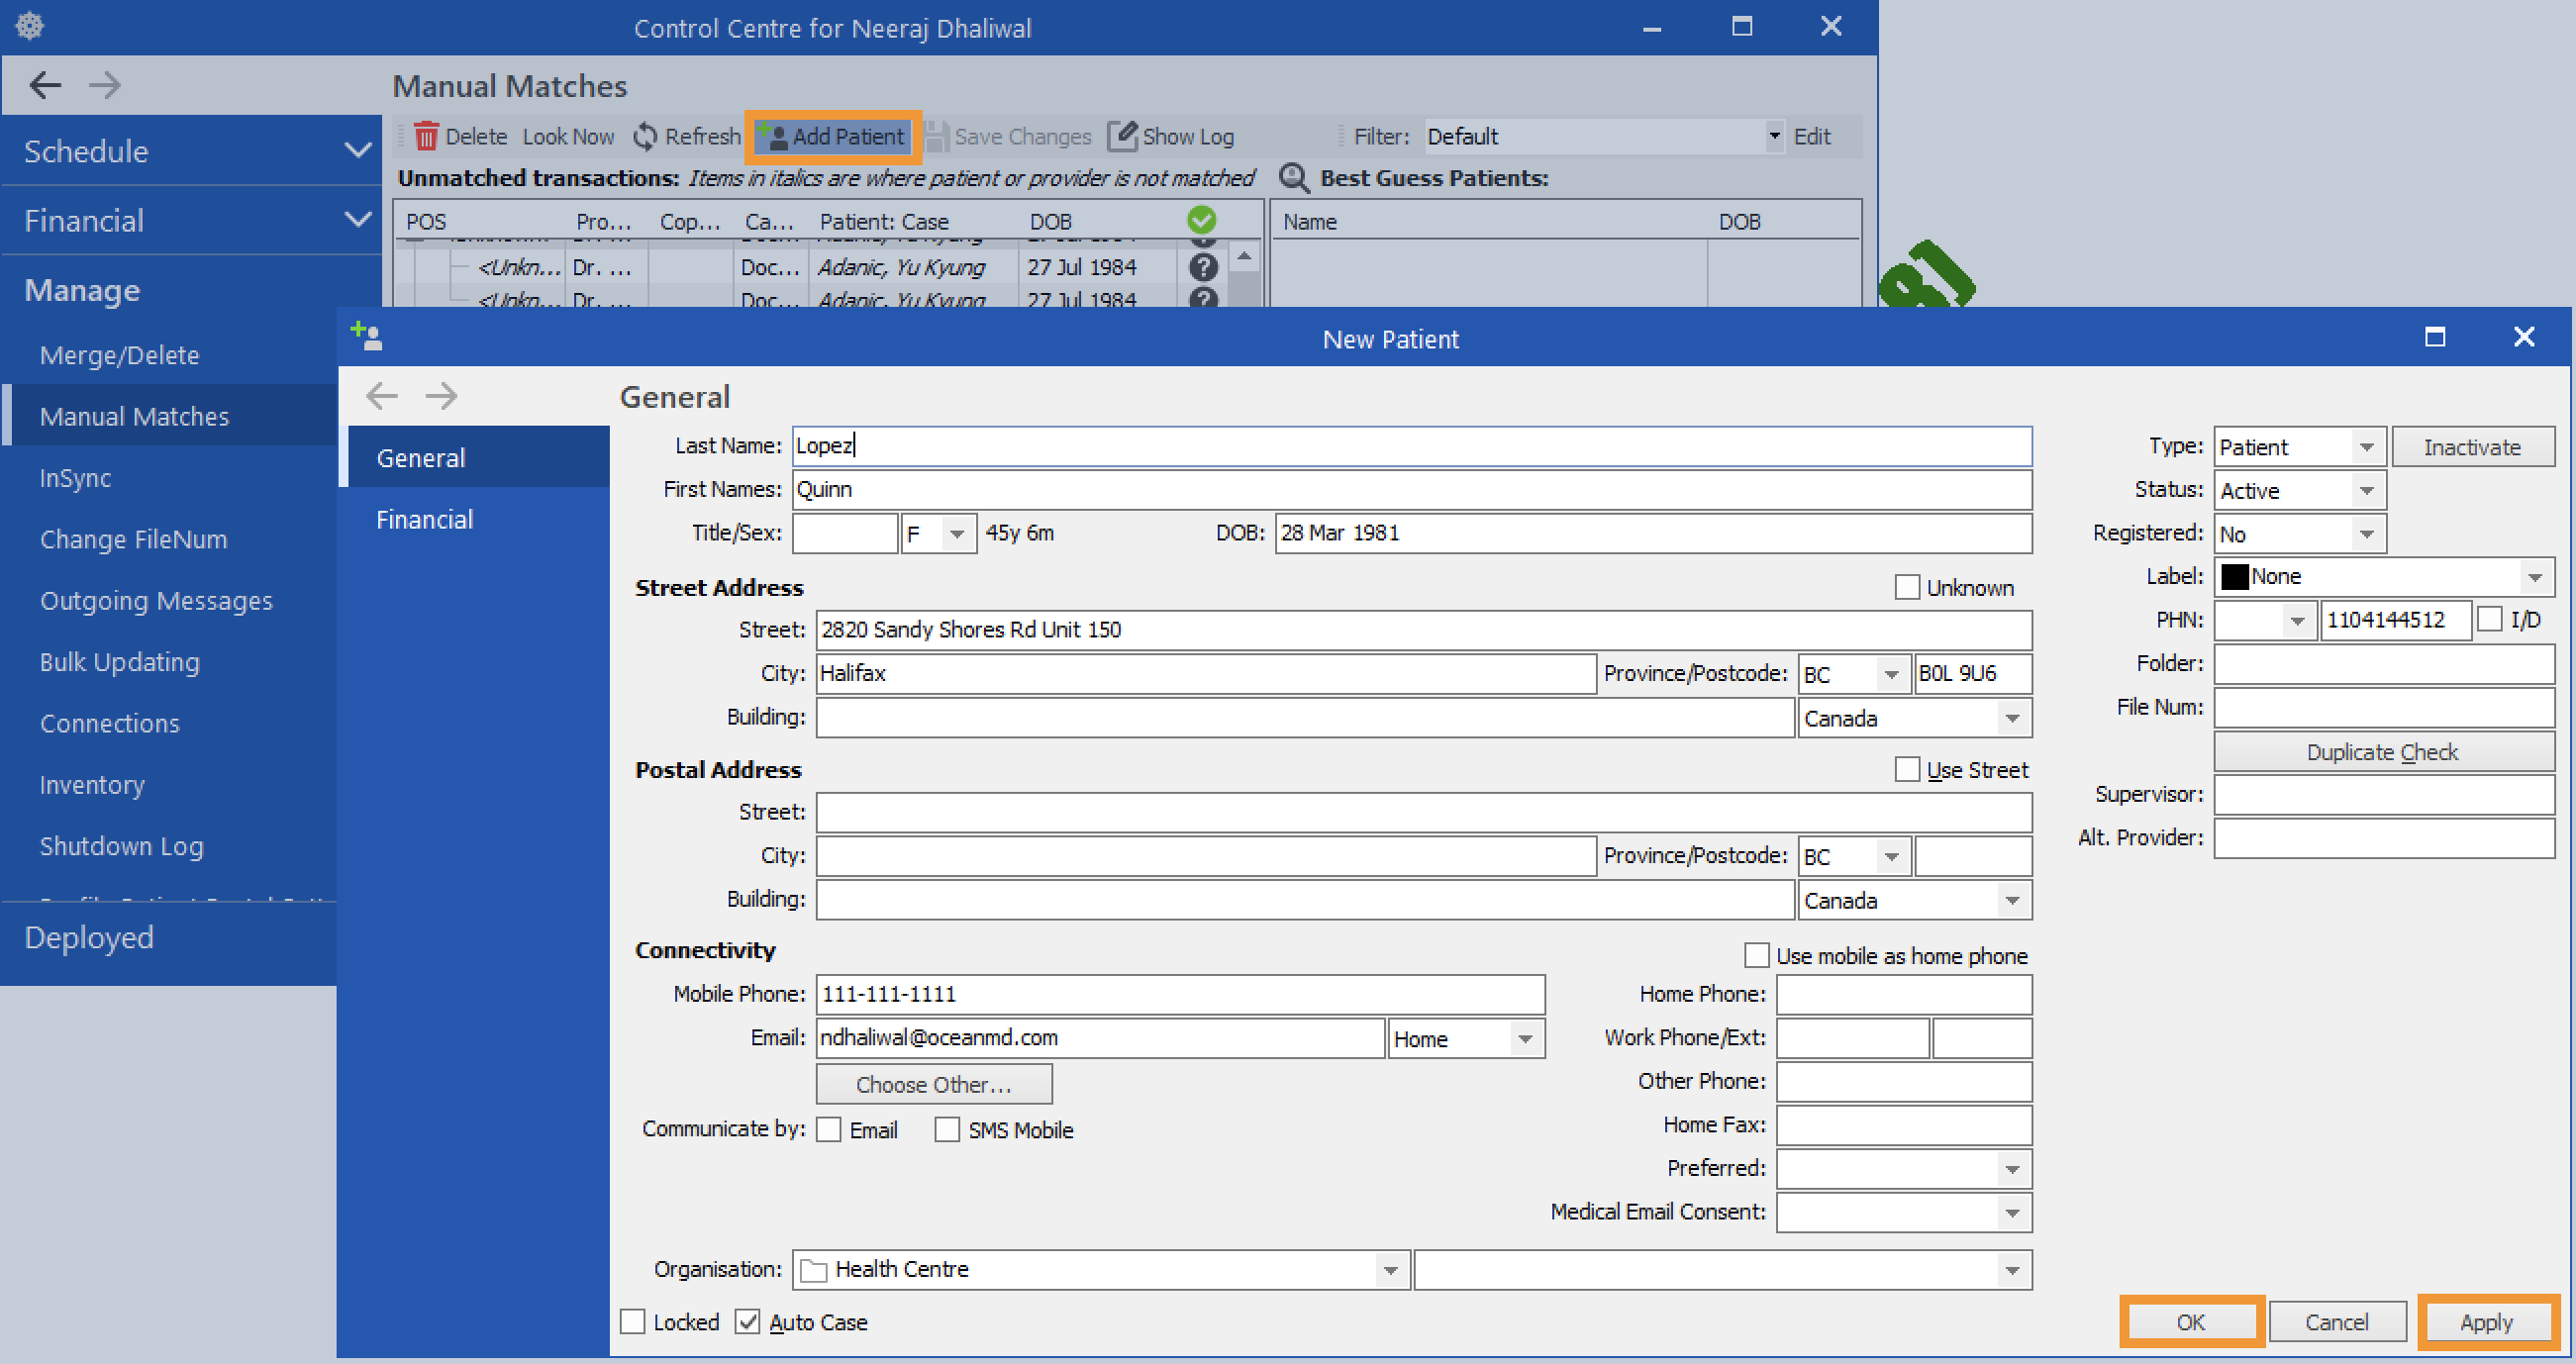
- Enter the patient's details in the window that opens. Relevant information included in the eReferral will be populated automatically. Click 'Apply' to apply your changes, and then click 'OK' to create the patient chart.
Assign a Provider
Next, match the patient to a provider in Profile.
- Click the patient's name under the Best Guess Patients section. Select the appropriate provider from the Providers list and click 'Assign'.
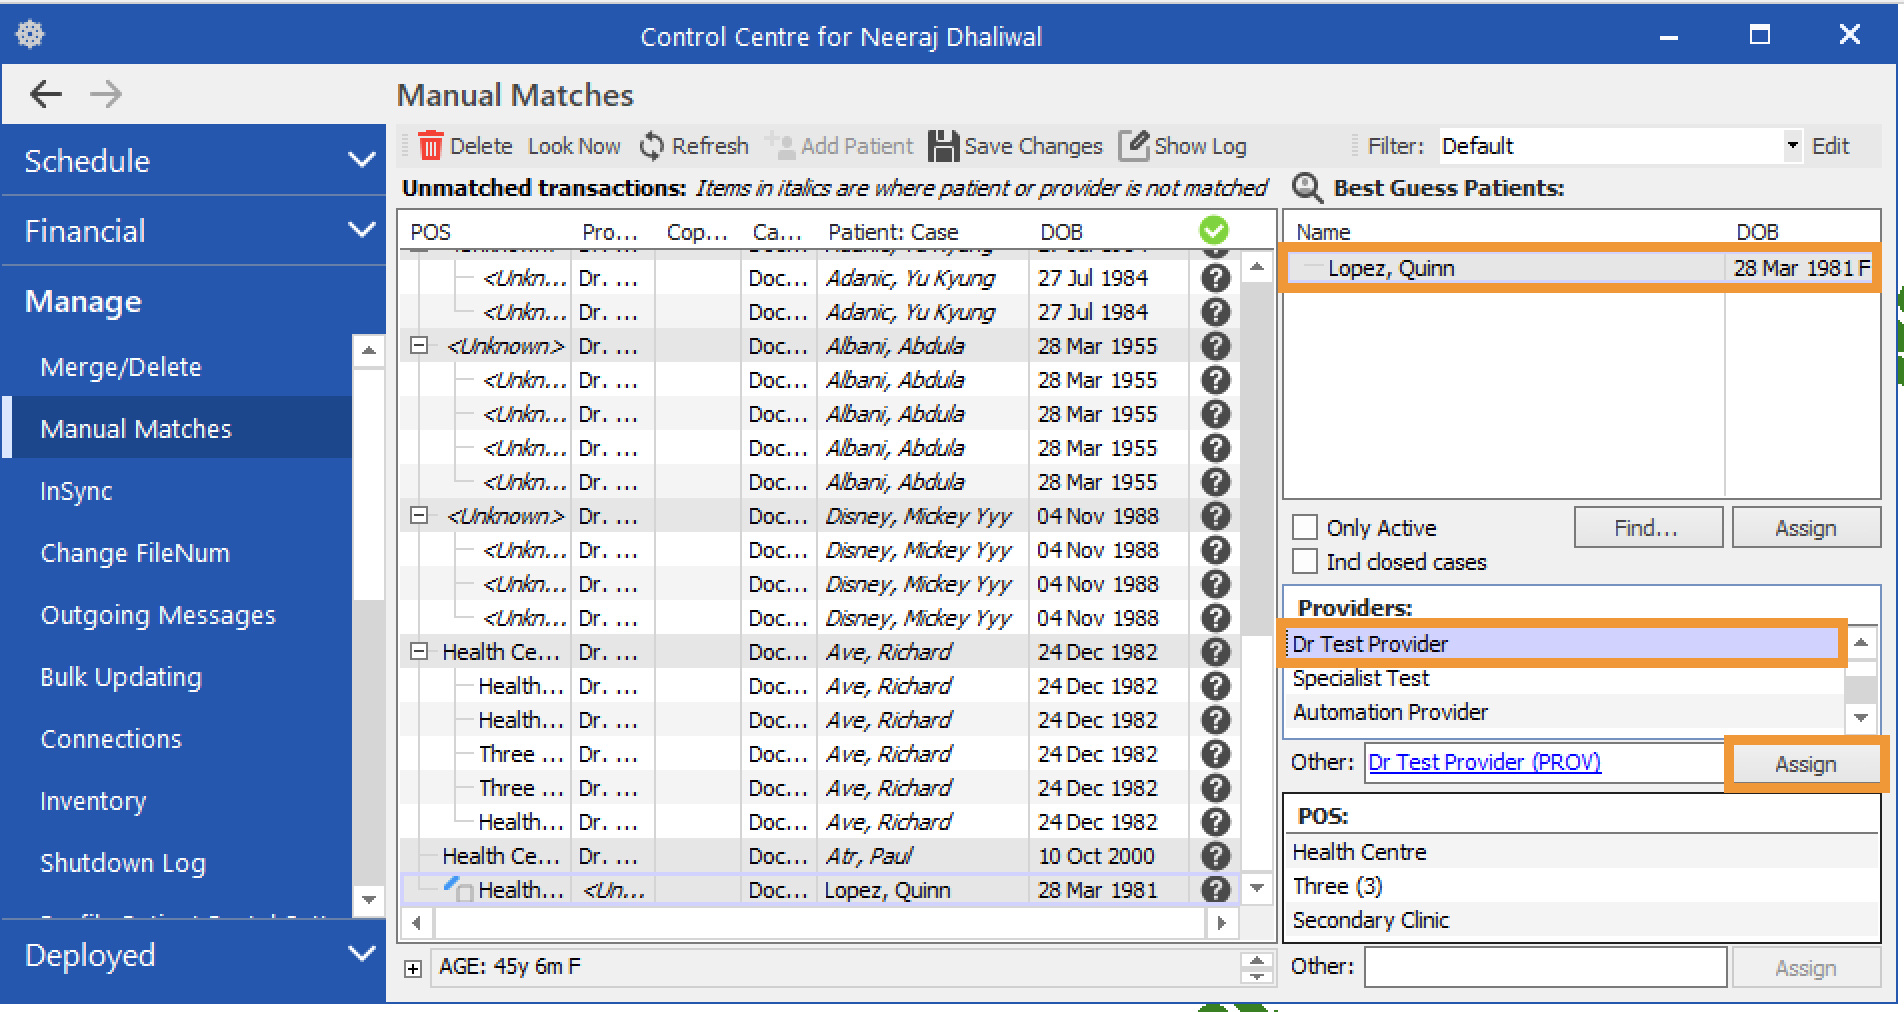
- A window will appear asking you to confirm that you want to match the patient and provider. Click 'Yes'.
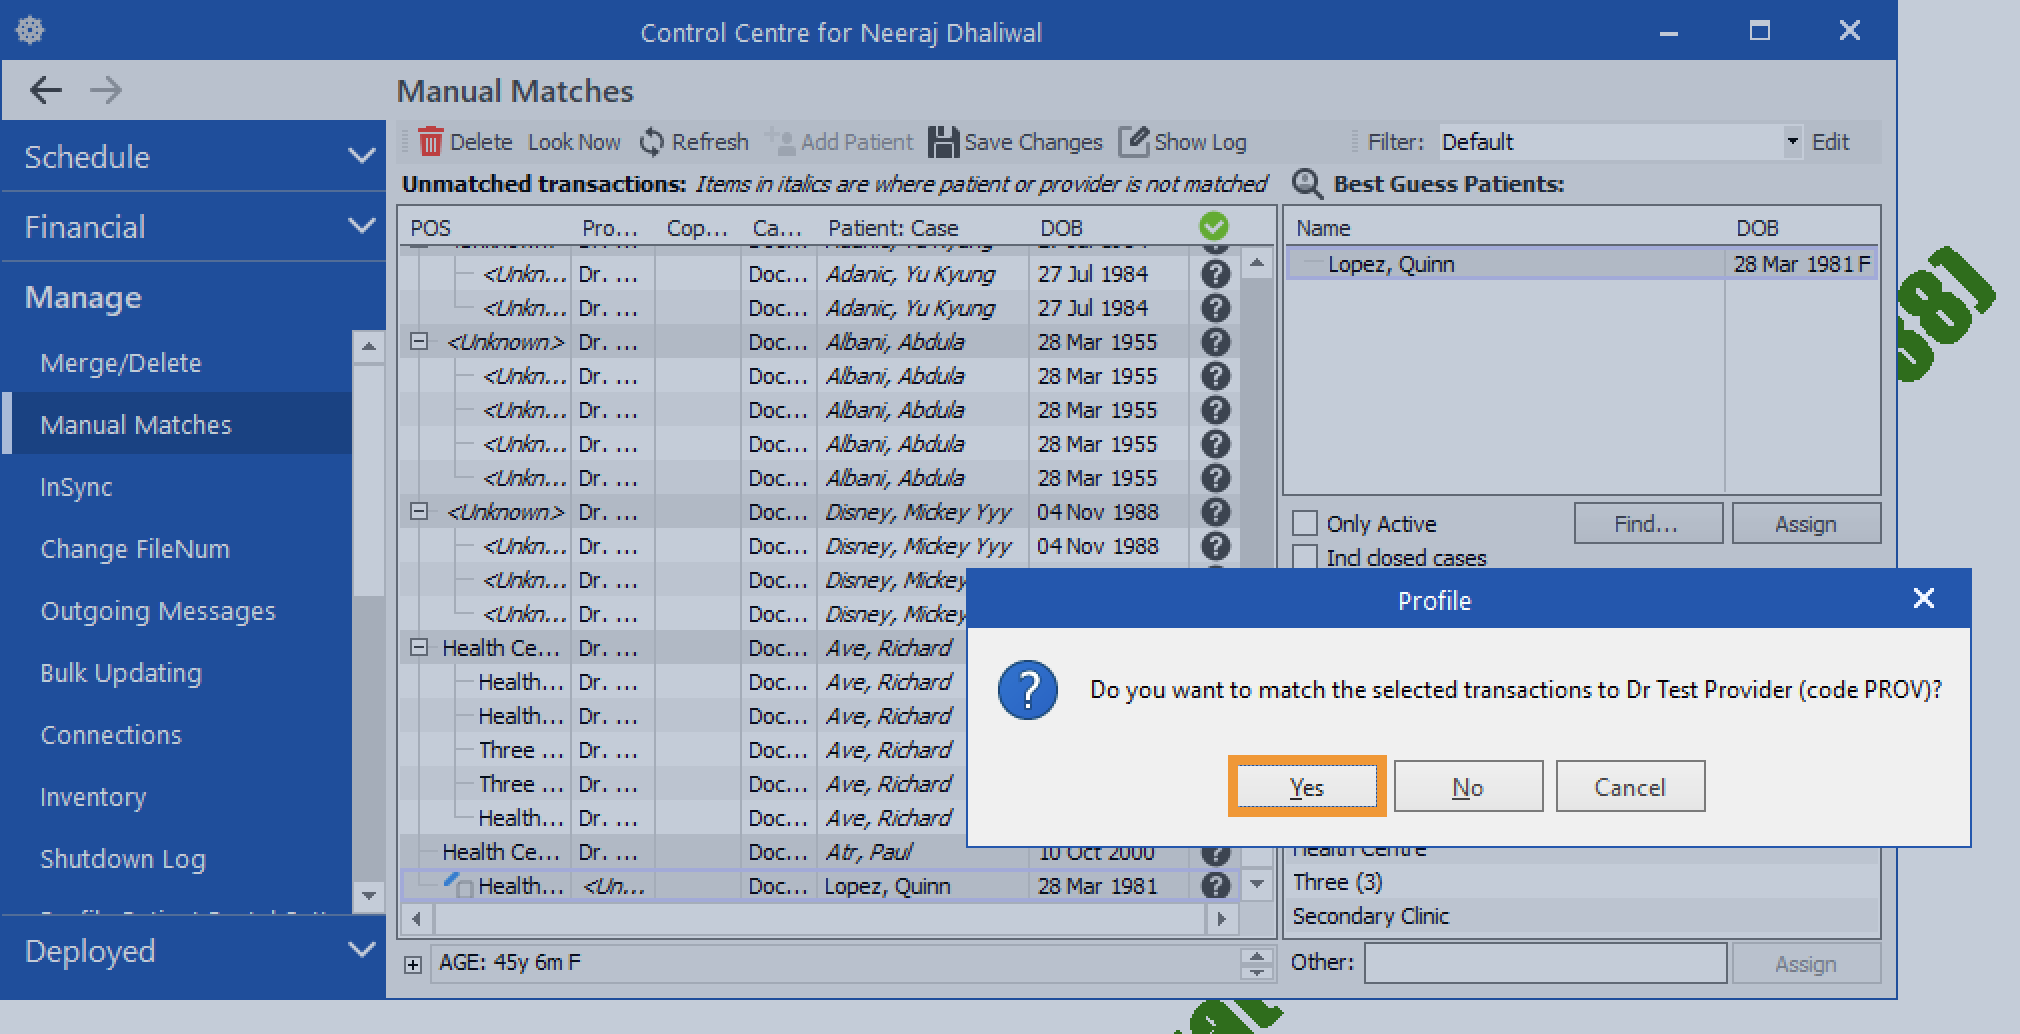
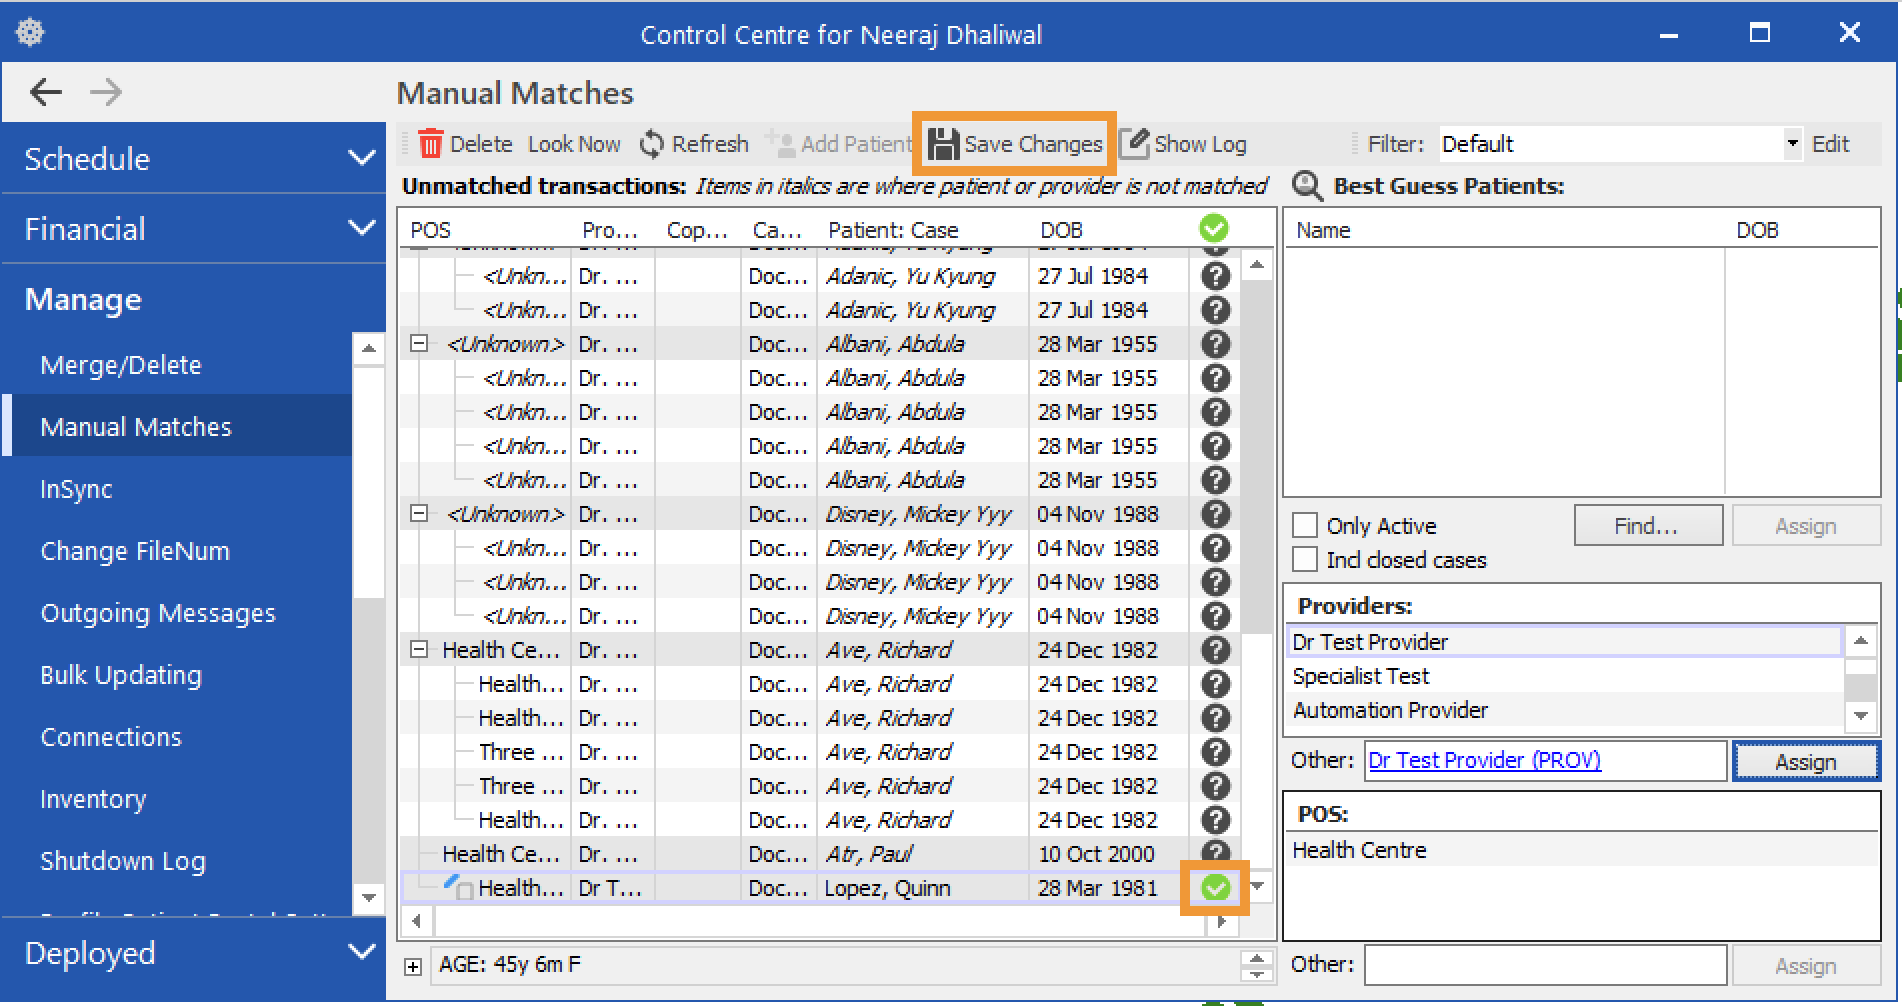
- A green check mark will appear next to the patient's name when the match has been completed successfully. Click 'Save Changes'.
-
Accepting & Declining eReferrals
Learn how to accept, decline, and import eReferrals into your EMR.
Review the eReferral
After opening the eReferral in Profile, review its contents to gain a more detailed understanding of the referral and ensure it contains the information you require.
Tip: If necessary, you can assign the referral to be reviewed by another user on your Ocean site for a secondary review.
-
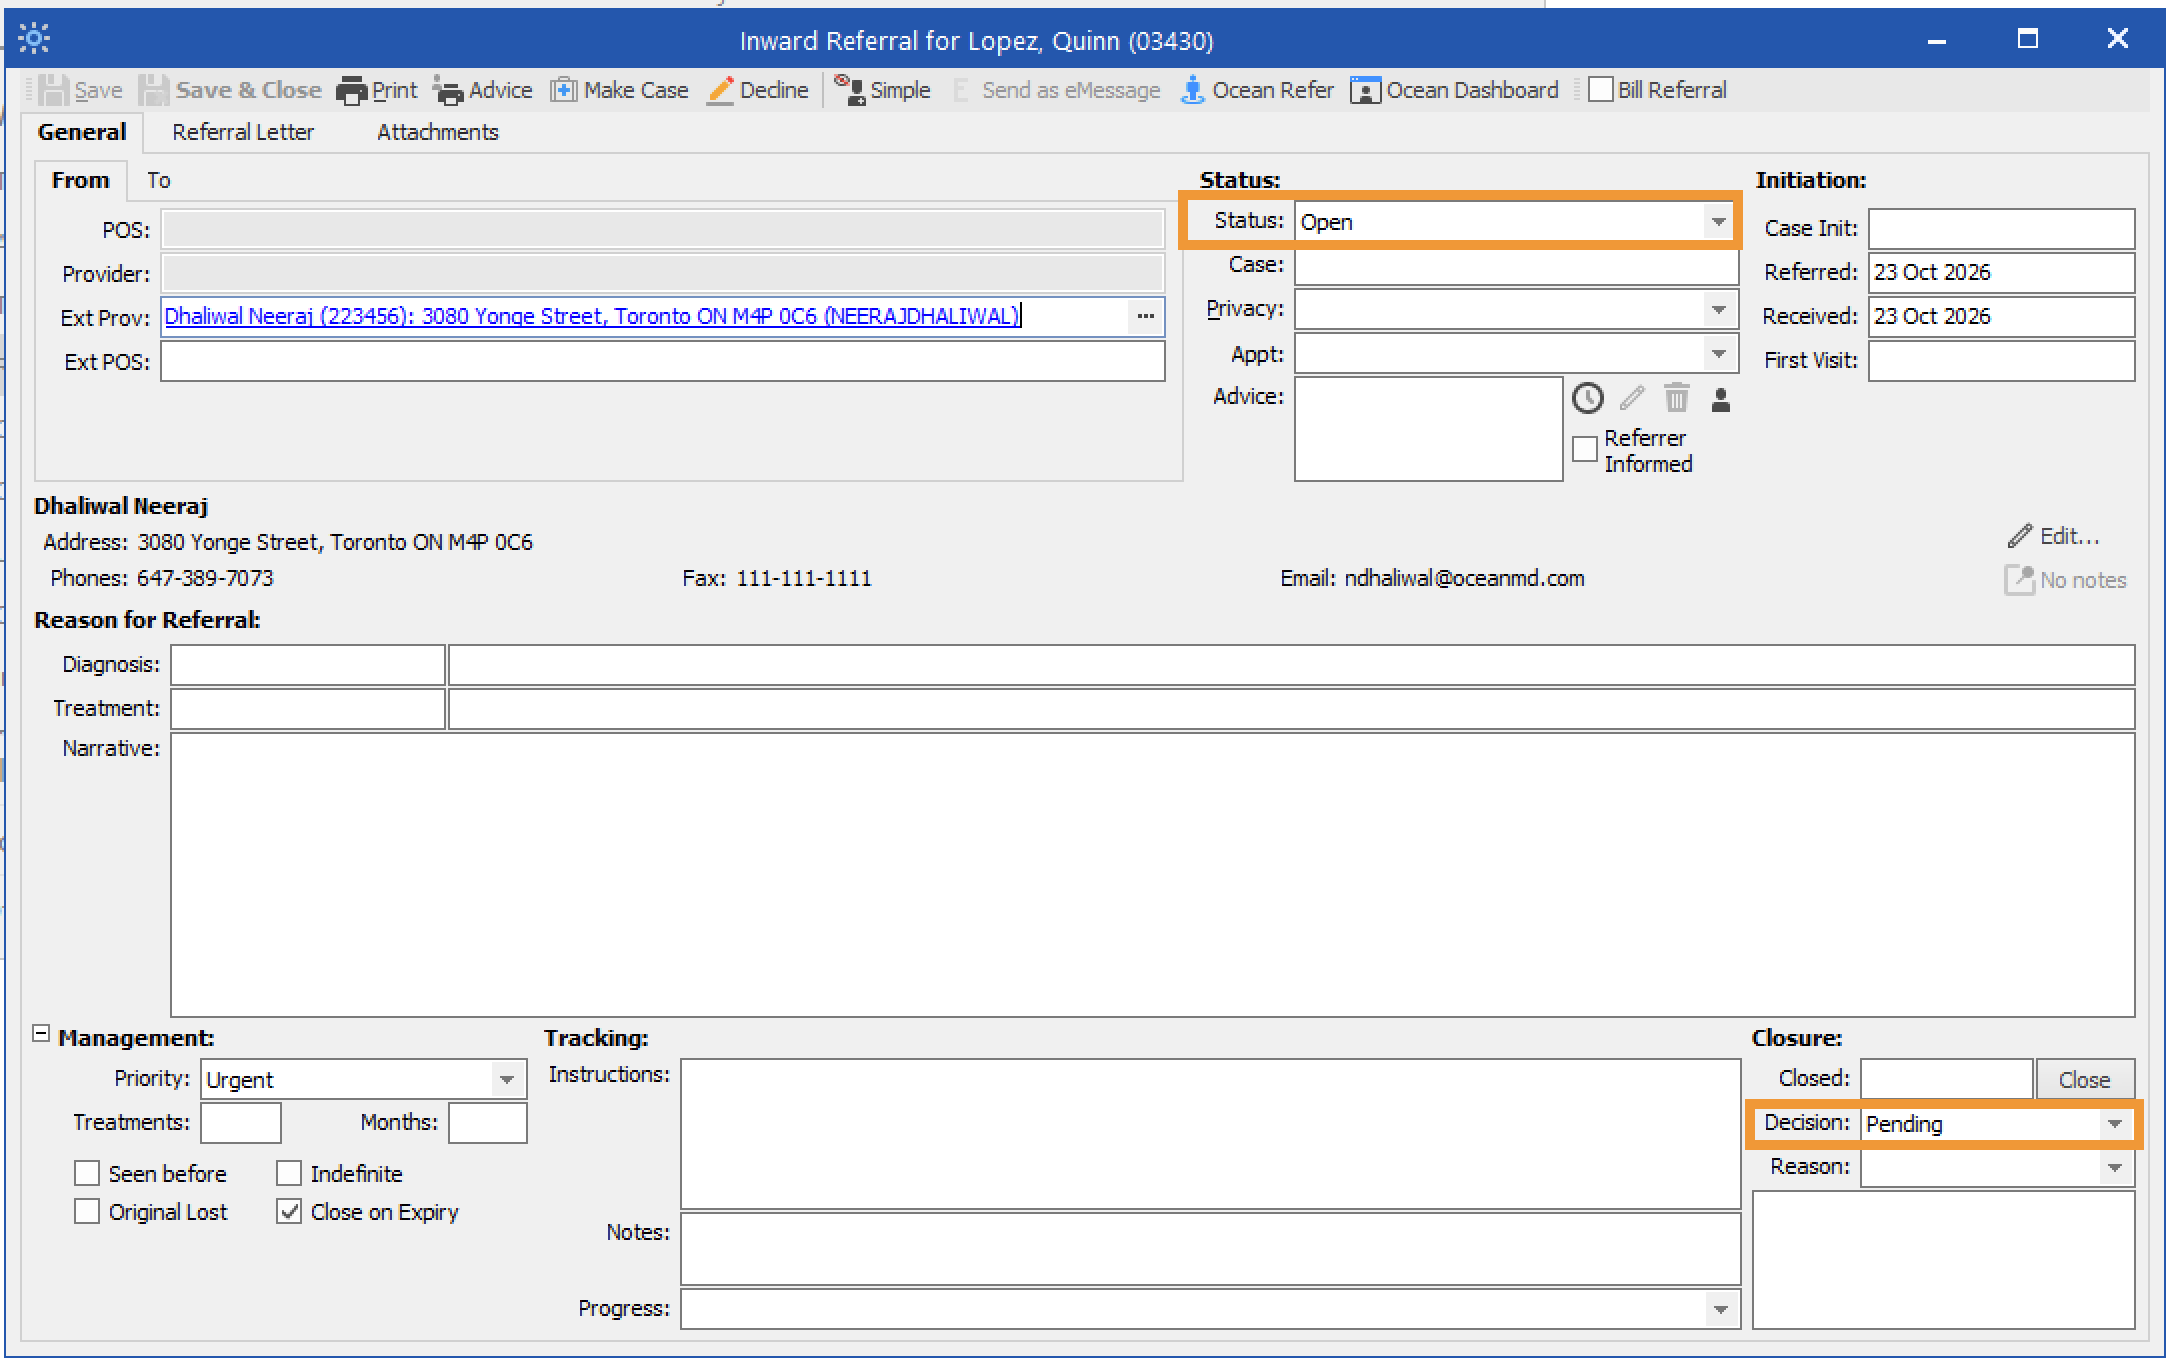
Open the eReferral in Profile. The General tab contains information about the referral's status and decision.
Status: Shows whether the eReferral is Open or Closed. A referral is closed once it reaches a terminal state, such as declined, cancelled, or completed.
Decision: Shows whether the eReferral is awaiting acceptance, has been accepted, or has been declined.
- Pending: Corresponds to the Awaiting Response status folder in the Ocean Portal.
- Accepted: Corresponds to the Pending Booking, Booked Unconfirmed, or Booked Confirmed status folders in the Ocean Portal.
- Declined: Corresponds to the Declined status folder in the Ocean Portal.
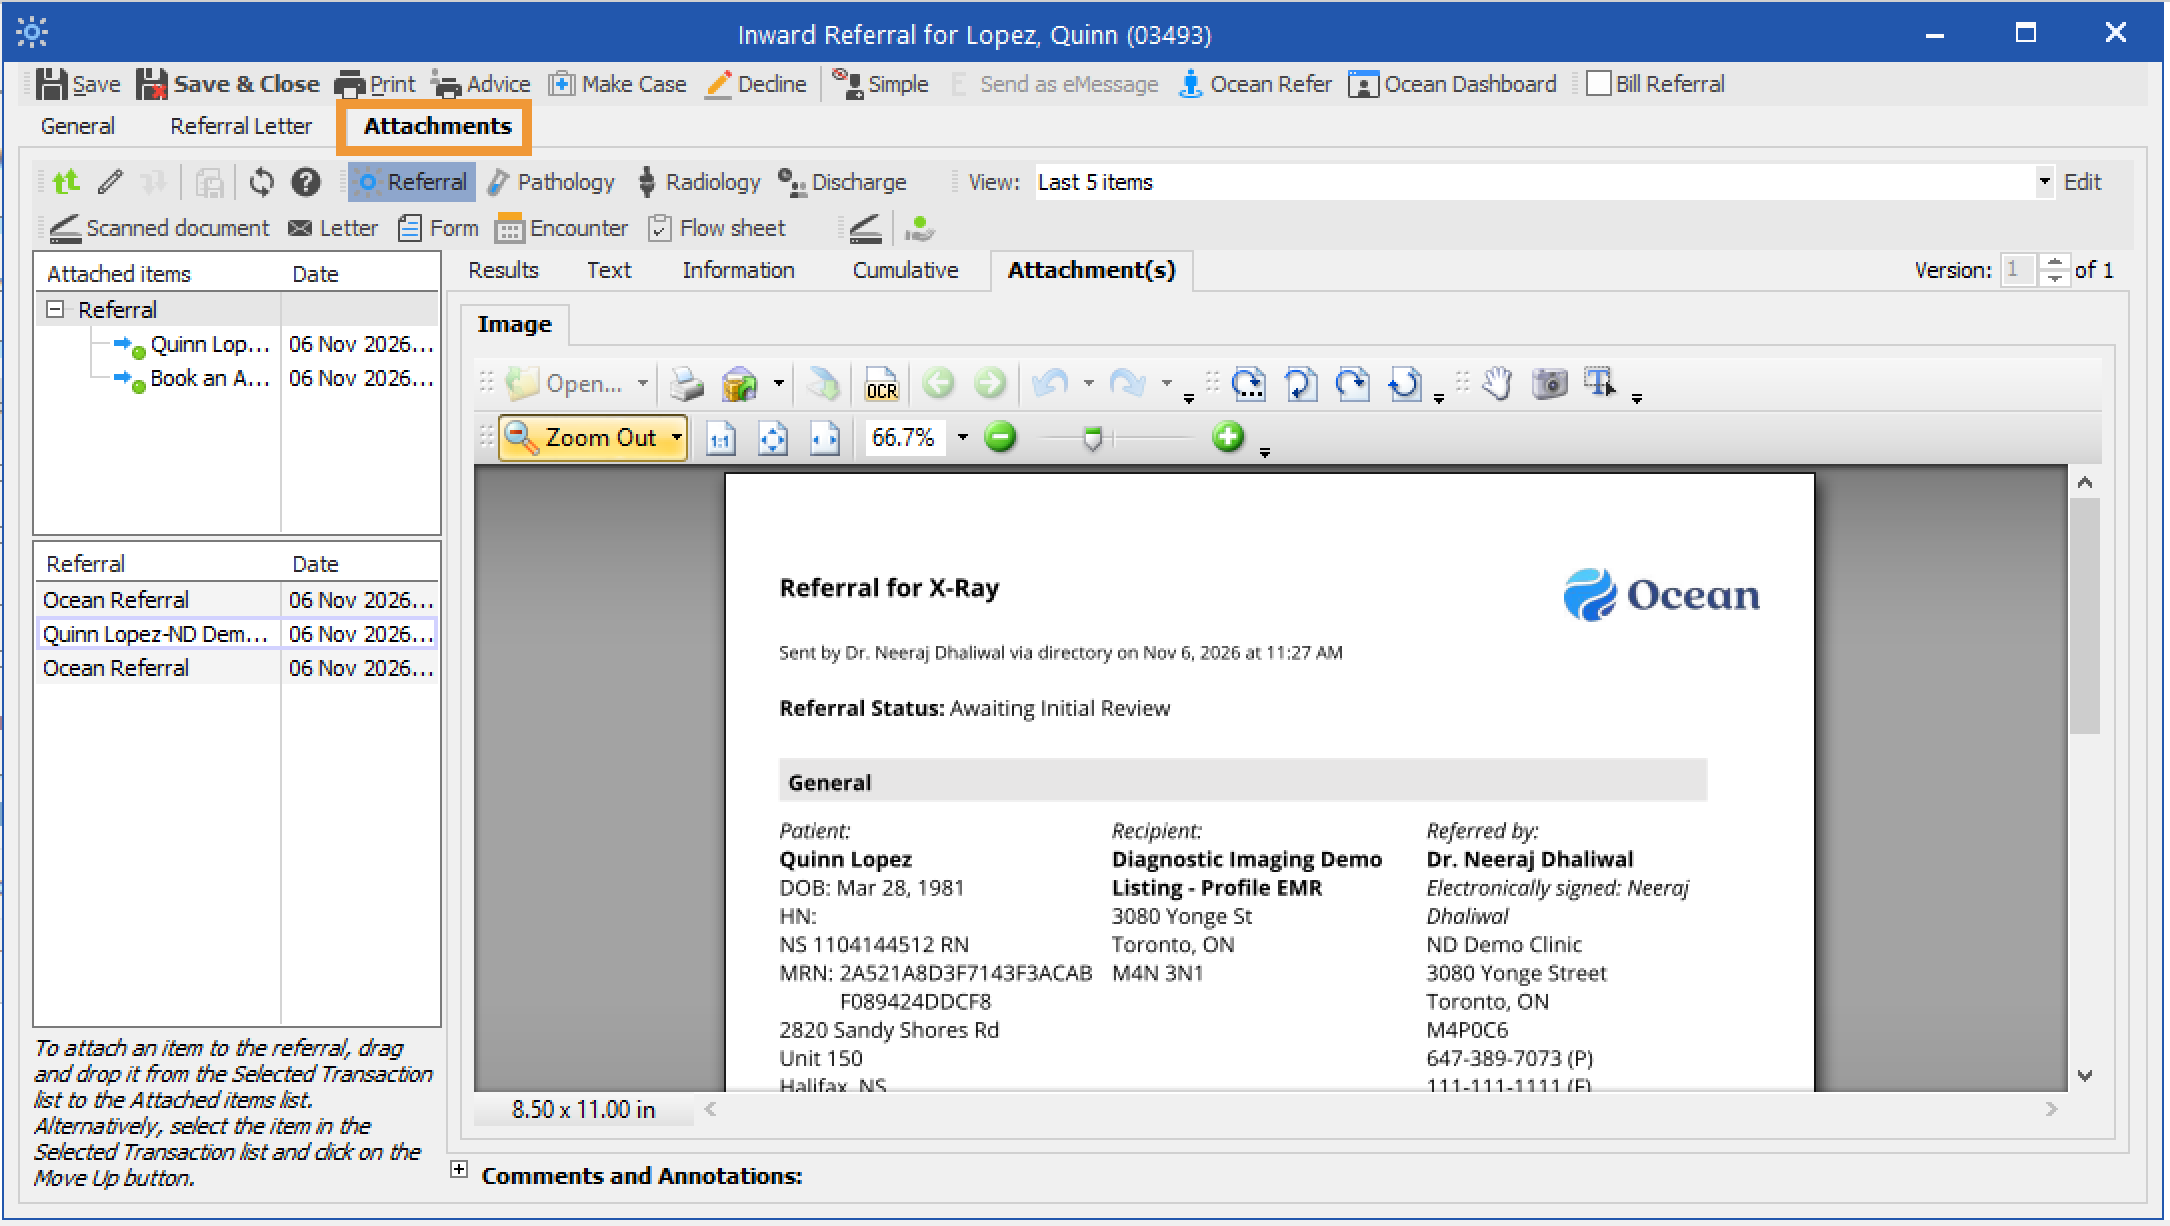
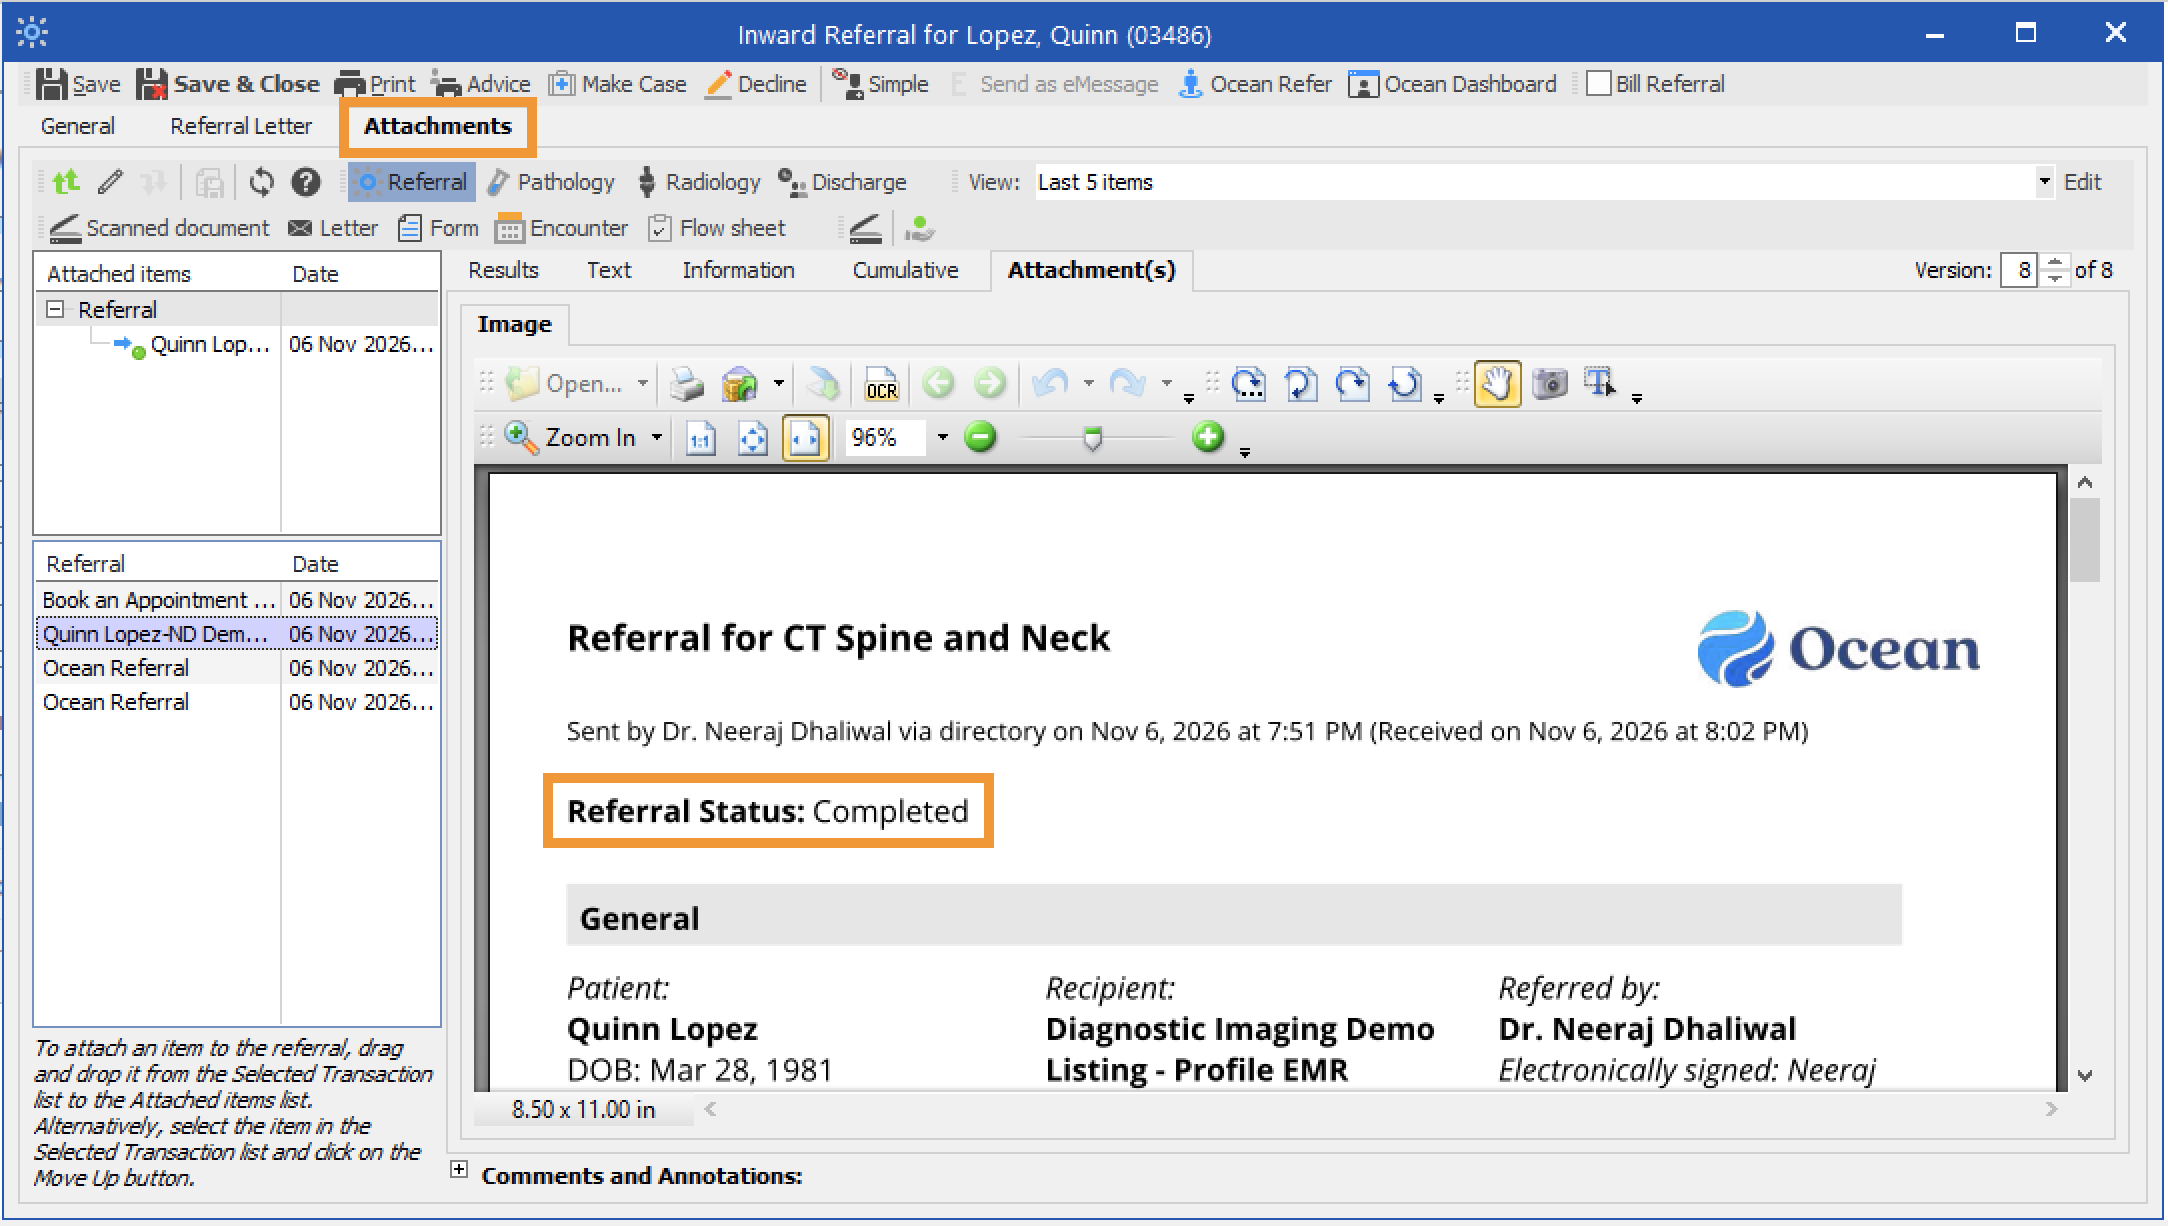
- Under Attachments, the referral record PDF will contain details about the referral, including patient information, the referral form summary, notes, messages, and attachments.
- Alternatively, click the 'Ocean Dashboard' icon to view the eReferral in Ocean.
Accept or Decline the eReferral
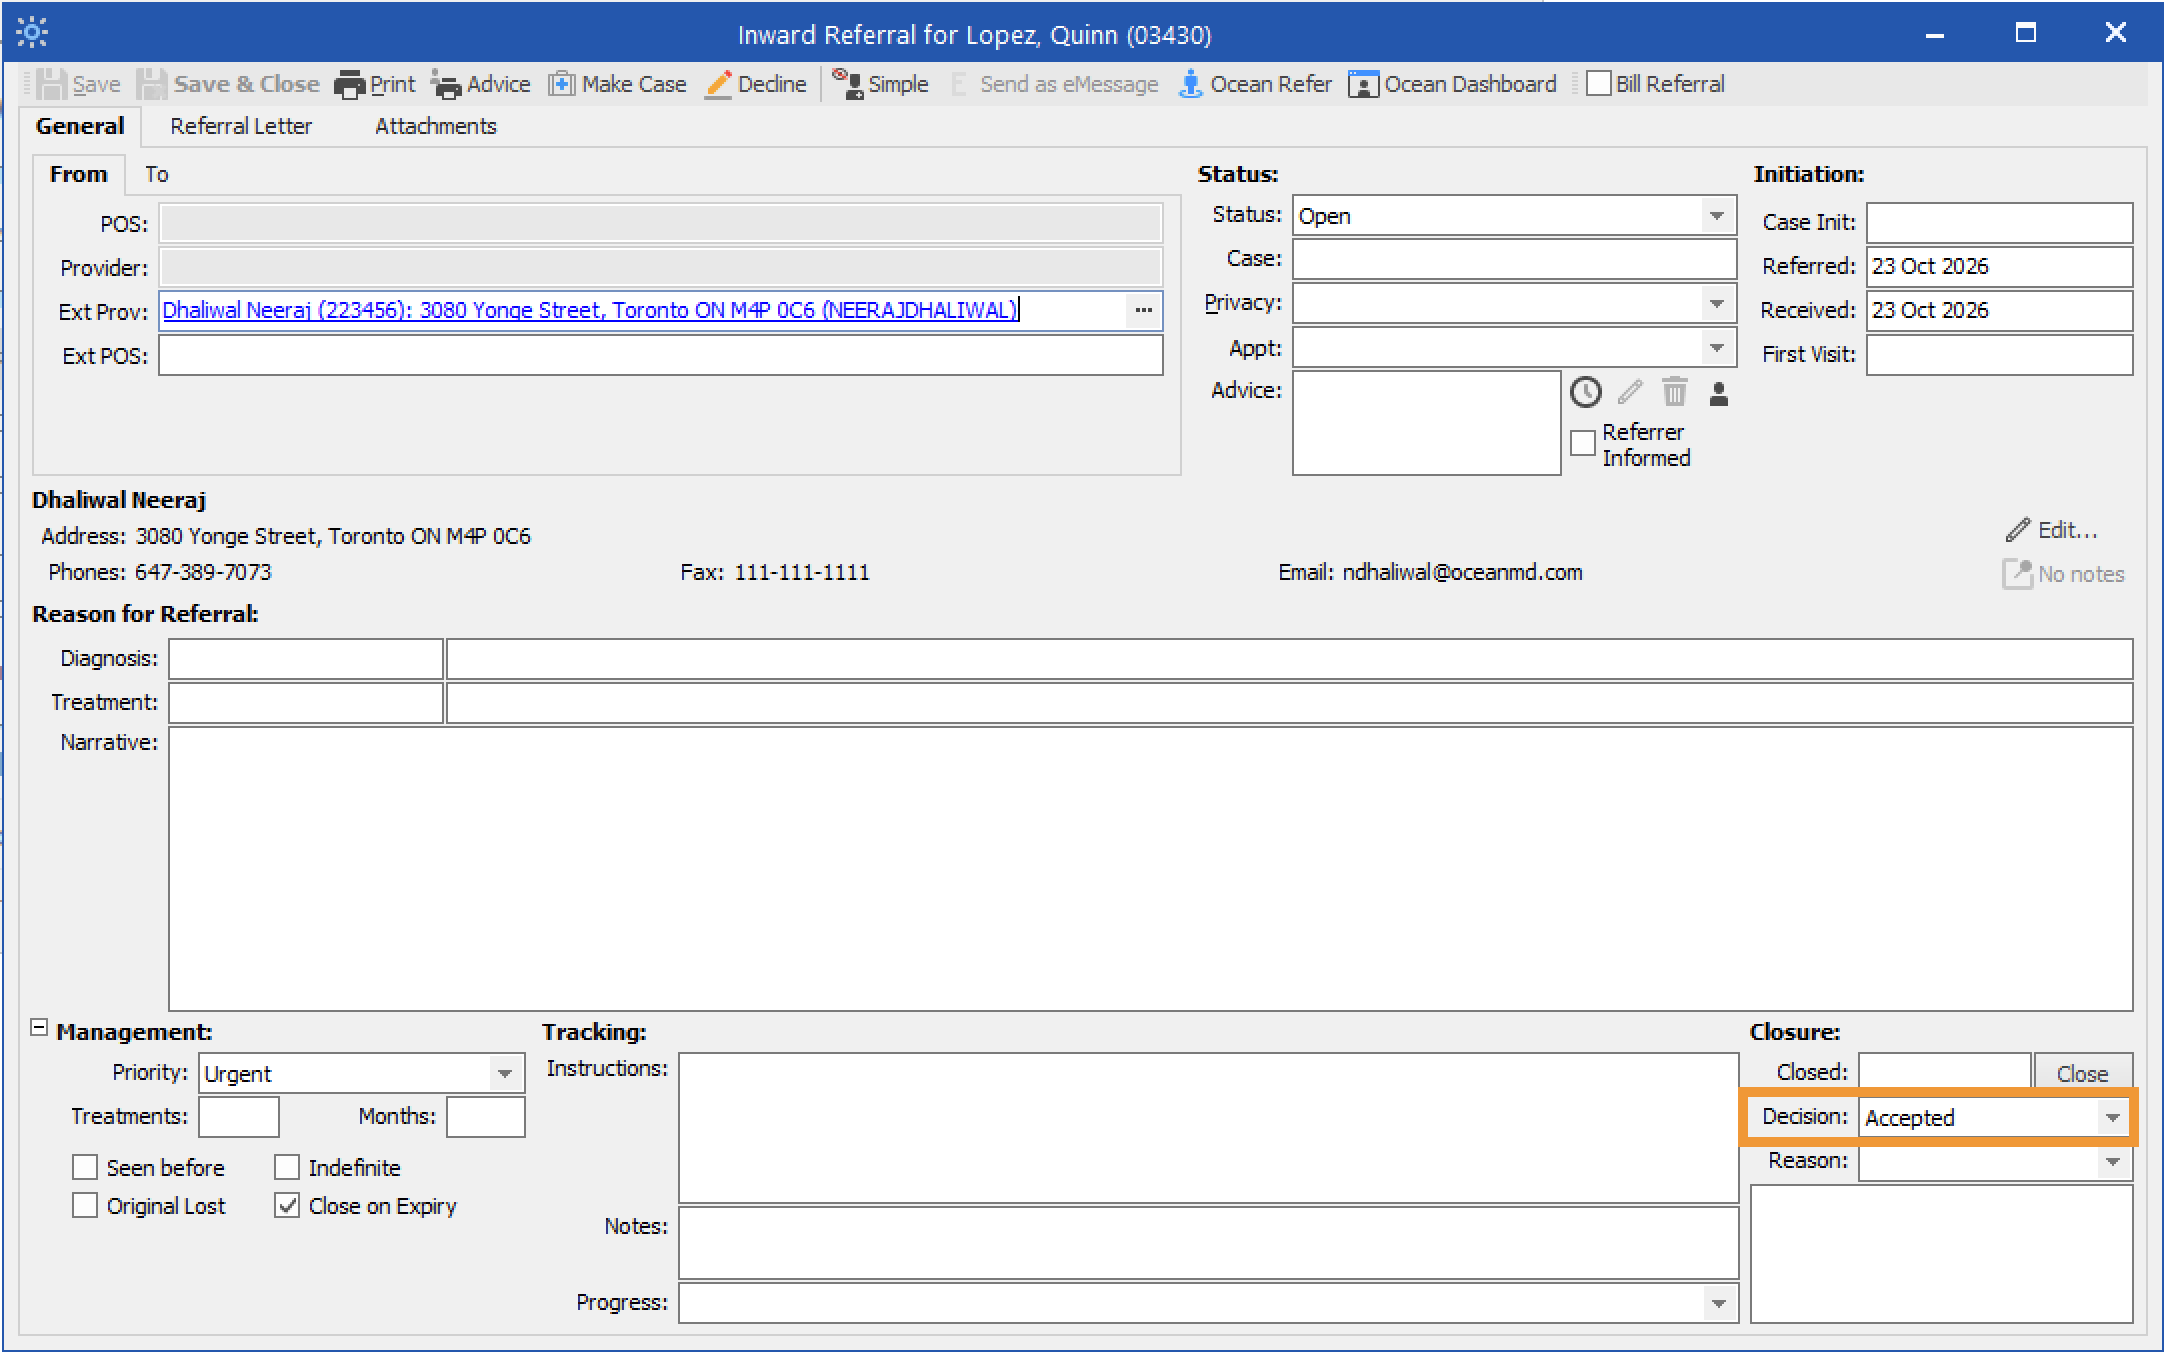
- To accept the eReferral from Profile, update the 'Decision' to 'Accepted'.
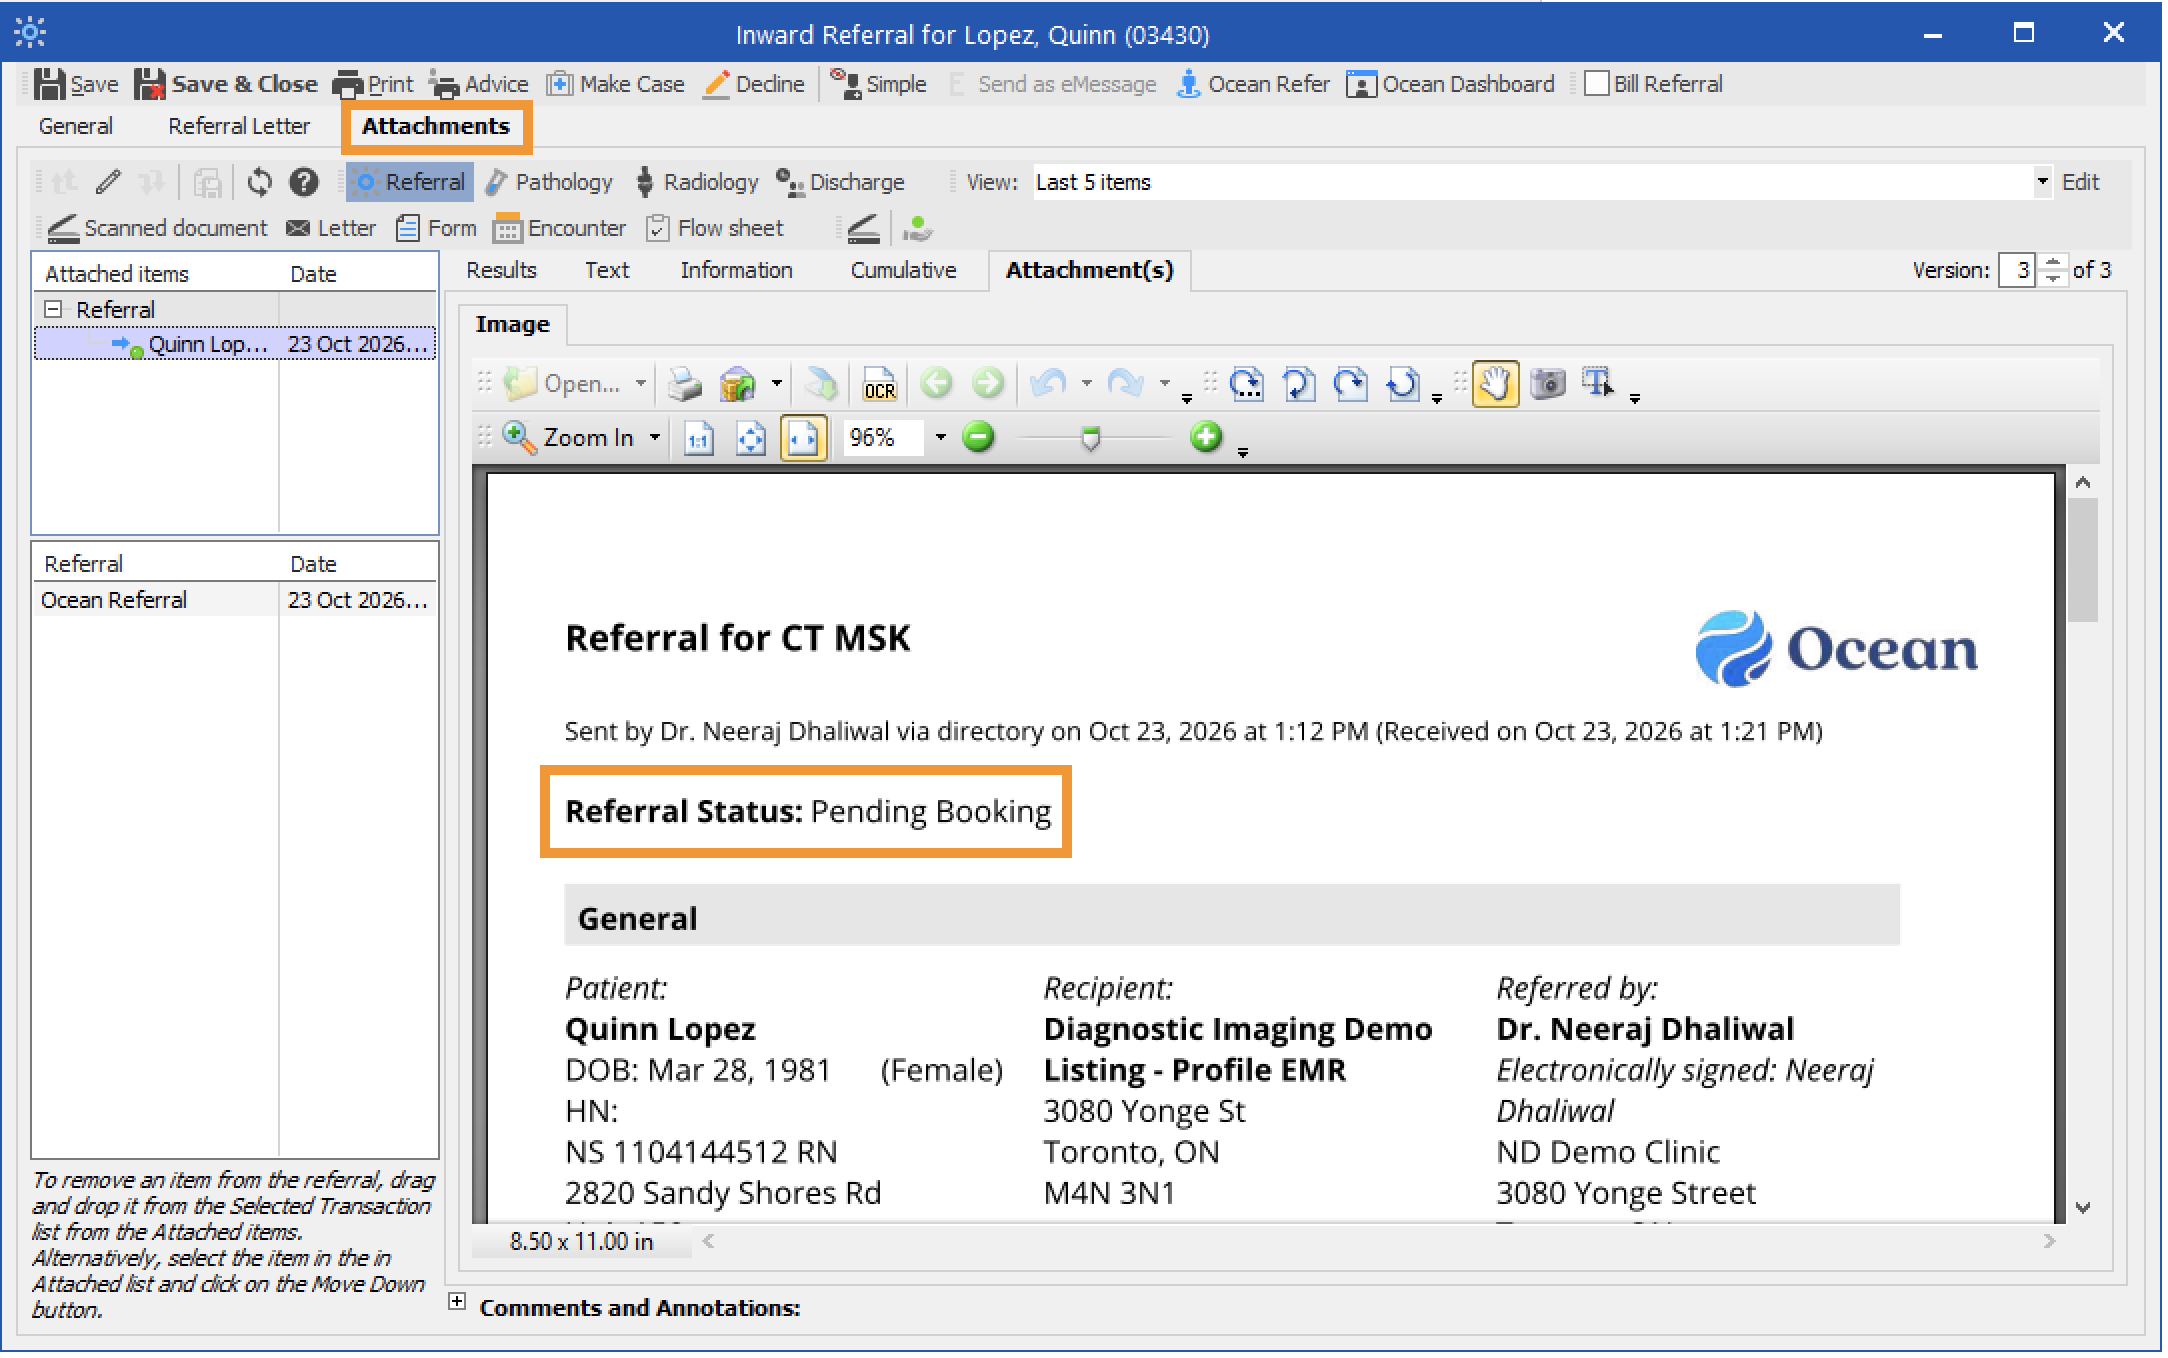
- The referral record PDF under Attachments will be updated with the new status of the referral.
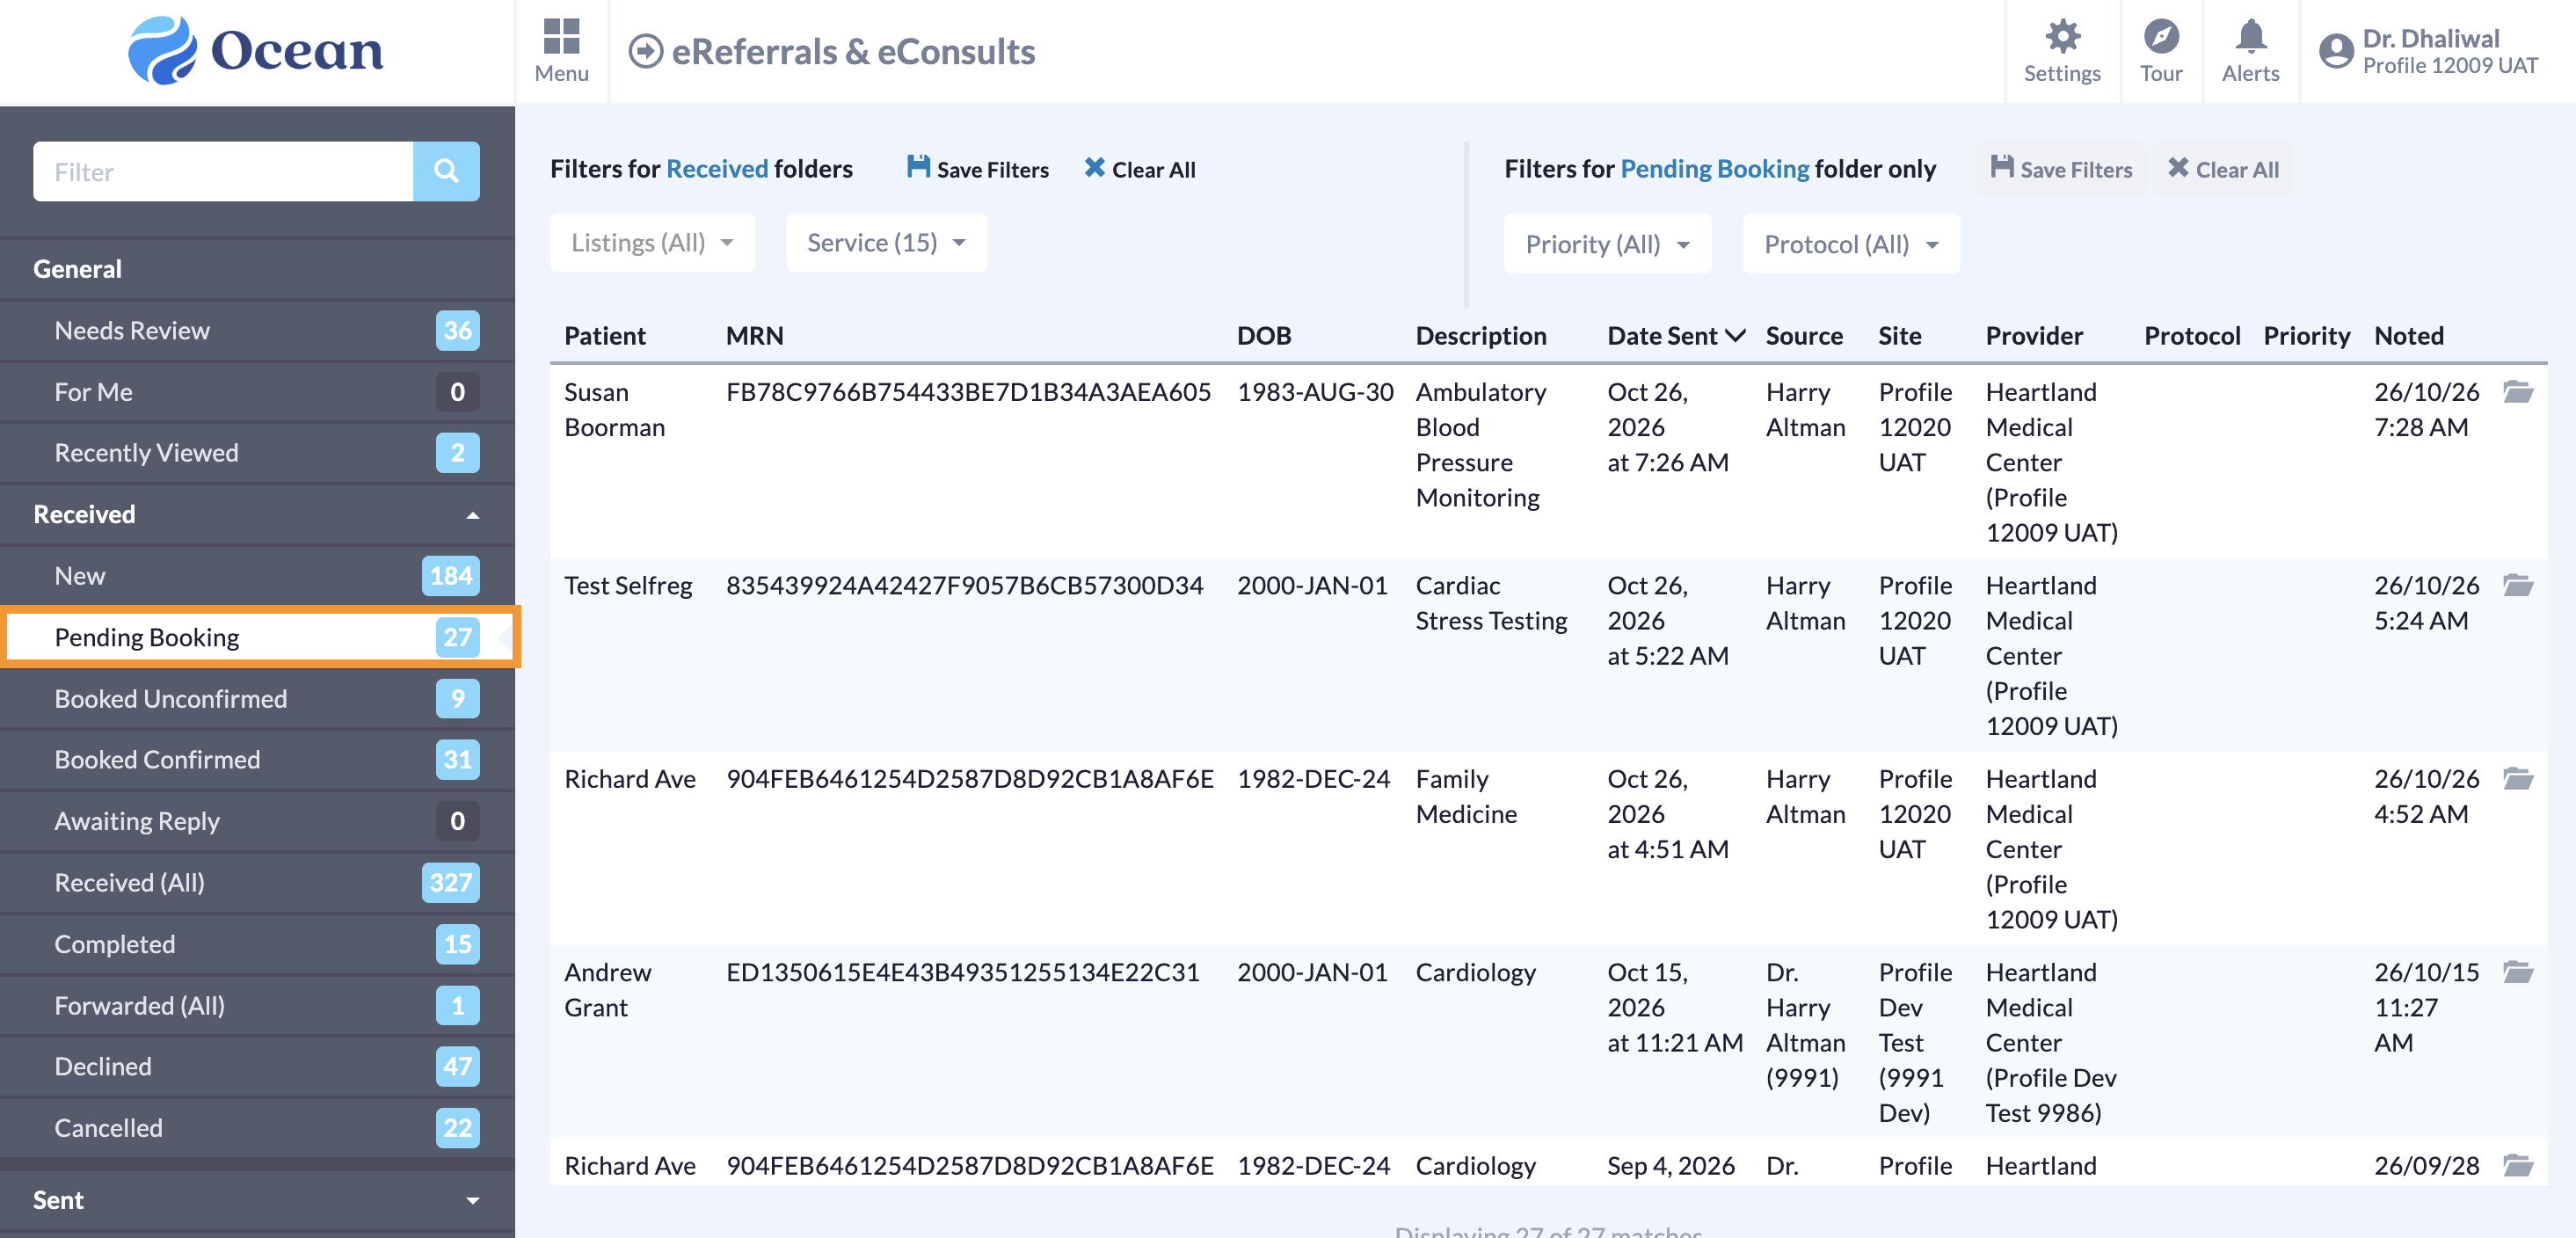
- In Ocean, the eReferral will be automatically moved to the Pending Booking status folder until an appointment is scheduled.
- To decline the eReferral from Profile, update the 'Decision' to 'Declined'. Use 'Reason' to indicate the reason for the declination, and use the text area beneath it to enter more information regarding the declination.
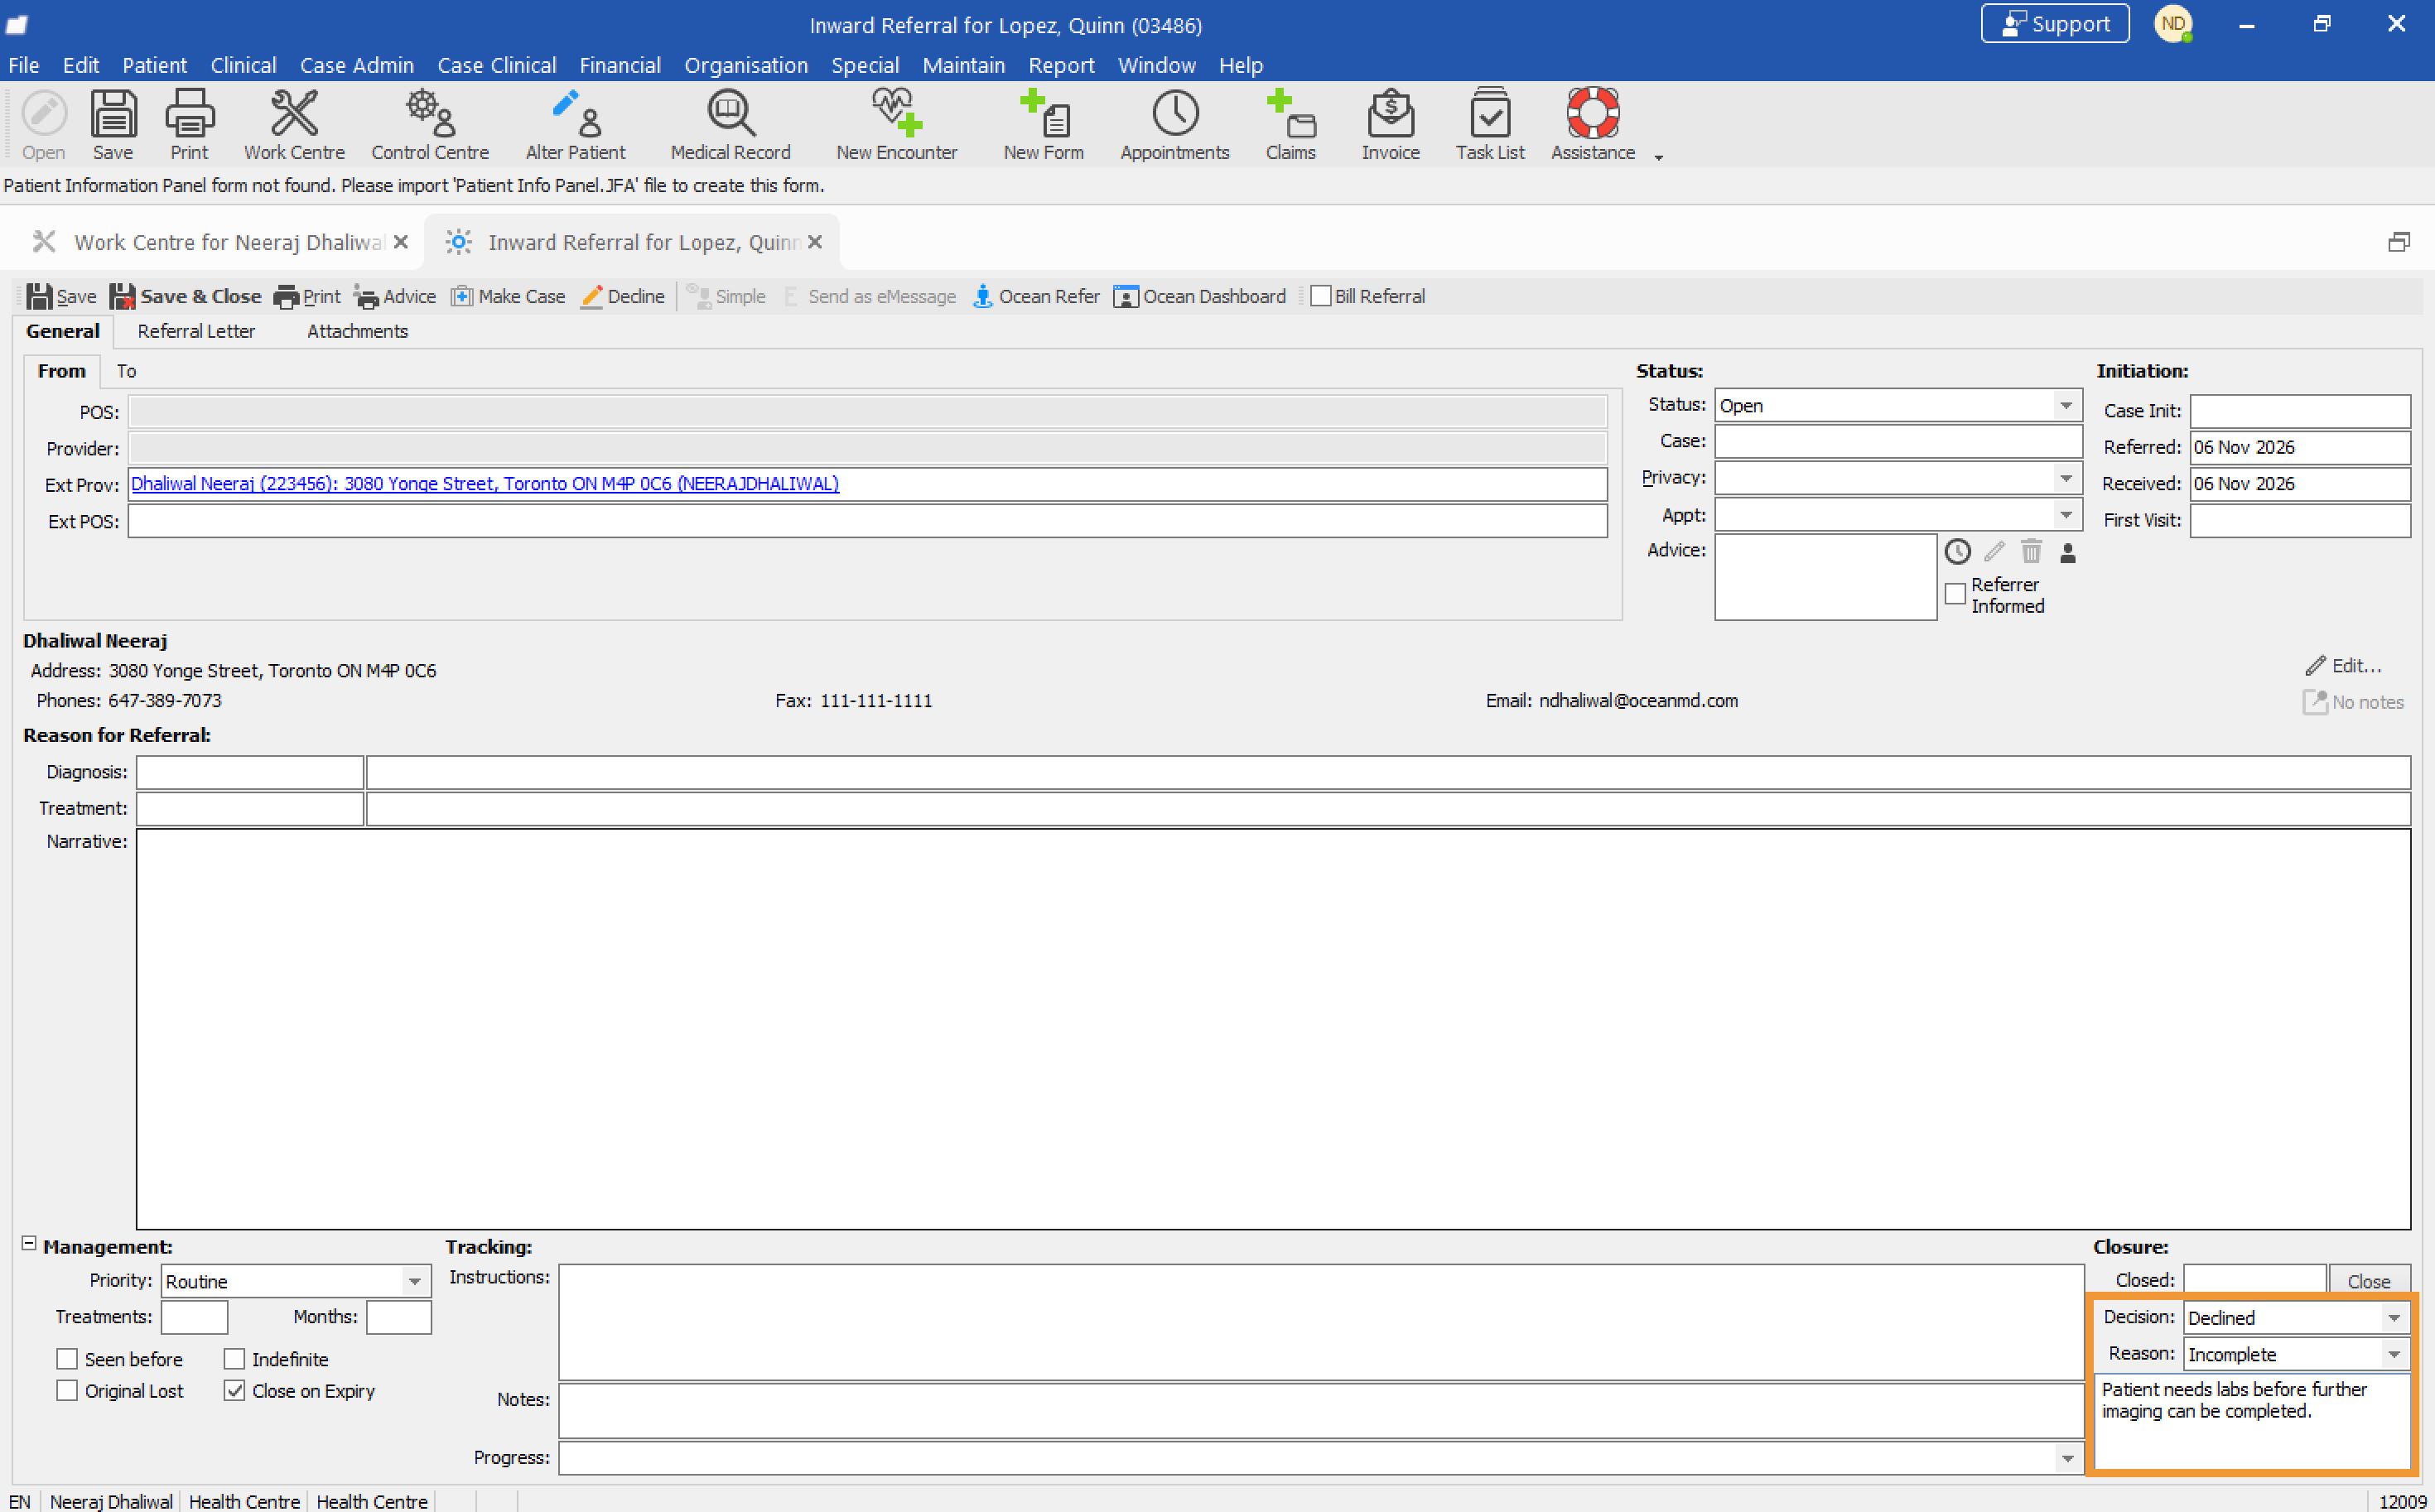
- The 'Status' will automatically update to 'Closed'.
- The referring provider will be notified of the declination.
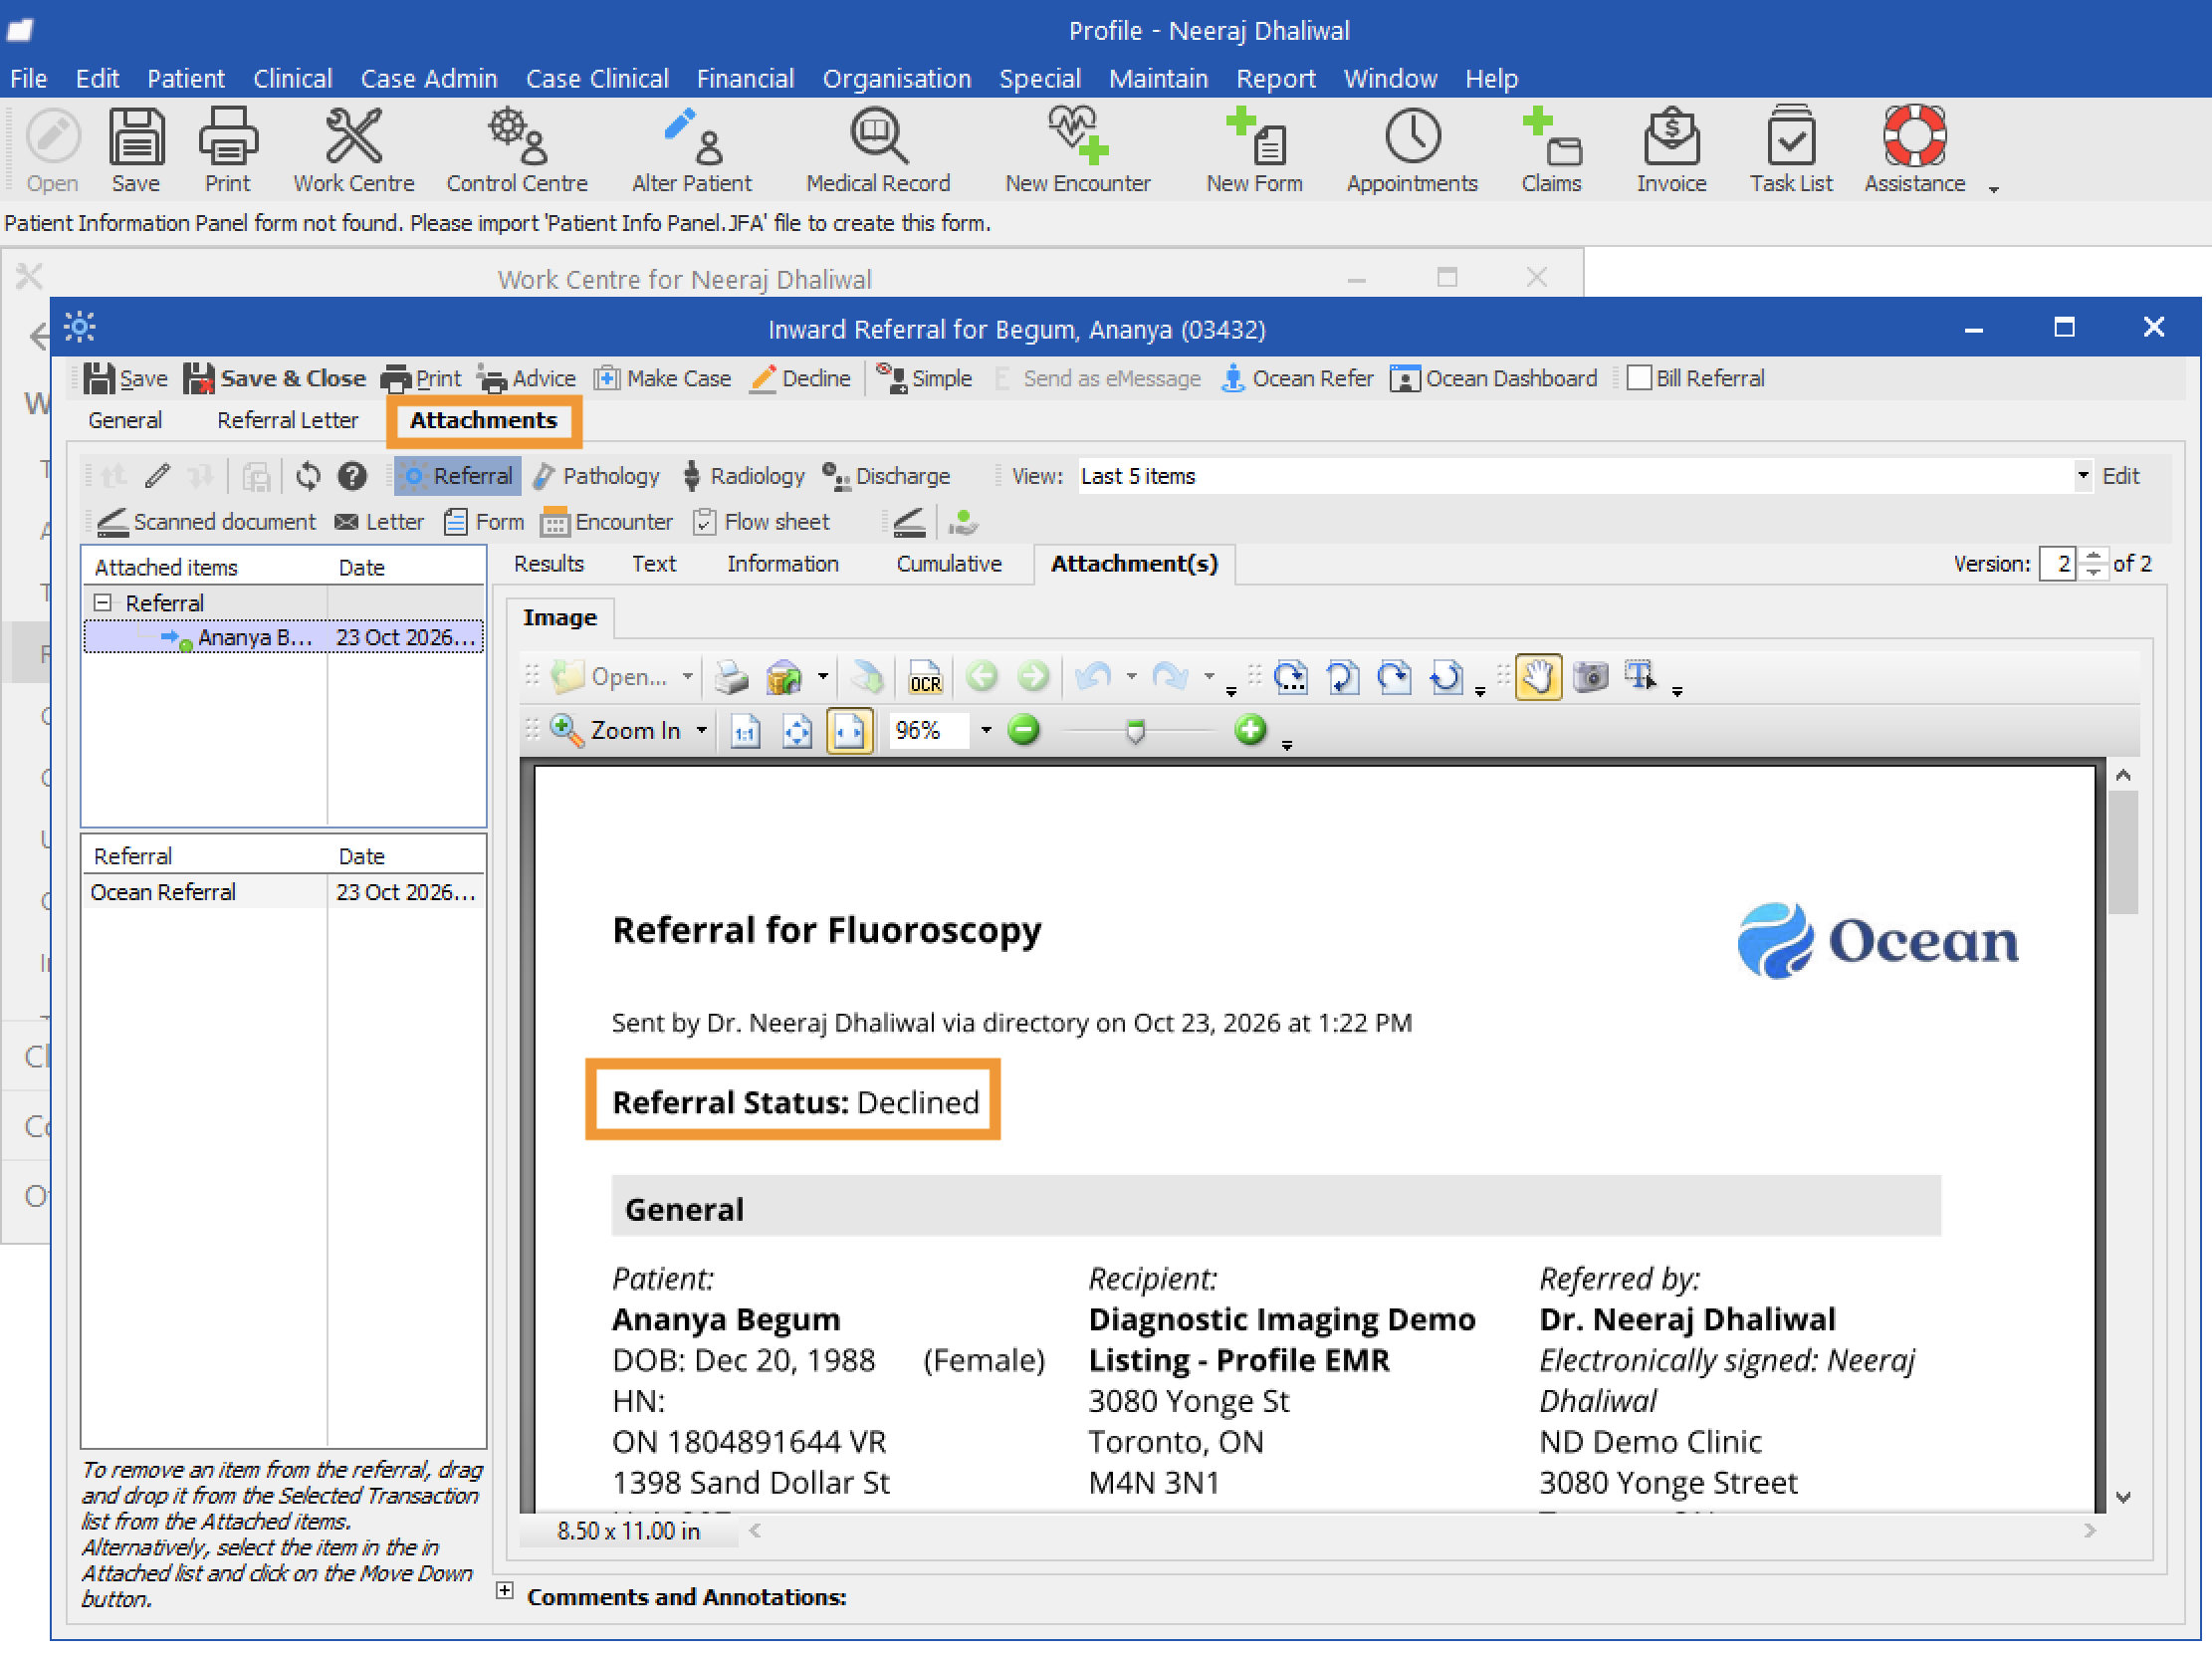
- The referral record PDF under Attachments will be updated with the new declined status, along with the reason for the declination.
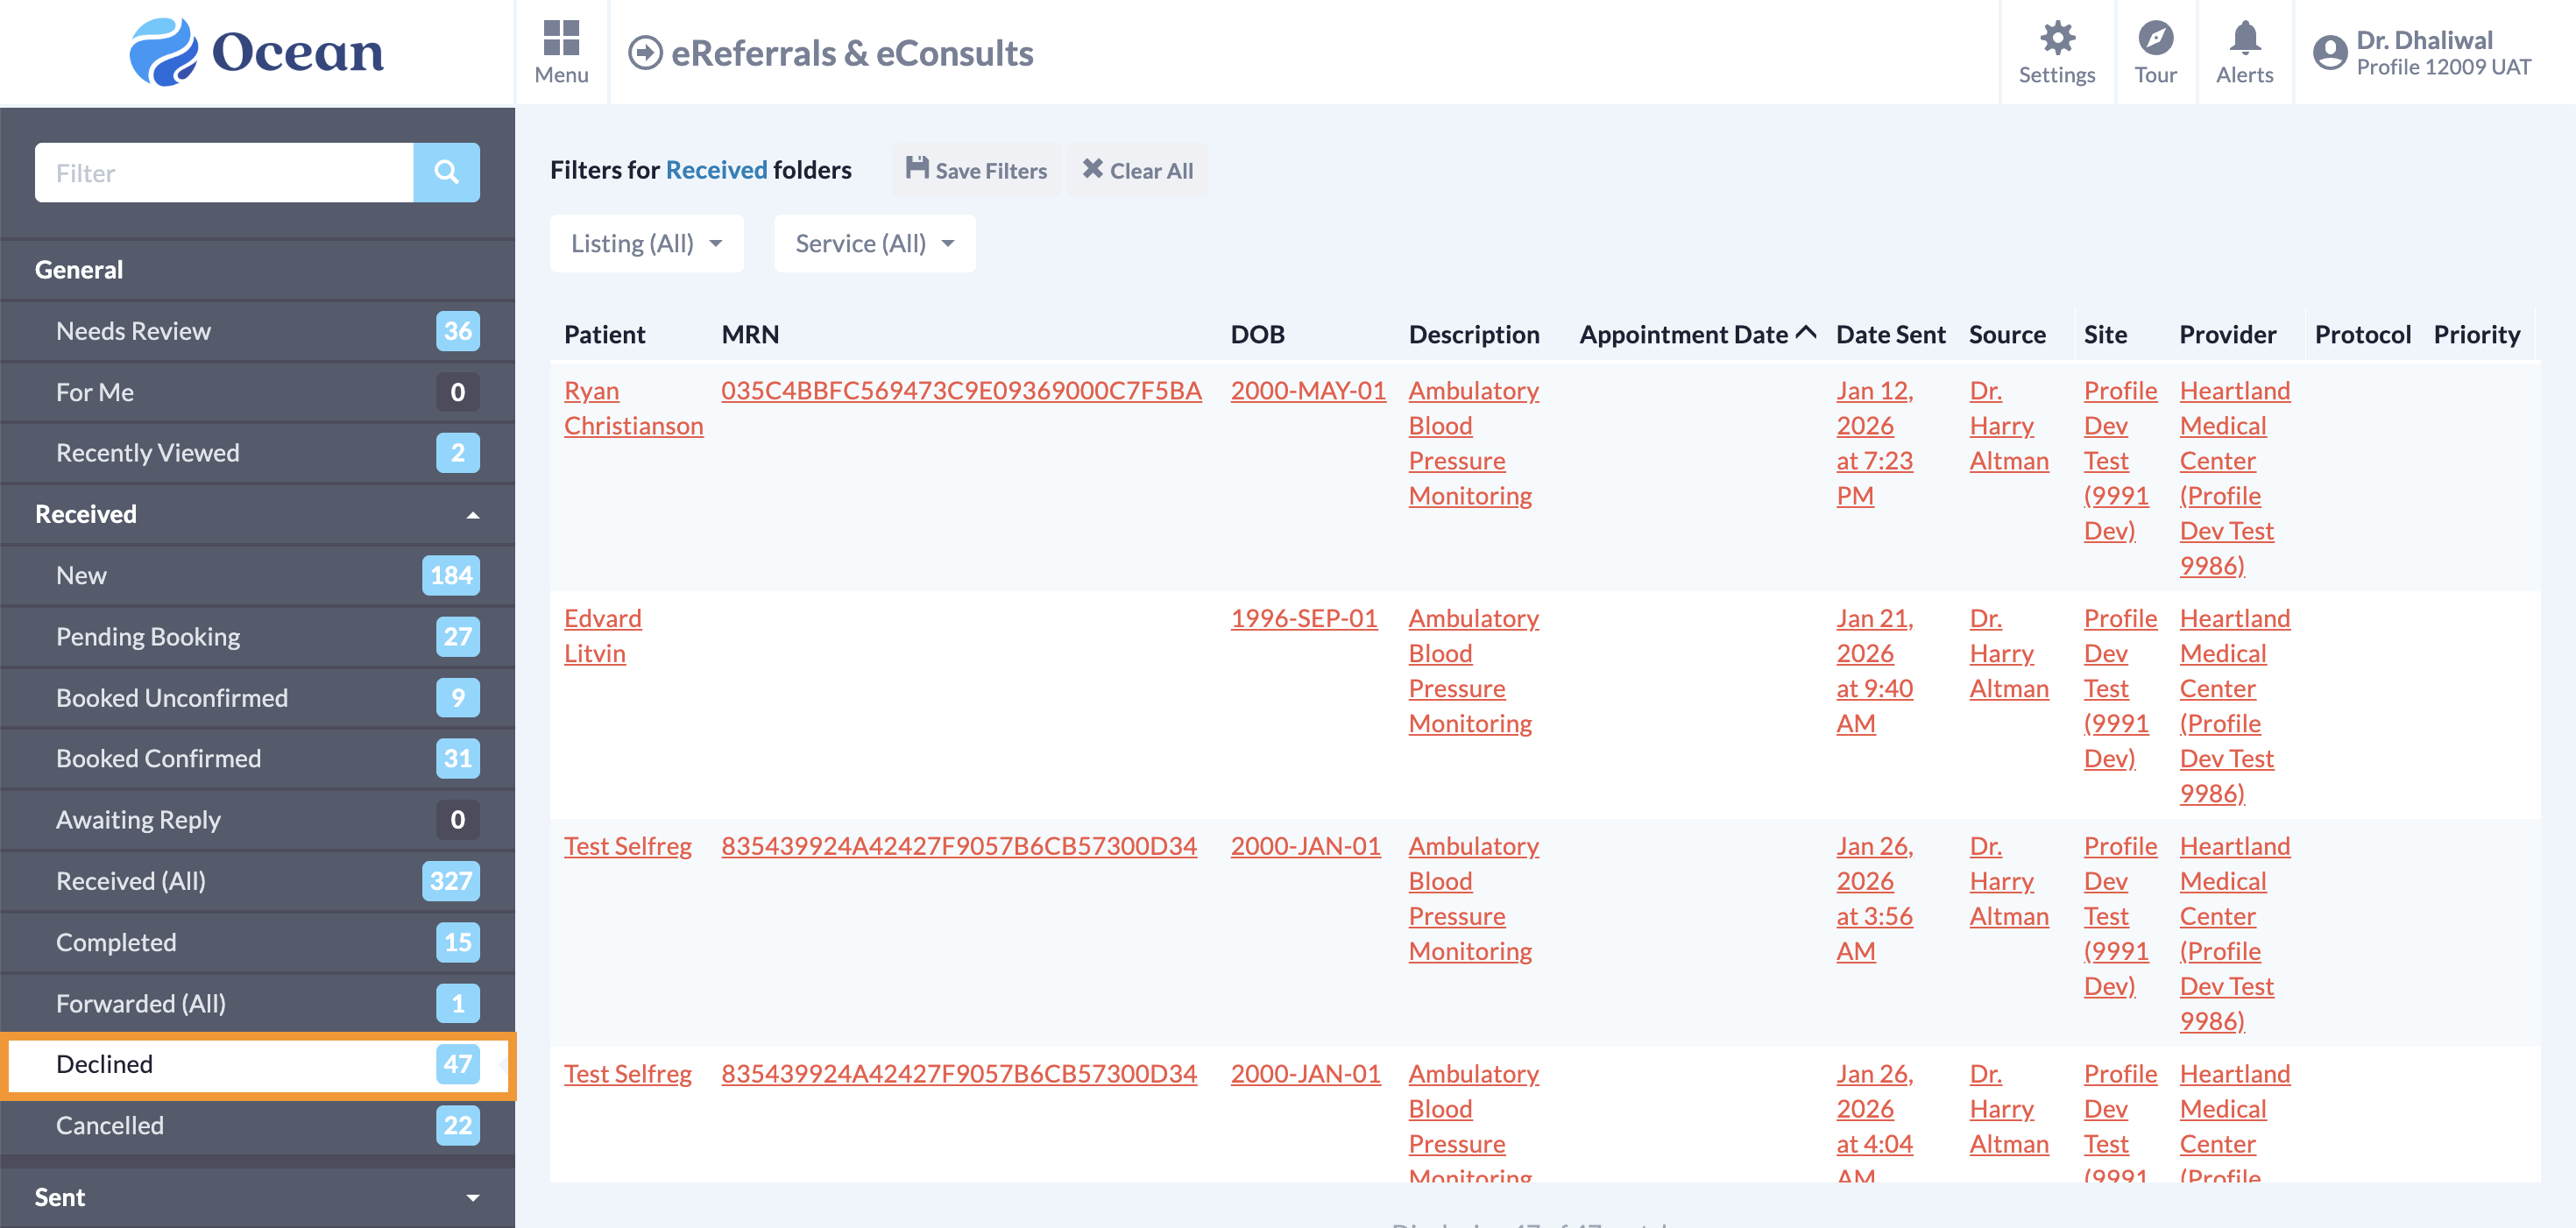
- In Ocean, the eReferral will be automatically moved to the Declined status folder.
-
-
Messaging within an eReferral
Please refer to the article Messaging within an eReferral.
-
Scheduling the Referral Appointment
Learn how to add appointment details to eReferrals in order to update patients and referring providers with appointment dates, times, mediums, and other scheduling details.
Appointment information can be added, edited, or removed by referral recipients at any point in an eReferral's lifecycle. This allows patients and referring providers to stay up to date with the latest appointment dates, times, delivery modes, and other scheduling details.
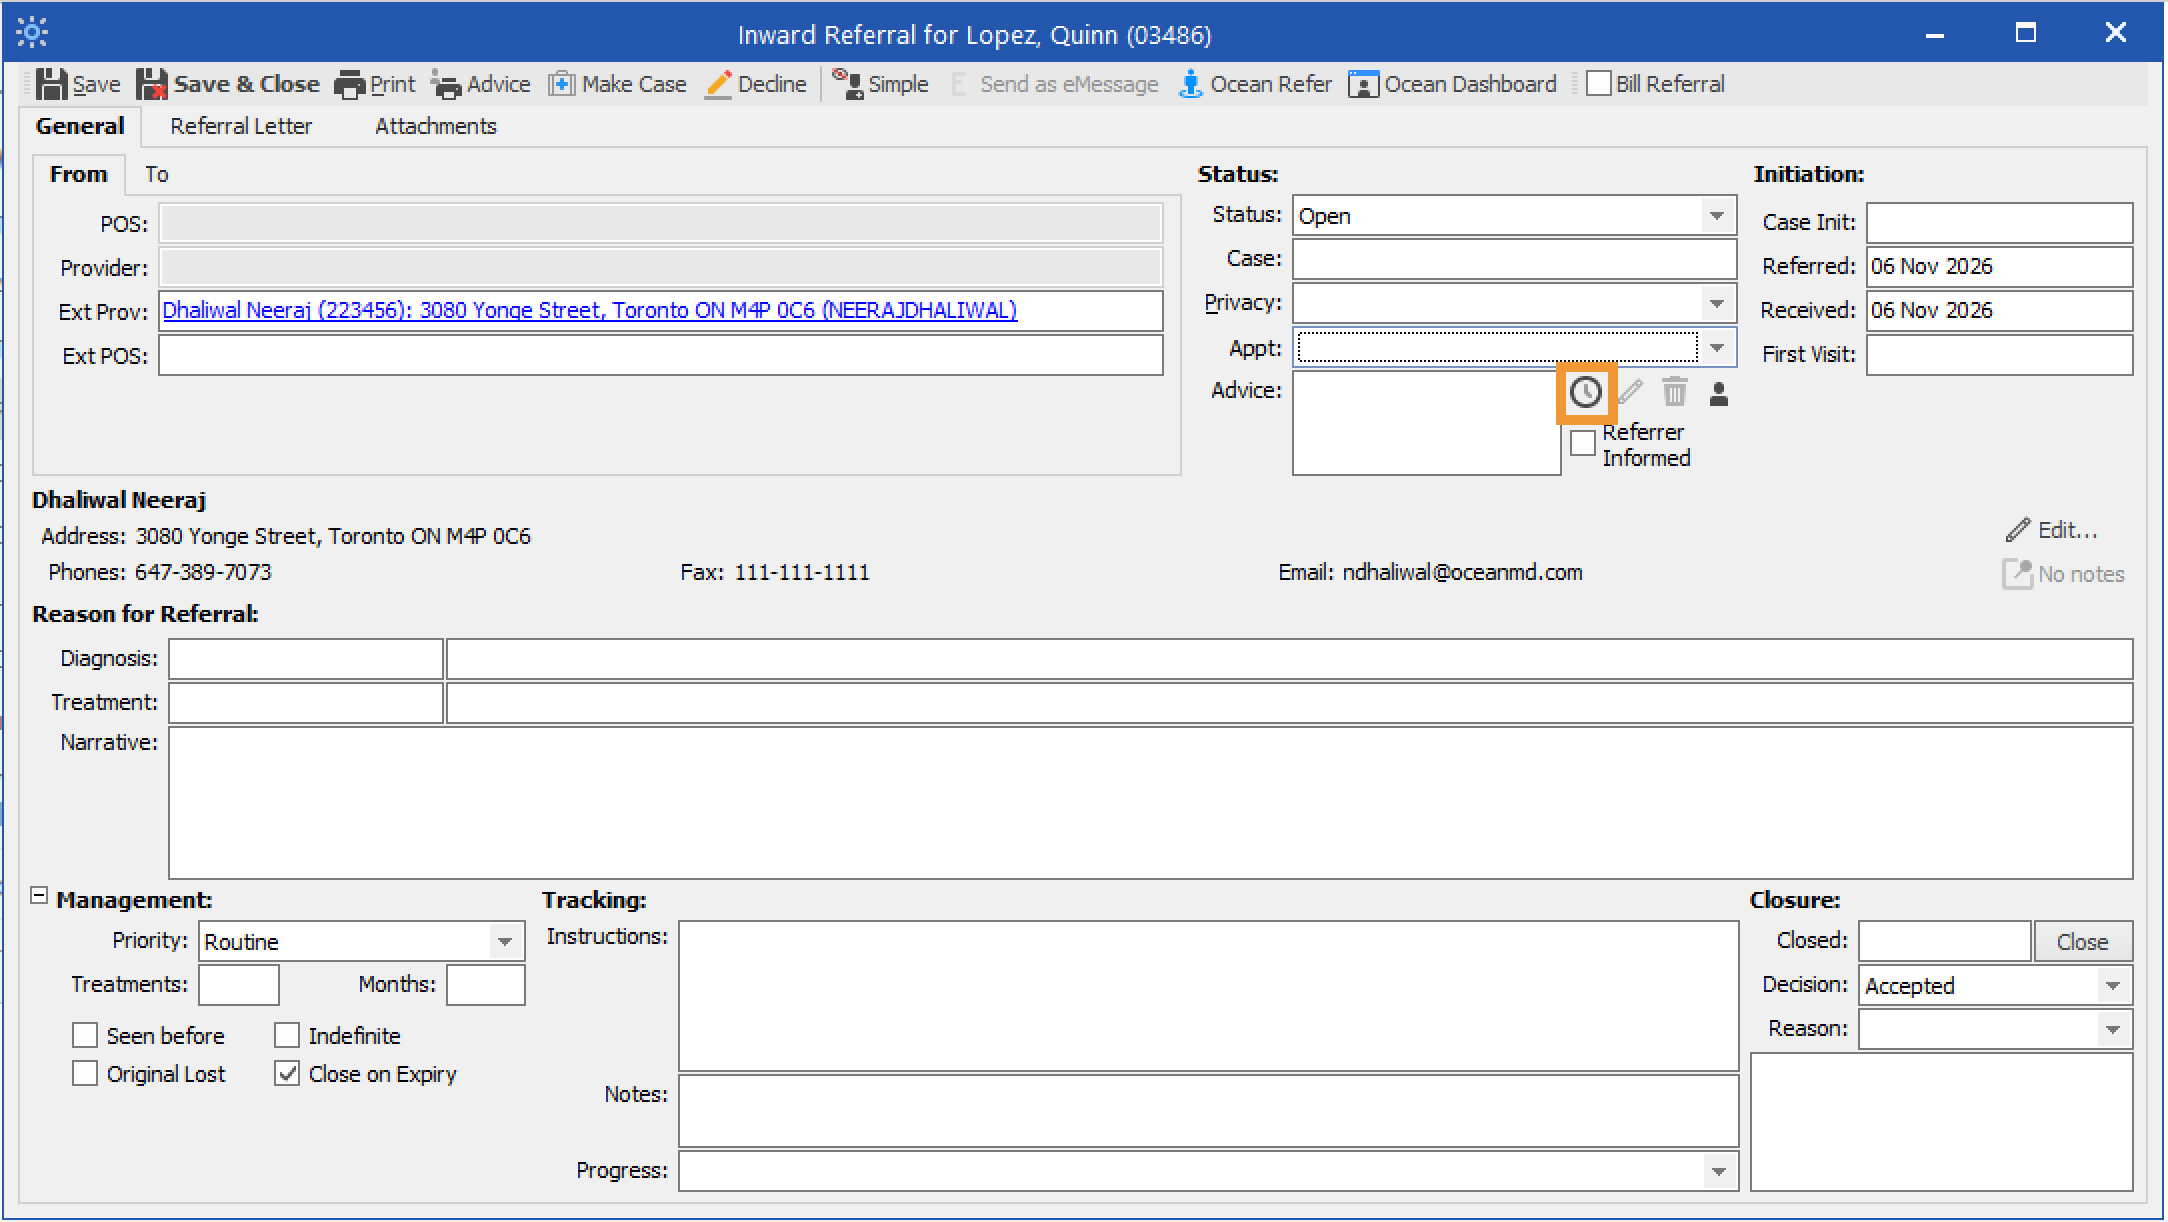
- Open the accepted eReferral in Profile. Under the Status section, locate 'Appt' and click the clock icon to schedule an appointment.
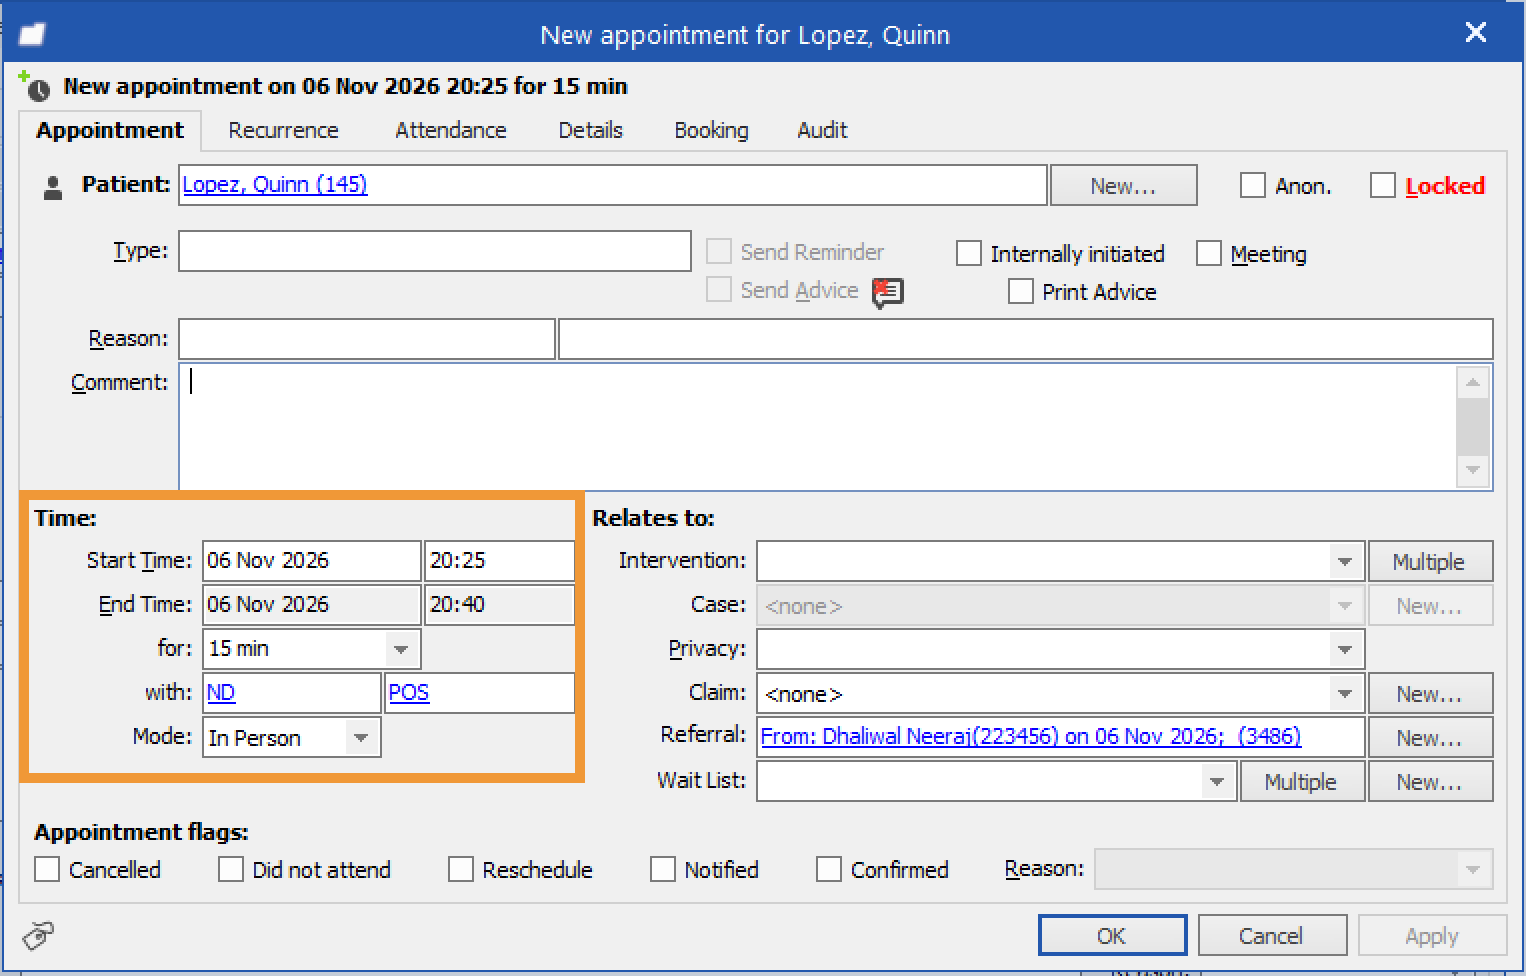
- Choose a delivery Mode (In Person, Phone, or Video) and enter the appointment date and time.
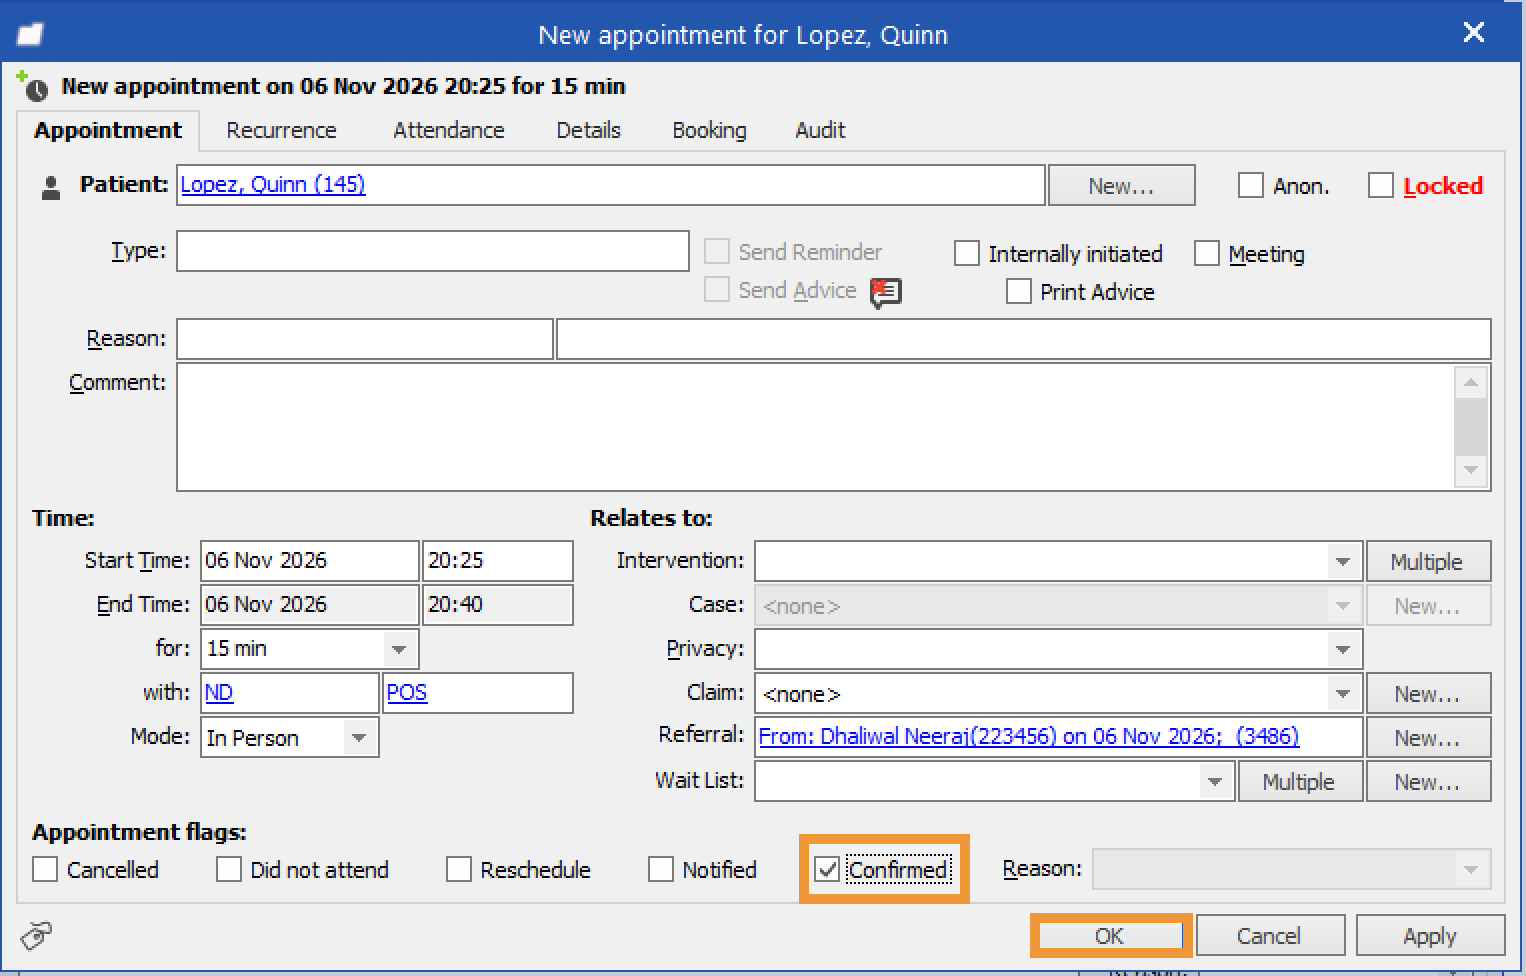
- When the appointment is confirmed with the patient, select the 'Confirmed' checkbox. Click 'OK'.
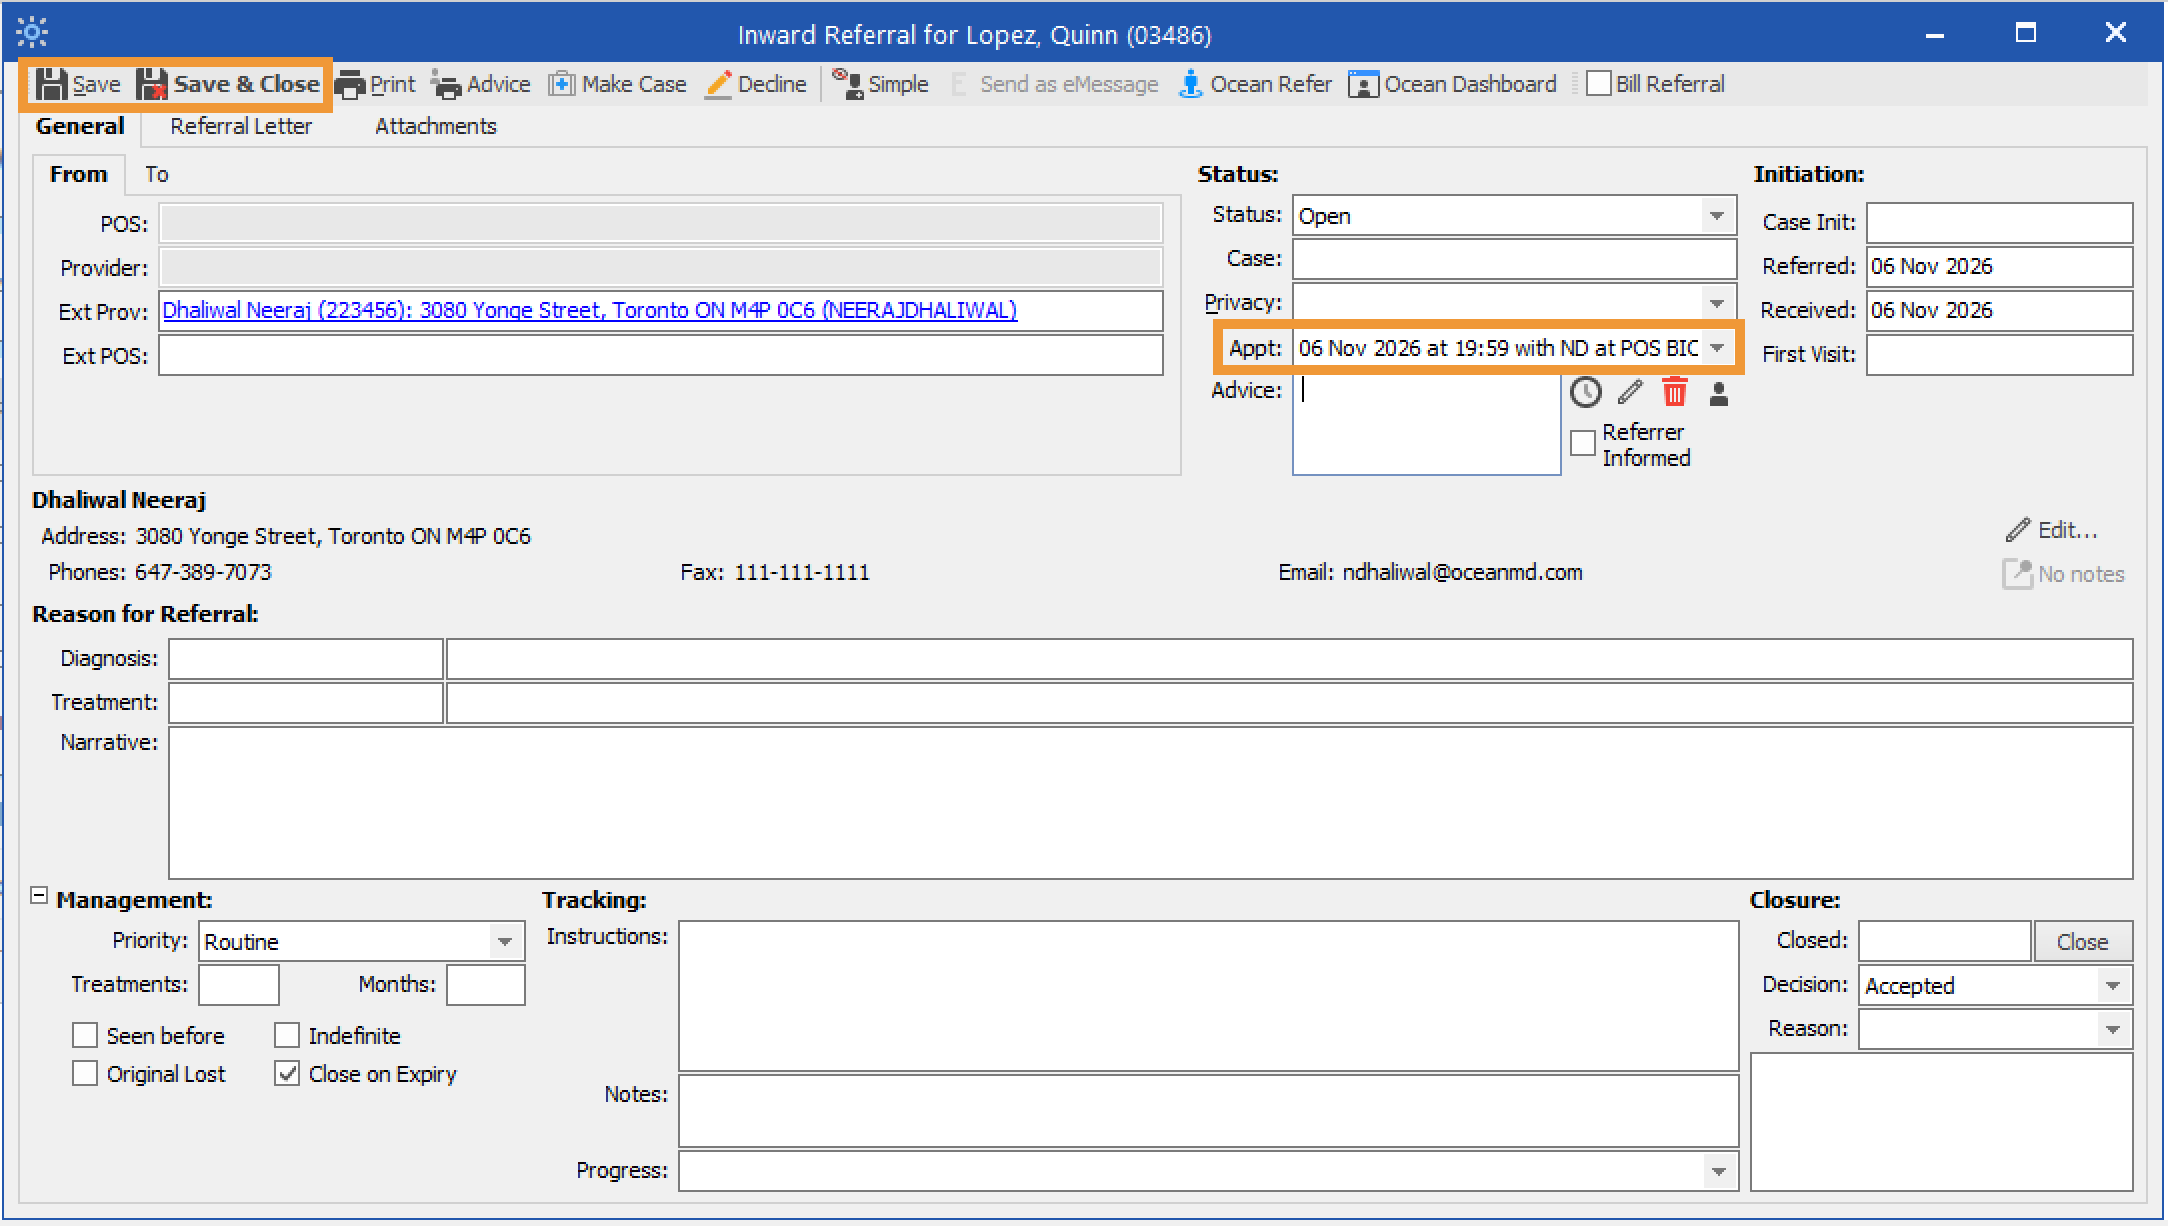
- Click 'Save' or 'Save & Close' to finalize the booking and synchronize it with the Profile schedule.
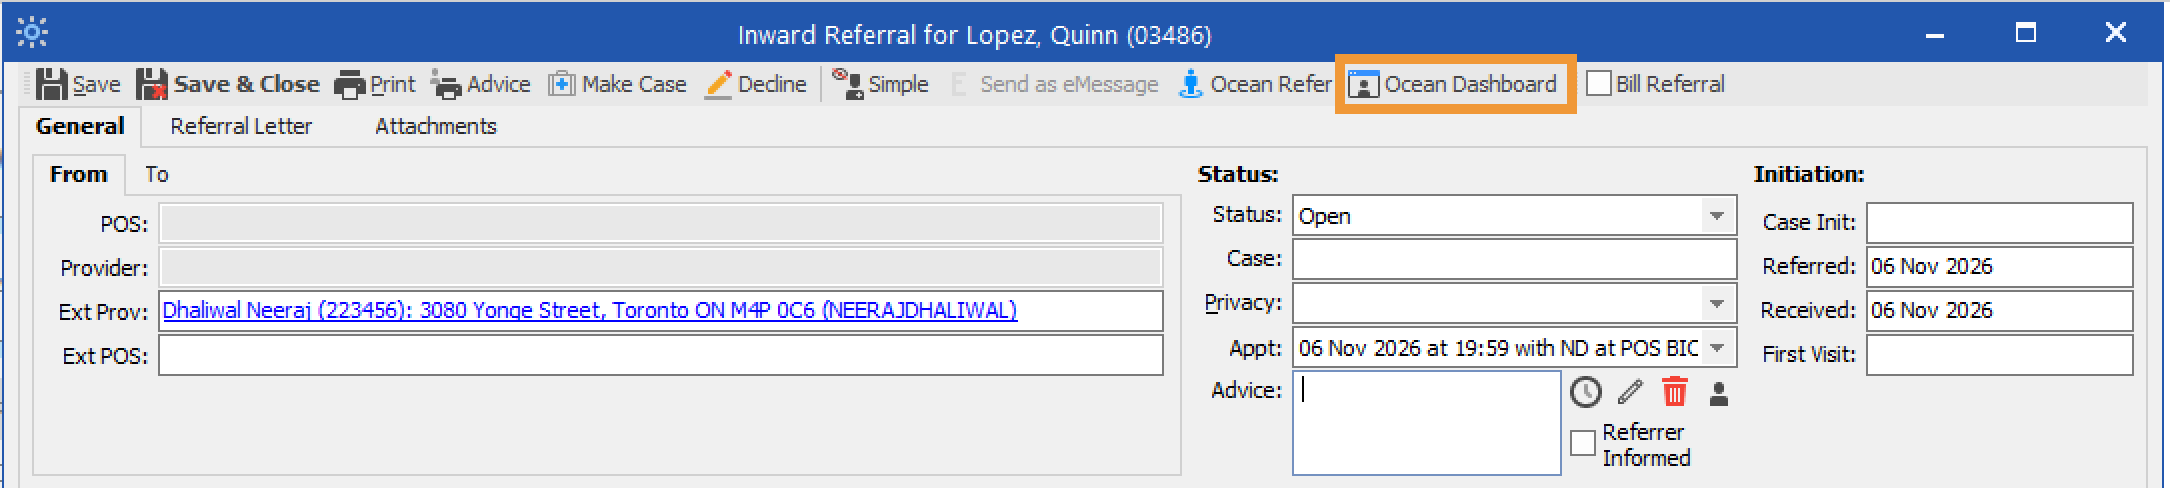
- Optionally, click the 'Ocean Dashboard' icon to view the eReferral in Ocean.
-
Under the Scheduling area, the appointment date, time, delivery mode, and confirmation status will be automatically populated from the information entered in Profile.
Type any comments for the referrer and patient into the text box, and click 'Add Attachments' to include any file attachments.
Tip: You can create canned booking comments to increase efficiency.

- In the eReferrals & eConsults area of the Ocean Portal, the referral will automatically move to either the Booked Unconfirmed or Booked Confirmed folder, depending on the confirmation status. An email notification will be sent to the referrer and/or patient containing the scheduled appointment details, comments and attachments, and the option to confirm the appointment, if applicable.
-
Completing the Referral
Learn how to mark a referral as 'Completed' to close the loop on its lifecycle.
Once the scheduled appointment date for the referral has passed, you are able to mark the referral as completed.
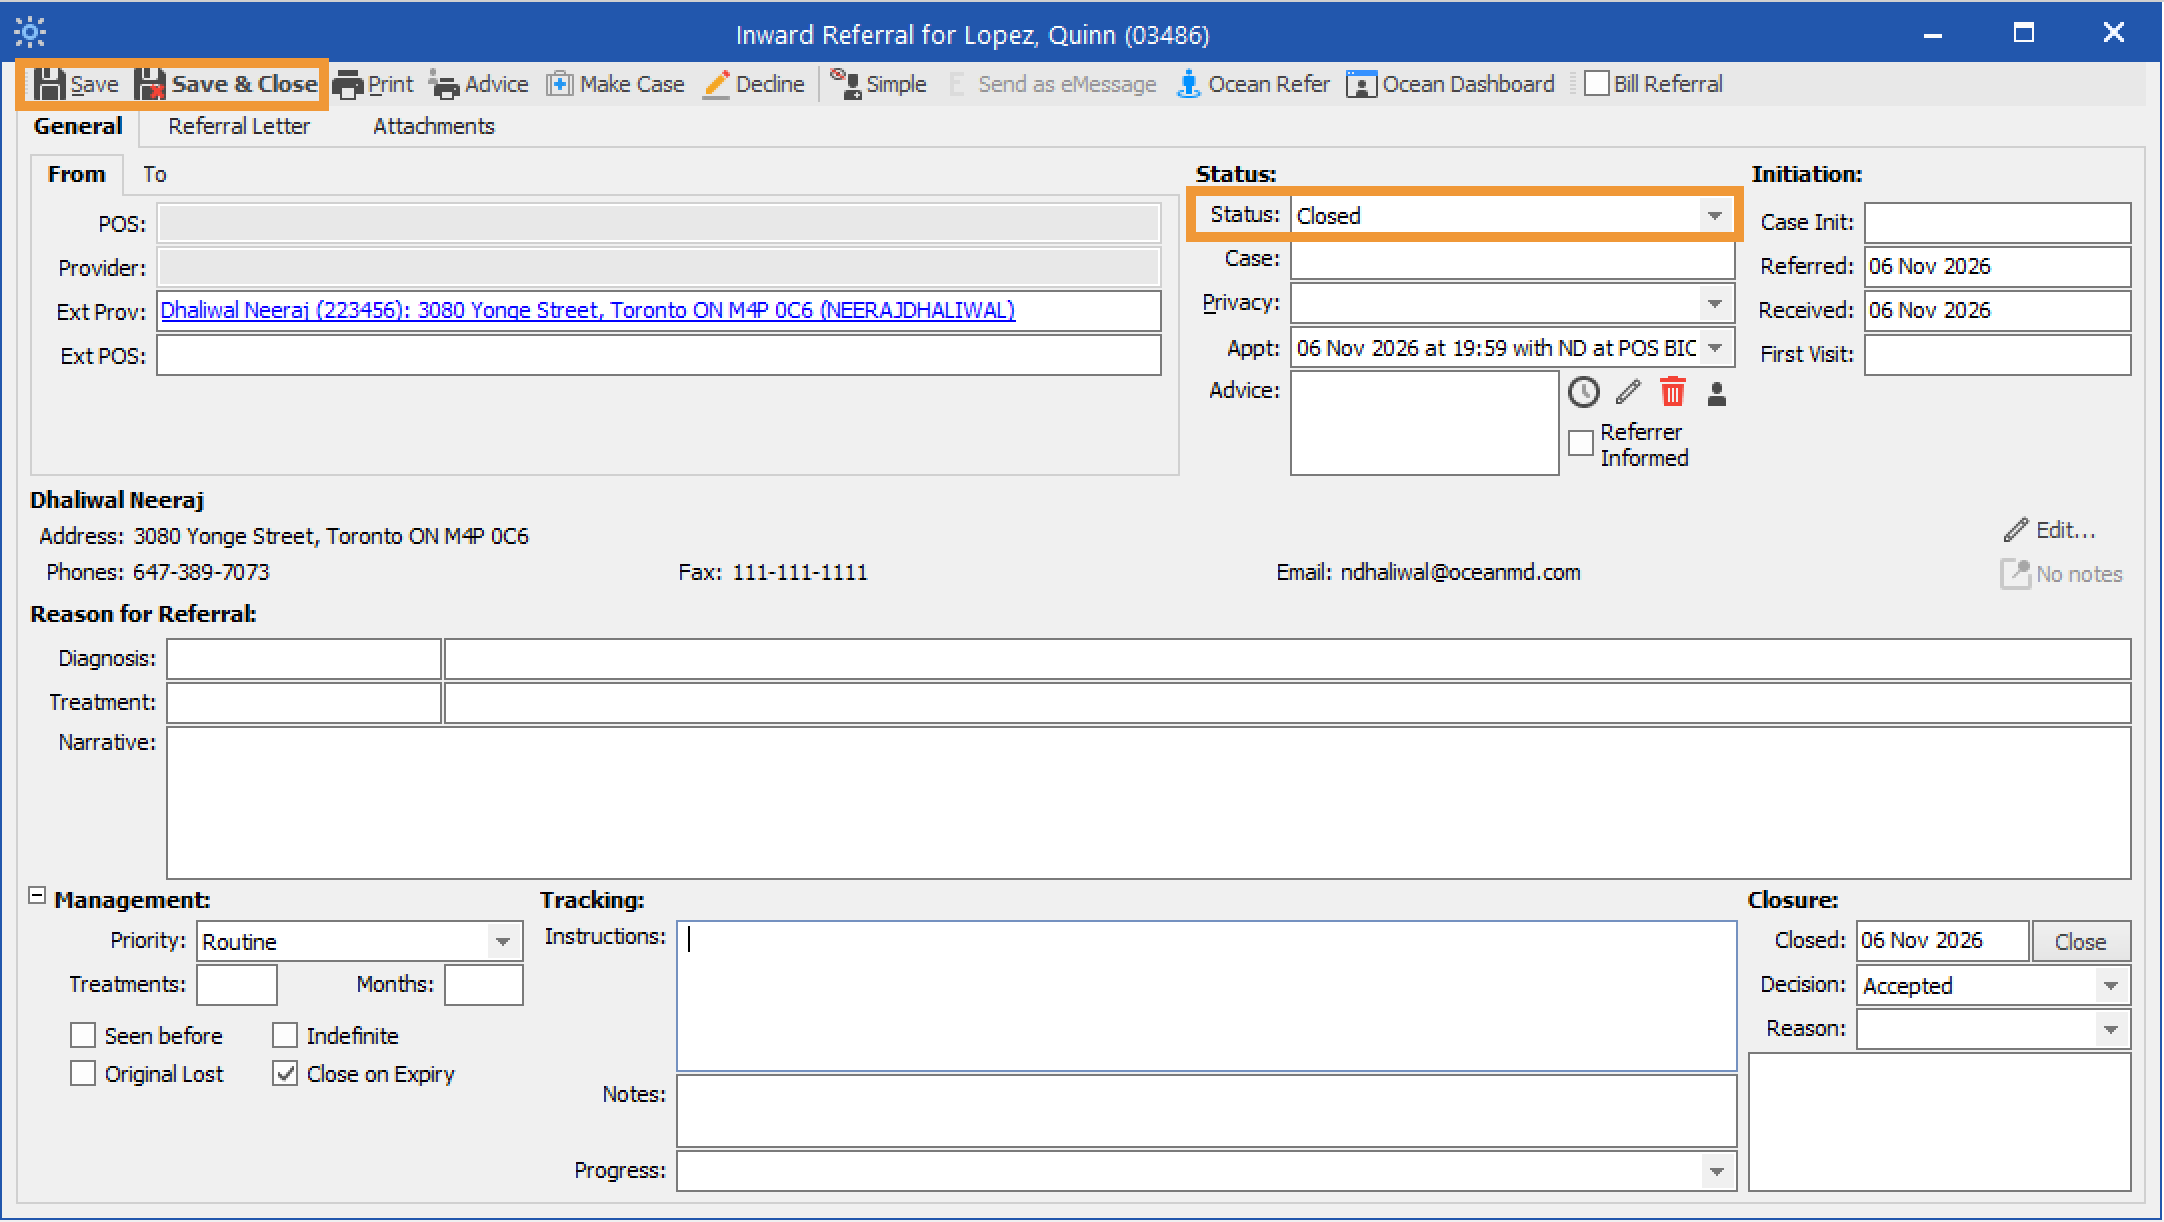
- Open the eReferral in Profile. Update the 'Status' to 'Closed'. Click 'Save' or 'Save & Close'.
- The referral record PDF under 'Attachments' will be updated with the Completed status.
- The referral will be automatically moved to the 'Completed' status folder.

Are referrals archived after they are moved into the 'Completed' status folder?
Yes, eReferrals are eventually archived after they are moved into the 'Completed' status folder. For specific details on Ocean's archival rules, refer to: How long are eReferrals and eConsults stored after they are sent through Ocean?
- If you would like to see the specific date that a referral is scheduled to be archived, you can click on the "Action" menu within the referral, and choose "View Event Log". The specific archive date will be displayed at the bottom of the event log.

-
Advanced Features and Best Practices
Please refer to the article Advanced Features and Best Practices.
Review Incoming eReferrals
Learn how to review incoming eReferrals from your FHIR-integrated EMR or the Ocean Portal.
Review New eReferrals
There are a few ways to review incoming eReferrals, either from the Ocean Portal or through your EMR.
From the EMR
- In Profile, open the Work Centre and select Referrals. Click the 'Ocean Dashboard' icon to access the eReferrals & eConsults area in the Ocean Portal.
From the Ocean Portal
- When you receive a new eReferral, you will receive an email notification based on your notification configuration. Click the link in the email to sign in to the Ocean Portal and view your received eReferrals.
-
Sign in to the Ocean Portal from your web browser and use the menu to navigate to the eReferrals & eConsults area.
Locate the eReferral under the Received tab and in the New status folder. Click the referral to open it and view more details.
Tip: Certain columns can be used to sort your referrals in ascending or descending order. Click a column header to change the sorting order.
Match Incoming eReferrals to Patients in the EMR
Before actioning an eReferral, check that it is matched to the correct patient chart in Profile. A referral will be unmatched if the patient does not yet have a chart in the EMR or if identifying information is missing.
Review Unmatched Referrals
- Open the Control Centre in Profile. Open the 'Manage' dropdown in the left sidebar and select 'Manual Matches'.
- Under Unmatched transactions, locate the eReferral you want to process using the patient's name or date of birth. If the referral is not listed, click 'Refresh'. Click the applicable row so that it is highlighted in purple.
Create a Patient Chart When Needed
- If the patient's name appears in the Best Guess Patients section, they have a matching chart in Profile and you can skip this section. If the section is empty, the patient does not have an existing chart in Profile.
To create a patient chart, follow these steps:
- Ensure that the patient's referral is selected, and then click 'Add Patient'.
- Enter the patient's details in the window that opens. Relevant information included in the eReferral will be populated automatically. Click 'Apply' to apply your changes, and then click 'OK' to create the patient chart.
Assign a Provider
Next, match the patient to a provider in Profile.
- Click the patient's name under the Best Guess Patients section. Select the appropriate provider from the Providers list and click 'Assign'.
- A window will appear asking you to confirm that you want to match the patient and provider. Click 'Yes'.
- A green check mark will appear next to the patient's name when the match has been completed successfully. Click 'Save Changes'.
Accepting & Declining eReferrals
Learn how to accept, decline, and import eReferrals into your EMR.
Review the eReferral
After opening the eReferral in Profile, review its contents to gain a more detailed understanding of the referral and ensure it contains the information you require.
Tip: If necessary, you can assign the referral to be reviewed by another user on your Ocean site for a secondary review.
-
Open the eReferral in Profile. The General tab contains information about the referral's status and decision.
Status: Shows whether the eReferral is Open or Closed. A referral is closed once it reaches a terminal state, such as declined, cancelled, or completed.
Decision: Shows whether the eReferral is awaiting acceptance, has been accepted, or has been declined.
- Pending: Corresponds to the Awaiting Response status folder in the Ocean Portal.
- Accepted: Corresponds to the Pending Booking, Booked Unconfirmed, or Booked Confirmed status folders in the Ocean Portal.
- Declined: Corresponds to the Declined status folder in the Ocean Portal.
- Under Attachments, the referral record PDF will contain details about the referral, including patient information, the referral form summary, notes, messages, and attachments.
- Alternatively, click the 'Ocean Dashboard' icon to view the eReferral in Ocean.
Accept or Decline the eReferral
- To accept the eReferral from Profile, update the 'Decision' to 'Accepted'.
- The referral record PDF under Attachments will be updated with the new status of the referral.
- In Ocean, the eReferral will be automatically moved to the Pending Booking status folder until an appointment is scheduled.
- To decline the eReferral from Profile, update the 'Decision' to 'Declined'. Use 'Reason' to indicate the reason for the declination, and use the text area beneath it to enter more information regarding the declination.
- The 'Status' will automatically update to 'Closed'.
- The referring provider will be notified of the declination.
- The referral record PDF under Attachments will be updated with the new declined status, along with the reason for the declination.
- In Ocean, the eReferral will be automatically moved to the Declined status folder.
Messaging within an eReferral
Please refer to the article Messaging within an eReferral.
Scheduling the Referral Appointment
Learn how to add appointment details to eReferrals in order to update patients and referring providers with appointment dates, times, mediums, and other scheduling details.
Appointment information can be added, edited, or removed by referral recipients at any point in an eReferral's lifecycle. This allows patients and referring providers to stay up to date with the latest appointment dates, times, delivery modes, and other scheduling details.
- Open the accepted eReferral in Profile. Under the Status section, locate 'Appt' and click the clock icon to schedule an appointment.
- Choose a delivery Mode (In Person, Phone, or Video) and enter the appointment date and time.
- When the appointment is confirmed with the patient, select the 'Confirmed' checkbox. Click 'OK'.
- Click 'Save' or 'Save & Close' to finalize the booking and synchronize it with the Profile schedule.
- Optionally, click the 'Ocean Dashboard' icon to view the eReferral in Ocean.
-
Under the Scheduling area, the appointment date, time, delivery mode, and confirmation status will be automatically populated from the information entered in Profile.
Type any comments for the referrer and patient into the text box, and click 'Add Attachments' to include any file attachments.
Tip: You can create canned booking comments to increase efficiency.
- In the eReferrals & eConsults area of the Ocean Portal, the referral will automatically move to either the Booked Unconfirmed or Booked Confirmed folder, depending on the confirmation status. An email notification will be sent to the referrer and/or patient containing the scheduled appointment details, comments and attachments, and the option to confirm the appointment, if applicable.
Completing the Referral
Learn how to mark a referral as 'Completed' to close the loop on its lifecycle.
Once the scheduled appointment date for the referral has passed, you are able to mark the referral as completed.
- Open the eReferral in Profile. Update the 'Status' to 'Closed'. Click 'Save' or 'Save & Close'.
- The referral record PDF under 'Attachments' will be updated with the Completed status.
- The referral will be automatically moved to the 'Completed' status folder.
Are referrals archived after they are moved into the 'Completed' status folder?
Yes, eReferrals are eventually archived after they are moved into the 'Completed' status folder. For specific details on Ocean's archival rules, refer to: How long are eReferrals and eConsults stored after they are sent through Ocean?
- If you would like to see the specific date that a referral is scheduled to be archived, you can click on the "Action" menu within the referral, and choose "View Event Log". The specific archive date will be displayed at the bottom of the event log.
Advanced Features and Best Practices
Please refer to the article Advanced Features and Best Practices.