To start, you will need to download four PS Suite Custom Form (.cfm) files and import them into your PS Suite EMR.
If you are setting up for the first time or downloading the latest version to update your instance, please follow the steps outlined below:
-
Download the Ocean custom form, toolbar and attachment exporter files.
- If the files do not appear as “.cfm”, right-click each of the links to and save them manually by selecting "Save As..." from the menu of options.
- The Ocean Attachment Exporter is required for automatically adding notes from a patient's chart to Ocean secure messages or eReferrals. Learn more about Creating a PDF Attachment to Add to a Secure Message.
-
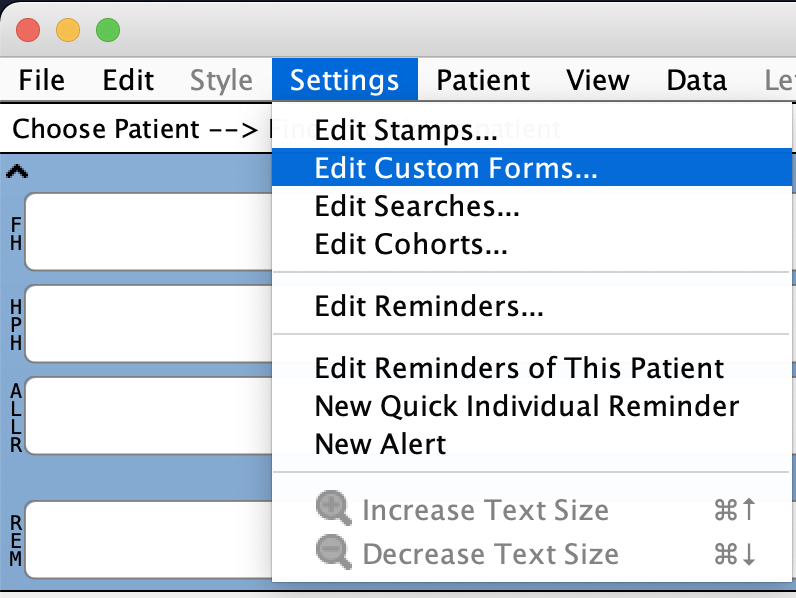
Open the Edit Custom Forms window in PS Suite.
- Log in to PS Suite and open the EMR (Records) window.

- From the "Settings" menu, choose "Edit Custom Forms".
-
Import the downloaded custom form files into PS Suite.
- From the Edit Custom Forms window, select "File" and then "Import Form(s)".

- Locate the .cfm files that were downloaded. (This will typically be in your computer's "Downloads" folder if you've downloaded the file recently.)
- Select "Choose" and close the Custom Forms window.


Note: Installing/updating the Ocean Toolbar, Custom Form and Attachment Exporter is an instance-wide process. You do not need to perform these steps on a per user basis. Once installed, the Ocean Custom Form, Toolbar and Attachment Exporter will be accessible to all users of the EMR.
Updating the Ocean Toolbar, Custom Form and Attachment Exporter
-
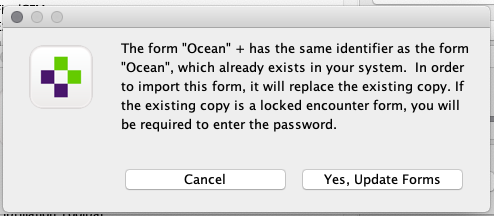
If you are updating the Ocean Toolbar, Custom Form or Attachment Exporter, you may be prompted by a dialogue window, when importing your new .cfm files, that a form with the same identifier already exists in your system.
-
-
You are safe to proceed and select "Yes, Update Form." This will safely replace and overwrite the earlier version with the updated file that has been downloaded.
-
Once complete, please refresh or manually close and reopen any active patient charts. This will ensure charts are correctly using the updated version.