To easily access Ocean directly within Accuro, you will want to set up CDS (Clinical Decision Support) links to various Ocean products or services.
What You Can Do with CDS Links
The CDS (Clinical Decision Support) option in Accuro's quick action menu provides a convenient user interface for interacting with Ocean directly within Accuro.
Using the CDS feature, Accuro users can add hyperlinks to Ocean that support single-sign-on (SSO) with automated patient-specific requests for interacting with Ocean.
Simply select a patient in Accuro, and then use the corresponding CDS link:
- View Ocean Portal
- Launch directly into the Ocean Portal.
- View Patient Summary
- Launch into a patient-specific summary.
- Send Patient Message
- Initiate a new Patient Message.
- Send eRequest
- Launch into the Ocean Healthmap to initiate a new eRequest.
- Send Referral Appointment Information
- Efficiently add appointment information from the EMR schedule into an eRequest.
Configuring CDS Links
Prerequisites for Getting Started
Before configuring your CDS links, please ensure the following steps have been completed:
- Your Ocean site is integrated with your Accuro EMR using Ocean Cloud Connect
- Your Ocean user account has Site Admin access
- Your have Administrator access in your Accuro EMR
-
Navigate to the 'Accuro CDS Links Configuration' panel in the Ocean Portal
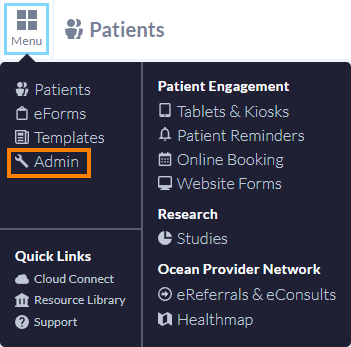
- Sign in to the Ocean Portal. Click the 'Menu'' button in the top left corner and select 'Admin'.
-
- Click on 'Manage Credentials' in the Admin Settings page.
-

- Click 'Configure Accuro CDS Links'. You will be prompted to enter your Ocean user account credentials.
-

- The 'Accuro CDS Links Configuration' window will appear, outlining the four parameter/value pairs that need to be set for each link in Accuro (siteKey, siteCredential, userID, and patientID) and a full list of available CDS link functionalities with their corresponding URL.
-

-
Determine which CDS links to Configure
The 'View Ocean Portal' and 'View Patient Dashboard' links are the most versatile as they offer additional Ocean-related functions for the patient.
However, the 'Send Patient Message', 'Send eRequest', and 'Send Referral Appointment Information' links increase efficiency if you initiate these actions frequently.
-
Configure each CDS link in Accuro
We recommend using global CDS links (i.e., not user-specific links) to launch from Accuro into Ocean.
When global CDS links are used, they are visible to all users in your Accuro instance, so everyone can benefit without having to configure the links themselves.
To configure global CDS links, follow the steps below:
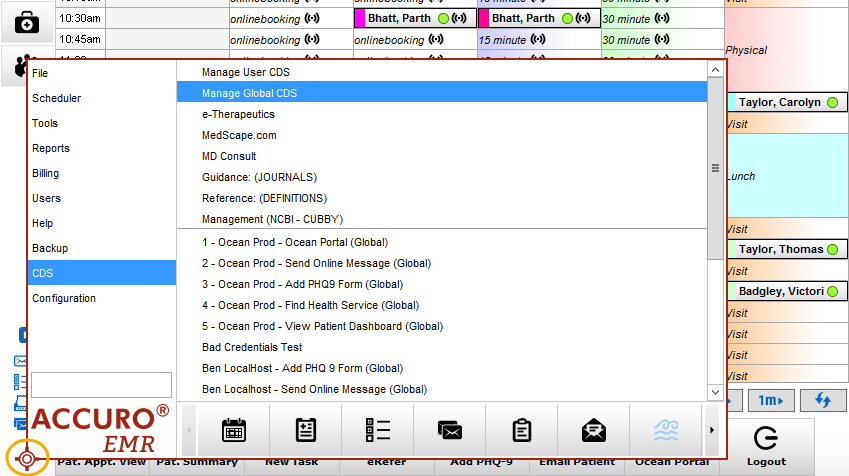
- In Accuro, open the Accuro action menu by clicking the crosshairs icon at the bottom left of the EMR. Enter the CDS menu and select 'Manage Global CDS'.
- Click the green plus (+) icon to open the 'Configure Global CDS Link' dialog box:

- When the 'Configure Global CDS Link' dialog box opens, fill in the following fields using the provided values from the 'Accuro CDS Link Configuration' window in Ocean:

- Note: Ensure there is exact capitalization for all of the following parameters, and verify there are no leading or trailing spaces.
- For efficiency, we recommend pressing the 'Copy' icon within the Ocean window, and then simply pasting into the relevant field in Accuro.
-
- Name
- Enter the name of the CDS link - e.g., 'View Ocean Portal'.

-
- URL
- Copy and paste the exact URL from Ocean. Ensure there are no leading or trailing spaces at the start or end of the copied URL.
-
- Parameter/Value Table
- Click the green plus (+) icon to add the four Parameter/Value pairs provided in the "Accuro CDS Links Configuration" window in Ocean: siteKey, siteCredential, userID, and patientID.

- Click "OK" to save the CDS link.
- Repeat Steps 3b through 3e above for each CDS link that you are configuring.
- Click "Close" to close the "Configure Accuro CDS Links" dialog box.
-
Test your new CDS links
- Test each of your newly configured CDS links by selecting them from the CDS menu within the Accuro action menu.

(Optional) Add User-Friendly Buttons
Once all your CDS links have been set up, you have the option of adding additional shortcuts to your Accuro action bar for quicker access. To learn more about how to configure these shortcuts, please refer to Add User-Friendly Buttons to CDS Links.
Precautions for All Ocean CDS Links
Accuro opens CDS Links in a minimalist embedded web browser. Although the browser is capable of performing most Ocean-related tasks, it cannot print, which prevents the printing of referral handouts and other actions.
Also note that the above URLs include the Shared Encryption Key for your Ocean site (encoded after the anchor '#' tag).
If you prefer to avoid including the Shared Encryption Key for security reasons, you can remove it from the URL by trimming the '#'' character and all characters following it. If you leave the shared encryption key in place, be aware that all of the links above that included the key will need updating if and when you change your site's shared encryption key in the future.