-
Locate your measurement type in your OSCAR EMR.
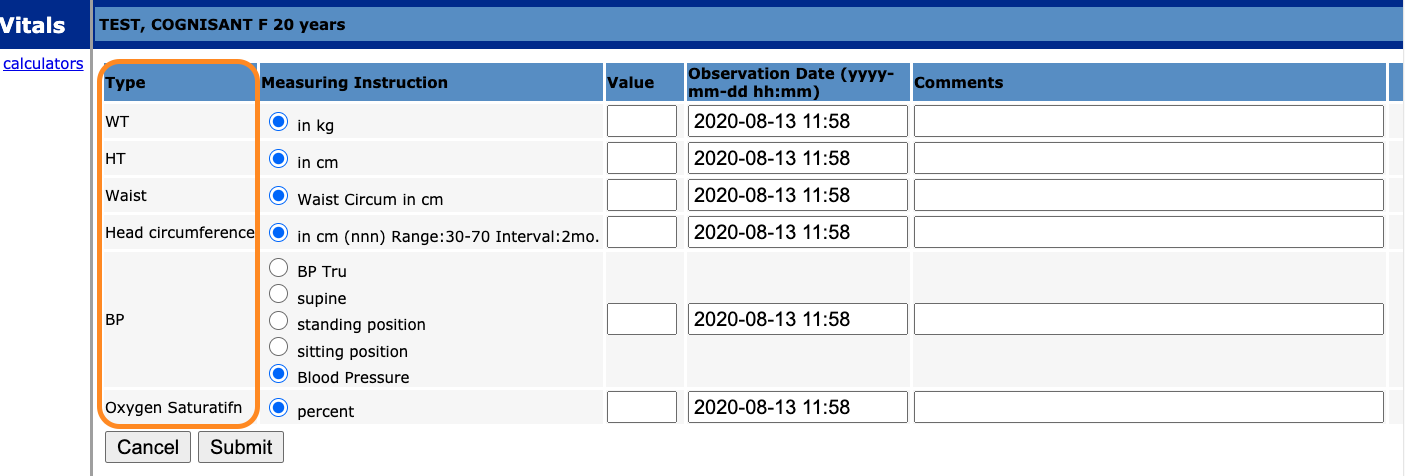
Locating Vitals
- Ocean can collect responses from a patient via eForm and populate Vitals in OSCAR. Simply navigate to the vitals in a test patient and copy the value under the Type column and proceed to the next step.
-
Locating a Custom Measurement
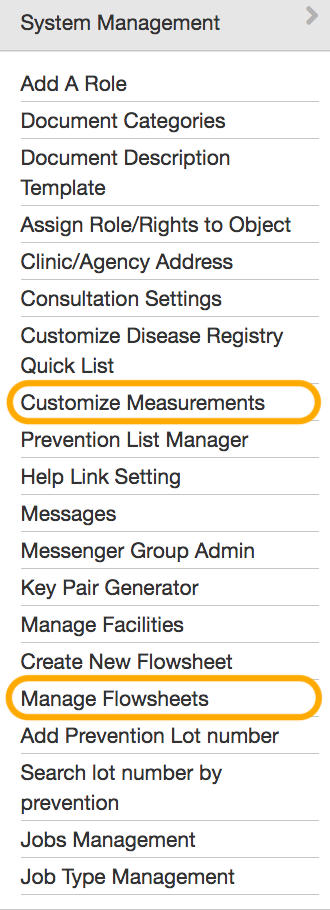
- Log in to your OSCAR EMR and open the Administration panel.

- Expand the "System Management" section (in the menu on the left) and select "Customize Measurements".
- To view existing measurements, click Edit Measurement Group. Select the measurement group you would like to investigate from the dropdown menu and click Modify Measurement Types. Here, you can view your existing measurements, add or remove measurements from this group. Copy the name of the measurement and proceed to the next step.

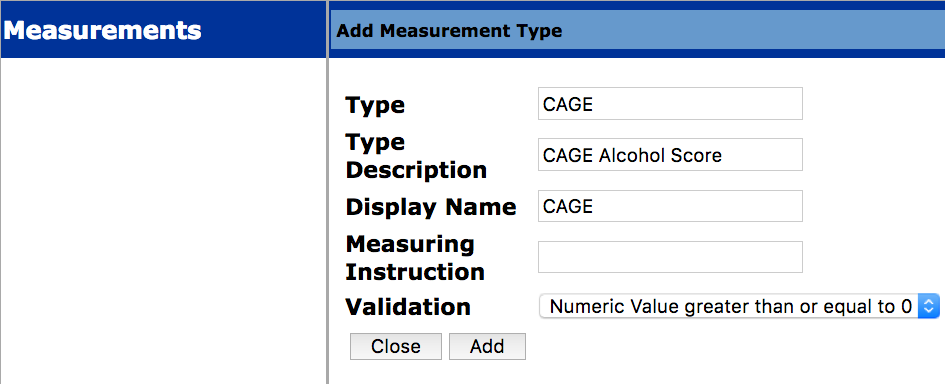
- To add a new measurement, click "Add Measurement Type". Copy the name in the "Type" field and proceed to the next step.
For a custom measurement to be properly mapped and tracked, you will need: a custom measurement type in OSCAR (with a type that matches the measurement's allowable values) and a custom flowsheet (with all your Ocean-provided measurements included).
Please note: Depending on your OSP, you may need a system administrator or staff member with admin privileges to perform the following steps on your behalf.- Log in to your OSCAR EMR and open the Administration panel.
- Expand the "System Management" section (in the menu on the left) and select "Customize Measurements".
- Select "Customize Measurements", and then "Add Measurement Type". Create your new custom measurement type (if it doesn't exist already in your OSCAR EMR).
Customize your Ocean flowsheet and upload it into your OSCAR EMR.
- The flowsheet to the right contains all the standard OSCAR-installed measurement types. You will likely already be using other measurement types, such as CAGE and PHQ-9. If you are adding a new measurement type, you must add it to this flowsheet before uploading it into OSCAR. OSCAR flowsheets are XML documents, so you will need to edit the raw XML in a text editor.
- Download the latest Ocean flowsheet
-
Please note: Some OSP configurations may not have all the standard OSCAR-installed measurement types contained in the Ocean flowsheet file.
If you are unable to properly load the flowsheet file in your EMR, edit the Ocean flowsheet XML file to only list entries for the measurement values you wish to track. Also ensure these measurements are properly defined in OSCAR's measurements settings, per this guide's earlier instructions. - For example, you can add the CAGE measurement type to the bottom of the flowsheet, before the
</header>element, as shown below: -
<item measurement_type="CAGE" display_name="CAGE" guideline="" graphable="no" value_name="CAGEOceanLabel">
- Once you are done editing the flowsheet, upload it into OSCAR by opening the Administration panel, expanding the "System Management" section (from the menu along the left), and selecting "Manage Flowsheets".
Note for clinics using KAI: To be compatible with KAI's requirements for flowsheet files, you'll need to add an additional attribute to your flowsheet file,
dxcode_triggers. Please ensure the first line of your Ocean flowsheet XML is formatted like so:<flowsheet name="Ocean" display_name="Ocean Measurement Updates" dxcode_triggers="">
-
Tag your measurement in your Ocean eForm.
- When you are building your eForms, if you "tag" a caption by surrounding a single word with "@" and ":" then the value will be available for mapping using EMR field mapping. Ensure this word matches your measurement from step 1.

Ensure your tagged field also contains a $$ variable after the colon to capture the value of your form item or formula defined in the "Scripting and More" tab. The complete tagged field syntax should be structured like so:
@taggedField: $$- An example can be found in the screenshot to the right or in the note generated by this standard CAGE questionnaire.
- CAGE Questionnaire
- Note: The value of the tagged field in the Ocean note is passed directly to the OSCAR measurement. In other words, if OSCAR expects "Yes" or "No" and the note contains Y or N, it won't work. Therefore, the note has to produce exactly what OSCAR expects for the measurement.
-
Map your OSCAR measurement in the Ocean Portal.
- Log in to the Ocean Portal. Click "Menu" and select "Admin".

- From the Admin Settings page, click "EMR Field Mapping" and add a row.
- The "Tagged Field" should match the note that you tagged in your Ocean eForm (i.e. the caption you surrounded with "@"" and ":" in your Ocean eForm).
- The "EMR Field" should be all capital letters and should exactly match the measurement type in OSCAR (see screenshot to the right).

- Make sure to save your changes in the Ocean Portal before leaving that "EMR Field Mapping" page.
- Now, if a patient completes the CAGE questionnaire, the CAGE value in the measurement will then be set in the "Measurements" section of their Encounter screen in OSCAR.
