
One-Time Booking Link templates are used when sending a unique booking link to an existing patient. The link can only be used once and expires based on the appointment window configured in the template.
Using the Template Manager, you're able to create a brand new templates from scratch, modify existing templates, or even duplicate a template to make a similar yet slightly different version.
Prerequisites
- Your Ocean Site has Advanced Clinic Booking enabled. If not enabled, contact the OceanMD team. To learn more about Advanced Clinic Booking refer to Introducing Online Booking.
- Your Ocean Site has at least one Booking Link that has 'Show this link in One-Time Bookings' enabled. To do this, please refer to the following article: Set Up Booking Links.
- You must be an Ocean Site Admin to customize Templates.
- To create a brand new template, log in to the Ocean Portal.
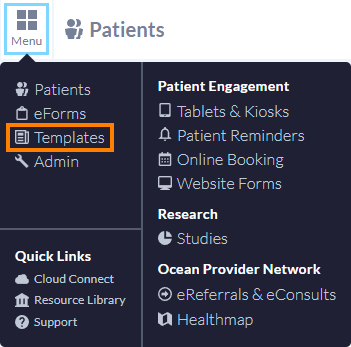
- In the top left corner, select "Menu" and click "Templates". This brings you to the Template Manager.
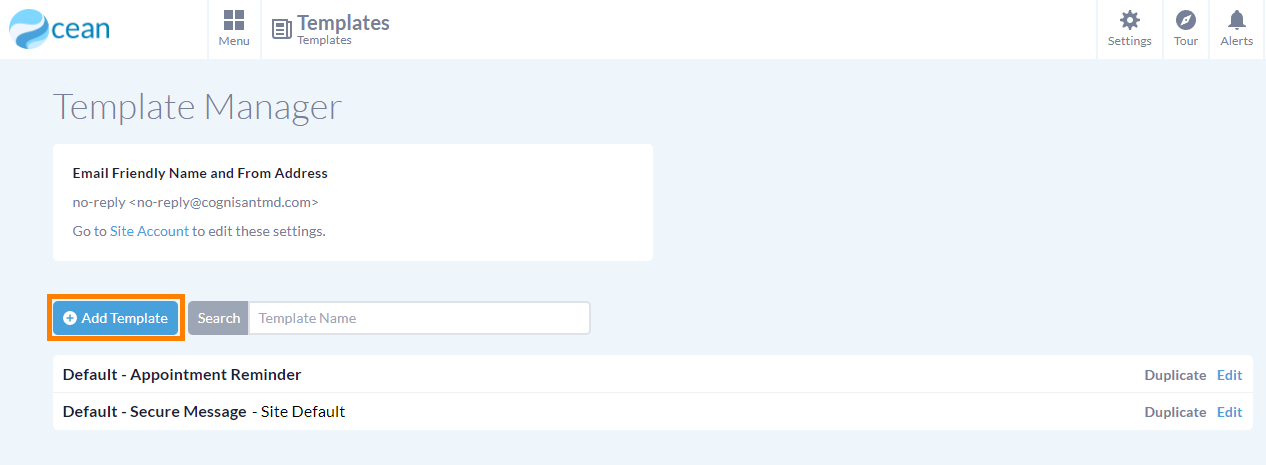
- Press the "Add Template" button.
- If Advanced Clinic Booking has been enabled for your site, you will be asked to select the Template type you want to add. Select “One-Time Booking” to bring you into the Template Editor .

- Certain fields are pre-populated with standard wording which you can choose to make slight modifications to, or even fully replace with your own content.

- Once you are happy with the contents of your template, press "Save" at the bottom of the page to save your template.
- Alternatively, you can press "Save & Make OTBL Default" if you would like this template to appear automatically each time you send a patient message.
- Tip: You can easily determine your site's default template from the Template Manager by looking for the template tagged with "OTBL Default".

- To customize an existing template, log in to the Ocean Portal.
- In the top left corner, select "Menu" and click "Templates". This brings you to the Template Manager.
- The Template Manager displays all of your existing templates. To customize an existing template, press the "Edit" button next to it.

- In the Template Editor, you're able to see the existing content of your template and modify it to your liking.
- Once you have finished making your changes, press the "Save" button at the bottom of the page.
If you're looking to create a catalog of templates for use at your clinic, the Duplicate functionality is helpful to efficiently build out your templates and make small changes to the contents.
- To duplicate a template, log in to the Ocean Portal.
- In the top left corner, select "Menu" and click "Templates". This brings you to the Template Manager.
- From the Template Manager, press the "Duplicate" button next to the template that you would like to duplicate.

- You will be launched into the Template Editor which is automatically populated with the contents of the template you chose to duplicate.

- The template is automatically named "Copy of [original template name]". You can modify the name to reflect the changes you are making to the template contents.
- Once you are finished modifying the contents of your template, press the "Save" or "Save & Make OTBL Default" button at the bottom of the page to save your template.
Template Settings
Template Name
- The template name is for you to easily recognize the contents of the template. It is never visible to patients, so you can use it to describe the purpose of the template for yourself and other users on your Ocean site.

Subject Line
- The customizable subject line is what will appear in patients' email inbox when they receive a secure message or reminder using this template.

Salutation
- The salution is the opening line of the email body.

Tip: The @ptPreferredOrFirstName keyword will automatically populate the patient's name as it appears in your EMR, providing an automatically customized salutation for your patients.
Email Body
- The email body allows you to customize the message that the patient will see in their email inbox.

Note: Content included in the email body will not be recorded into the patient's chart.
The '[booking_link]' Keyword
The '[booking_link]' keyword indicates where in your email body a hyperlink will automatically appear for the patient to click on to access any secure content. The hyperlink will appear as: 'Book Appointment Now '.
If no keyword is included in the template, Ocean will automatically append the English '[booking_link]' version of the keyword to the end of the email body.
One-Time Booking Link
- Select when the patient should book their appointment for and which booking link they should access.

- Appointment Window Start Date
-
Select when the patient can start booking appointments using the link. By default, it is set to “Today”. You can select from the options or select “Custom” to adjust.
The Appointment Window Start Date is calculated based on when the booking link is used by the patient. For example, if the Start Date is set to “1 week” and the patient uses the booking link on June 1, they can book appointments starting June 8.
- Appointment Window Length
Select how long the patient can use the link to book an appointment. By default, it is set to “1 year”. You can select from the options or select “Custom” to adjust.
- Booking Link
Select the Booking Link that should be used for this One-Time Booking Link template.
Note: For a One-Time Booking Link, the Appointment Window settings override the following Booking Window settings in the associated Booking Schedule:
Note: Only Booking Links where Show this link in One-Time Bookings is enabled will be available for selection. For more information, please see article: Set up Booking Links.
Advanced Settings
- This area allows you to customize advanced settings including the minimum notice required.
- Minimum notice required
This field determines how far in advance patients must book an appointment. For example, if you set the minimum notice to 1 day, patients cannot book appointments that begin within the next 24 hours.
